Week 7
Hard Surface
Hard surface modeling in ZBrush has evolved significantly over the past 20 years. Today, artists have access to an extensive set of tools and controls, making it possible to create even the most complex shapes with precision. This upcoming series of demonstrations will focus on key hard surface modeling concepts and techniques that highlight the strengths of ZBrush.
However, it is important to approach hard surface modeling with care. Without proper methodology, a model can lose its intended structure or fail to maintain its form. In the early days, hard surface modeling primarily relied on a technique known as box modeling, where shapes were constructed by extruding faces and adjusting points. One of the key advantages of this method is its ability to create bevels, which are essential in hard surface modeling.
Bevels play a crucial role in defining the realism of machine-made objects. They are commonly found at transitions between planes, influencing how light interacts with the surface. Properly executed bevels enhance the readability of an object, ensuring that it appears both visually convincing and functionally accurate.
ZBrush offers several powerful tools for managing edge definition and maintaining form in hard surface modeling. Edge Loops, Group Loops, and Panel Loops play a critical role in ensuring clean, well-defined geometry that holds up under subdivision and sculpting.
Below are some listed points of interest to give you a propper intor to hard surface.
Topology
Edge Loops: Edge loops in many ways are the corner stone of what can drive the stability of your mesh. Propper edge loops will help with better Polygrouping, Bevels, seems or part lines, as well as overall structural quality.
Creasing: Edge creasing is a crucial technique in hard surface modeling, particularly in ZBrush, as it helps maintain sharp edges when applying subdivision levels to a model. Without edge creasing, a model’s edges can become overly rounded or lose their intended form, which can negatively impact the final design. Here’s why edge creasing is important:
1. Maintains Structural Integrity
When working with subdivision surfaces, models tend to smooth out as new geometry is introduced. Edge creasing allows artists to control which edges stay sharp, ensuring that mechanical or industrial shapes retain their precise, hard-edged appearance.
2. Efficient Topology Control
Using edge creasing means fewer support edges are needed to maintain sharpness, keeping the geometry cleaner and reducing unnecessary complexity. This is particularly useful in workflows where models are used for high-resolution rendering or game assets that require efficient topology.
3. Enhances Realism and Readability
Objects in the real world, especially manufactured items, have varying degrees of sharpness in their edges due to wear, machining, or design choices. Edge creasing allows for fine-tuned control over these transitions, ensuring that the model captures the correct level of realism.
4. Flexibility in the Modeling Process
Unlike traditional support loops, edge creasing gives artists the ability to adjust sharpness dynamically without committing to additional edge loops. This non-destructive approach allows for quick refinements without permanently altering the topology.
5. Optimized for Subdivision Workflows
Edge creasing is especially useful when working with ZBrush’s Dynamic Subdivision, allowing users to preview the effect of subdivisions before applying them. This helps in refining the form without immediately increasing the polygon count.
By strategically applying edge creasing, artists can achieve clean, precise hard surface models that hold their intended form through the sculpting and subdivision process, making it an essential tool for professional-quality modeling in ZBrush and other 3D applications.
Bevels
1. Edge Loops: Enhancing Form and Control
Edge loops are essential for defining and reinforcing key shapes in a model. In ZBrush, they help in maintaining structural integrity by adding support geometry around specific areas, preventing unwanted smoothing when subdividing.
Maintains Hard Edges: Adding edge loops around key areas ensures that sharp corners and important details remain intact.
Improves Deformation Control: Edge loops help when posing or animating a model by allowing smooth, predictable deformations.
Supports Clean Subdivisions: Without proper edge loops, subdivision levels can overly round or distort the intended form.
2. Group Loops: Strengthening Polygroups and Surface Transitions
Group Loops are generated around Polygroups, adding supporting edge loops at the borders. This is particularly useful for preserving form when smoothing or sculpting.
Defines Clear Separations: When working with complex designs, Group Loops help reinforce the boundaries between different Polygroups, ensuring clean transitions.
Enhances Control Over Paneling: Used effectively, Group Loops create a structured base for detailing, making it easier to sculpt mechanical seams or layered surfaces.
Improves Subdivision Behavior: Models with Group Loops subdivide more predictably, preventing Polygroup edges from softening too much.
3. Panel Loops: Creating Mechanical Panels and Layered Surfaces
Panel Loops are used to generate raised or inset panels based on existing Polygroups, making them one of the fastest ways to create complex hard surface details in ZBrush.
Quickly Generates Paneling: Instead of manually extruding surfaces, Panel Loops allow you to separate sections of a model into distinct, polished panels with beveled edges.
Automates Thickness and Depth: With adjustable settings, you can create panels with varying thicknesses, perfect for designing armor, sci-fi components, or industrial objects.
Maintains Clean Topology: Unlike traditional sculpting methods, Panel Loops keep geometry structured and organized, reducing the need for manual retopology.
Polygroups
Polygroups are one of the most powerful organizational tools in ZBrush, allowing for greater control, efficiency, and precision when modeling hard surface objects. Unlike traditional 3D modeling workflows that rely on selection sets or object groups, ZBrush uses Polygroups to segment a model into visually distinct sections without physically separating the geometry. Here’s why they are crucial in hard surface modeling:
1. Enhancing Selection & Workflow Efficiency
Polygroups make selecting and manipulating different parts of a model much easier, eliminating the need for complex masking or manual selections.
Quick Selection with Visibility Shortcuts: Using
Shift + Ctrl + Clicklets you isolate, hide, or show specific Polygroups instantly.Facilitates Faster Modeling Adjustments: Instead of manually selecting edges or faces, you can work on different sections with precision.
Simplifies Boolean Operations: When working with Live Booleans, Polygroups help define subtraction, intersection, and union operations more clearly.
2. Controlling Edge Definition and Surface Detail
In hard surface modeling, maintaining clean edges and precise surfaces is essential. Polygroups help reinforce structure and improve subdivision behavior.
Works Seamlessly with Group Loops: By adding Group Loops around Polygroups, you can preserve crisp edges when subdividing.
Refines Paneling and Seam Work: Creating Panel Loops from Polygroups allows for fast generation of inset or raised panels with clean beveled edges.
Prepares Models for Creasing & Subdivision: Polygroups help define where Edge Creasing should be applied, keeping mechanical shapes from softening.
3. Optimizing ZBrush’s Hard Surface Tools
Many of ZBrush’s most powerful tools rely on Polygroups for precision and automation in the hard surface workflow.
Dynamic Subdivision: Polygroups allow you to control how different areas subdivide dynamically.
ZRemesher with Keep Groups: Ensures cleaner retopology while maintaining hard surface definition.
Polish by Features: Enables you to selectively smooth surfaces without losing sharp edges.
4. Enabling Efficient Boolean and Kitbashing Workflows
When working with Live Booleans or kitbashing, Polygroups make it easier to break a model into functional sections.
Boolean Precision: Assigning different Polygroups to subtraction or addition pieces helps create more complex boolean operations.
Quick Kitbashing & Modular Design: By defining separate Polygroups, you can easily swap out, refine, or reuse specific elements in a modular way.
5. Supporting UV Mapping and Texturing
Polygroups play a role beyond modeling by making UV mapping and texturing more manageable.
Automatic UV Generation: When used with UV Master, Polygroups can generate organized UV islands.
Surface Control for Materials & Textures: Certain Masking and PolyPaint techniques use Polygroups for targeted texturing.
Why Polygroups Matter in Hard Surface Modeling
Improve Selection Speed – Work faster with easy isolation of model sections.
Preserve Hard Edges & Paneling – Ensure clean bevels, seams, and mechanical details.
Enhance ZBrush’s Hard Surface Tools – Use Group Loops, Panel Loops, and Creasing efficiently.
Facilitate Booleans & Kitbashing – Easily manage modular parts in a non-destructive way.
Optimize UV Mapping & Texturing – Help with clean UV unwrapping and detailed texture control.
Mastering Polygroups in ZBrush allows hard surface modelers to work smarter, faster, and with greater precision, making them an essential part of any professional workflow.
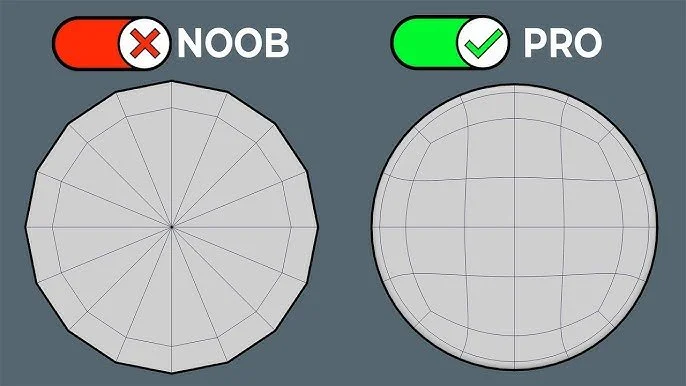
Sub-D vs. Tris
The Significance of Using Sub-D vs. Tris in ZBrush for Hard Surface 3D Modeling
When creating hard surface models in ZBrush, understanding the difference between Subdivision (Sub-D) modeling and Triangular (Tris-based) geometry is crucial. Each approach has its strengths and limitations, and using the right one for the right situation can greatly impact the final model’s form, editability, and production readiness.
1. Sub-D (Subdivision) Modeling – The Standard for Precision and Clean Geometry
Subdivision modeling is the process of working with quad-based topology that can be subdivided to increase resolution while maintaining clean, predictable surfaces.
Why Sub-D is Essential for Hard Surface Modeling:
Preserves Edge Control & Form: Sub-D surfaces smooth predictably, maintaining clean shapes and sharp edges with proper edge loops and creasing.
Works with Dynamic Subdivision: In ZBrush, Dynamic Subdivision allows you to preview smooth surfaces without permanently increasing polygon count.
Easier to Modify & Retopologize: Quad-based geometry deforms predictably, making it easier to refine, add details, or transition to animation.
Necessary for Game & Film Pipelines: Many production workflows (such as animation or 3D printing) require clean quads for baking and rendering.
Optimized for Creasing & Edge Loops: Sub-D allows for advanced control over bevels, paneling, and smoothing without destructive geometry changes.
When to Use Sub-D in ZBrush:
When creating high-precision mechanical parts with controlled edges.
When using ZRemesher for clean topology before further detailing.
When working with Dynamic Subdivision for a non-destructive modeling approach.
When planning for retopology and UV mapping in external software (Maya, Blender, etc.).
2. Tris-Based Geometry – Quick, but Unpredictable for Hard Surface Work
Triangular geometry (tris) is often a byproduct of Dynamesh, Booleans, or decimation and can be problematic for hard surface modeling due to its unpredictable smoothing behavior.
Challenges of Using Tris for Hard Surface:
Unpredictable Smoothing: Tris do not subdivide evenly, leading to pinching or artifacts when applying Sub-D.
Difficult to Edit or Modify: Hard surface models require clean edge loops, which are impossible to maintain with tris.
Not Ideal for Animation or Deformation: Models made with tris do not deform well in rigging/animation workflows.
Can Create Shading Issues: Unevenly placed tris may cause artifacts in rendering, especially when using normal maps.
When Tris Might Be Acceptable:
✔ Dynamesh for Sculpting: If refining a concept sculpt, tris-based Dynamesh can help before retopology.
✔ Live Boolean Operations: Many Boolean workflows result in tris, which can later be cleaned up.
✔ Decimation for Game/3D Printing: If a final asset doesn’t require subdivision, decimating into tris reduces polycount for optimization.
✔ High-Resolution Detailing (Non-Deformable Assets): Some hard surface objects (like statues or CNC milling projects) can use tris if they are never subdivided.
3. Key Takeaways: Choosing the Right Approach
If your goal is precision, edge control, and future editability, Sub-D (quad-based) modeling is the superior choice for hard surface work in ZBrush. Tris-based geometry may be useful for concept sculpting, Boolean workflows, or decimation, but it should be converted to quads before finalizing the model for production use.
By understanding when to use Sub-D vs. Tris, you can optimize your hard surface modeling workflow, ensuring your models are clean, professional, and ready for any production pipeline. 🚀
Box Modeling


Tools
Extracting
Mesh


Dynamic-SubDiv
ZSpheres


Hard Surface Brushes


Topology Brush
Edge Loops / Group Loops / Panel Loops
Edge Loops
Group Loops


Panel Loops


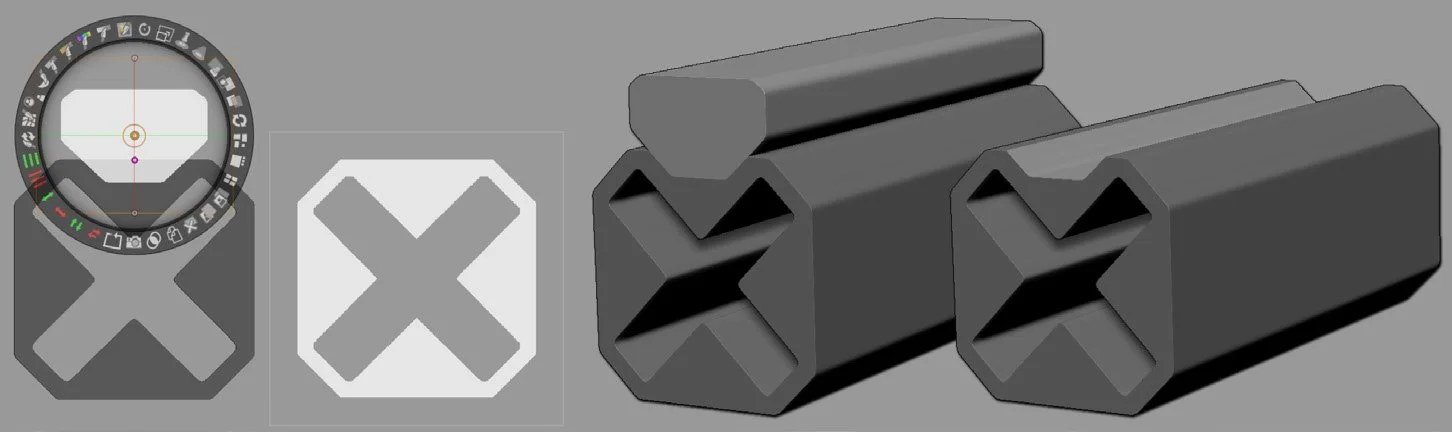
ZModeler Brush


ZRemesher For Hard Surface
Hard Surfaces
ZRemesher and Hard Surfaces
ZRemesher is optimized to work on all kinds of model structures and shapes but will by default produce better results with organic shapes. However, with some extra effort on your part retopology of hard surfaces and mechanical models can be greatly improved.
Mesh Density
Unlike organic shapes, hard surface models generally have drastic changes in direction along their surfaces and multiple topology variations in small areas. All these topology changes put a lot of stress on the algorithms. With this in mind, requesting a low value for the target polygon count can decrease the quality of the results.
To help ZRemesher, the first step to do is to avoid using a low polygon count and allow a higher value. This gives ZRemesher the necessary freedom to manage these topological changes.
Work with PolyGroups
ZRemesher has two different options dedicated to PolyGroups. One of them strictly keeps the PolyGroup borders (using them as edge loops) while the other uses them as references during the retopology. If your hard surface model is defined by PolyGroups, turning these options on will improve the results. Depending on the model, it is advised to test both options.
If your model doesn’t have PolyGroups, it is benifical to create them to assist ZRemesher. When working with hard surface objects, Tool >> PolyGroups >> Group By Normal will quickly produce PolyGroups based on angles between edges.
Use Curves
At a value of 100, the Curve Strength setting forces ZRemesher to put partial or complete edge loops at the curve positions. Making extensive use of this for hard surface models can therefore increase the quality of edge surface topology. Unfortunately, it can be difficult to accurately place a curve exactly along an edge.
There is, however, an easy way to produce an accurate set of curves based on the angles and edges of your surface:
First create PolyGroups based on the model’s normals by using Tool >> PolyGroups >> Group By Normal and adjusting its Max Angle Tolerance slider as needed.
Use those PolyGroup borders to create curves via the Stoke >> Curve Functions >> Frame Mesh feature. Don’t overlook the usefulness of the Border and Creased edges modes.
Set Tool >> Geometry >> ZRemesher >> Curve Strength to 100, along with any other ZRemesher options that you need. (Like the Keep Groups option.)
Run ZRemesher.
Kit Bashing


Privative Deformers
Spotlight for Hard Surface (Snapshot)
Bevel Pro


Industry


Homework
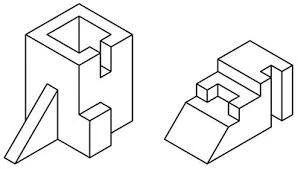
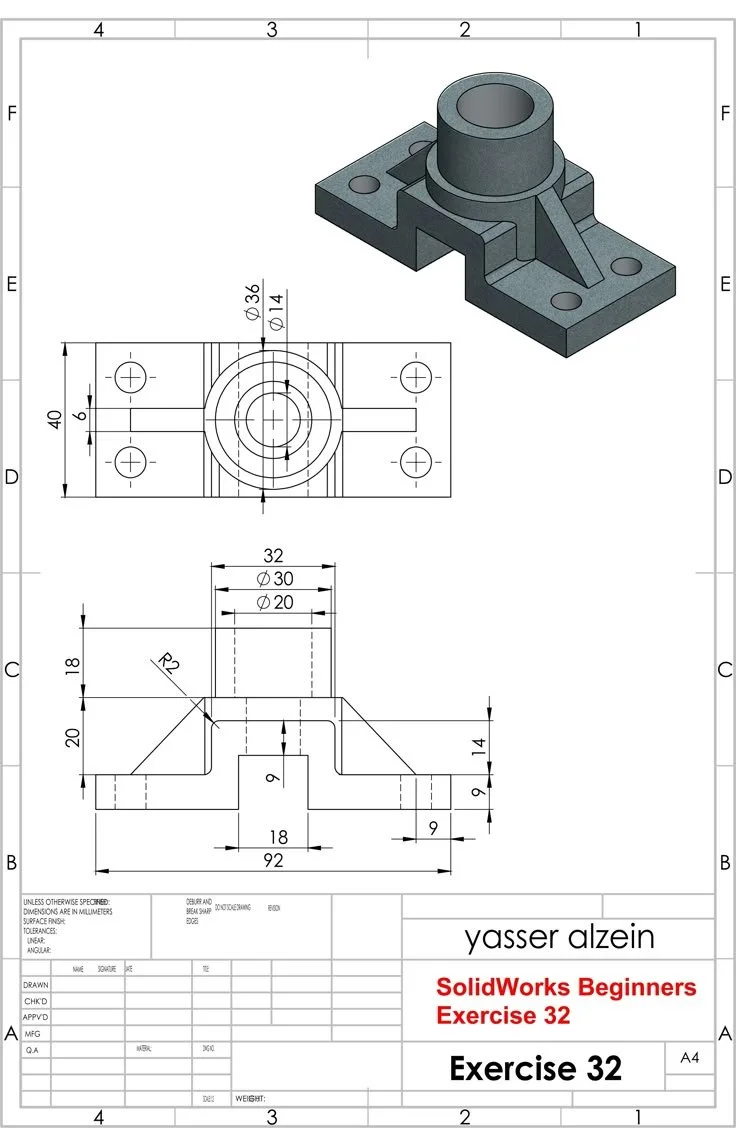
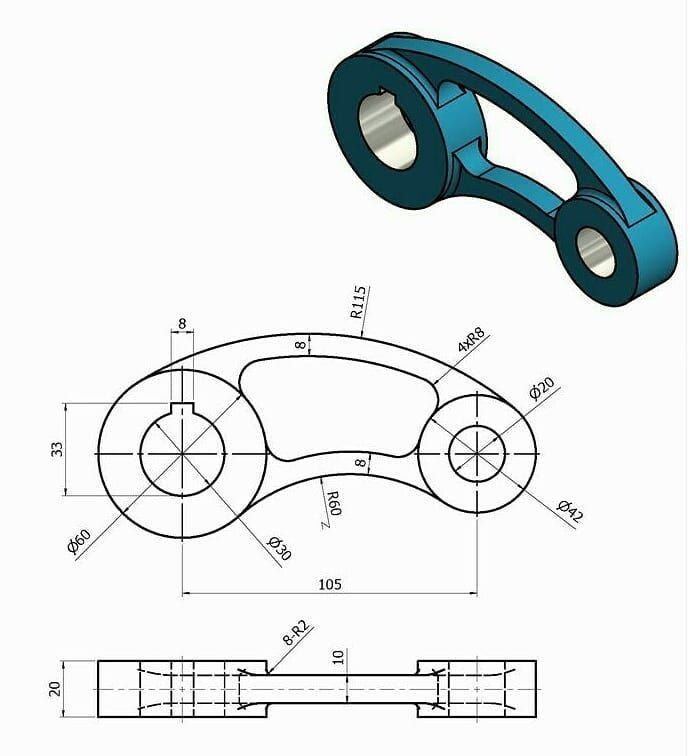
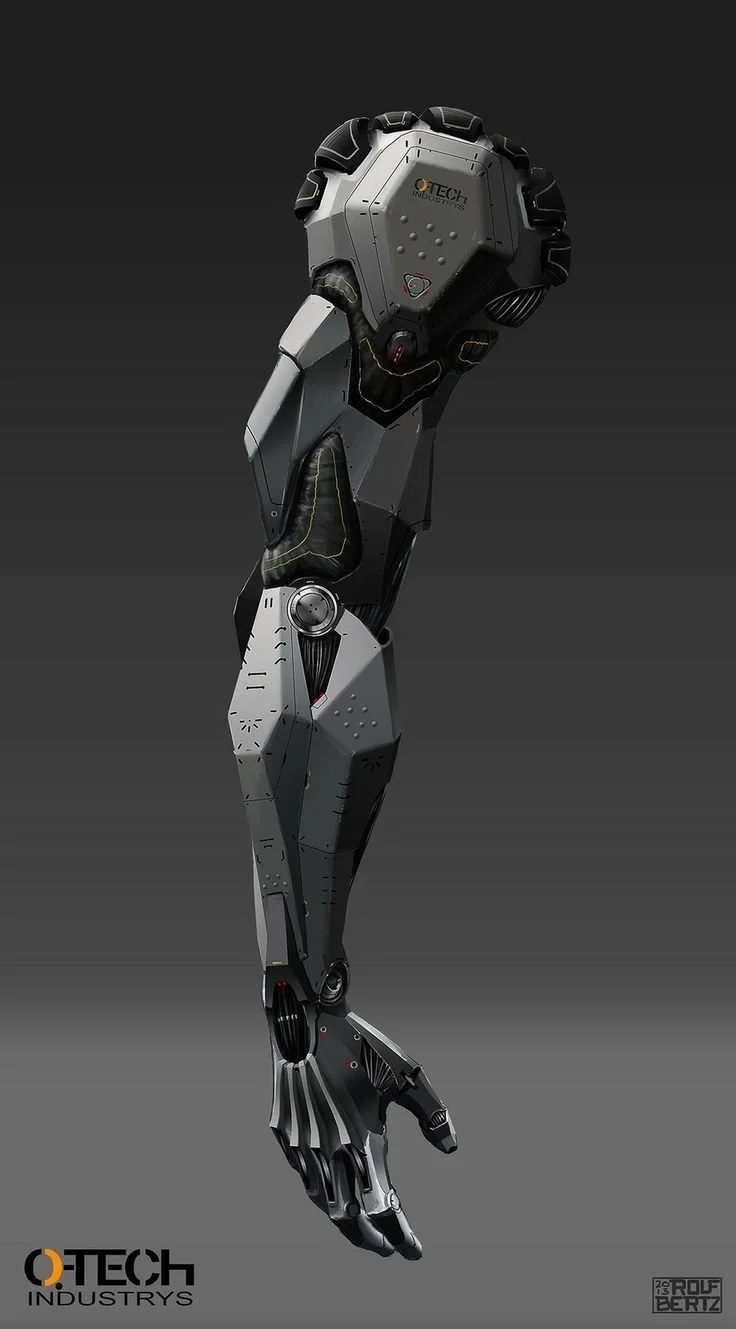
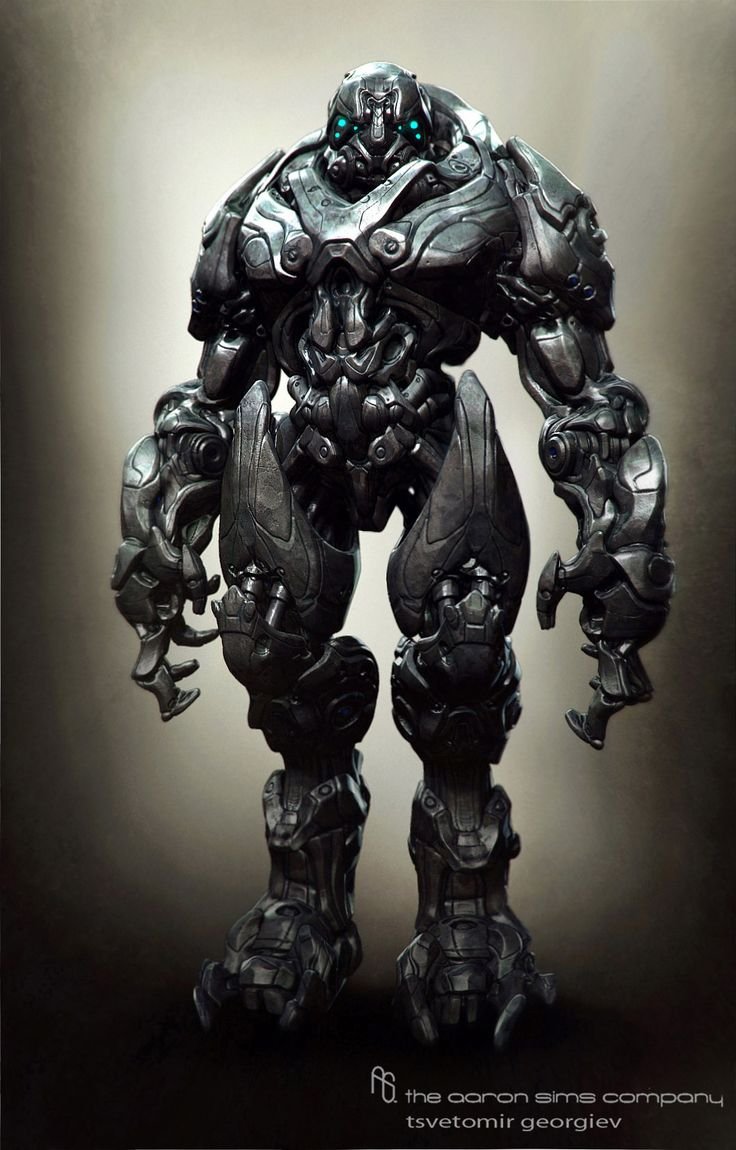
Use the ZModeler Brush to recreate one of the examples from below. And create an orthographic slide to present next week.
Hard Surface Examples