
ZBrush Project | Creature Bust
Alien Creature Bust
Creature Bust
Jared Krichevsky
4 Weeks | 100 pts
Project Brief:
Taken straight from the pages of my new book, coming out in September 2025, this assignment dawns from the instruction of Jared Krichevsky (Godzilla, TMNT, Ready Player 1, Megan, Guardians of the Galaxy). Together we will work through his process for concept, creation, iteration, and rendering.
Critique Date:
TBD
Required Learning:
Dynamesh/Sculptris Pro, ZRemodeler, Redshift3D, Redshift Materials
Required Slides | TOTAL: 100 pts
Hero Shot - (Redshift3D Render): 20 pts
Character Sheet (Orthographics): 10 pts
Variants: 10 pts
Brushes: 10 pts
Reference: 10 pts
Sketches: 10 pts
Turntable: 10 pts
Sculpting an Alien Head
By Jared Krichevsky


Up to this point, our focus has been on developing the foundational skills required to sculpt believable, expressive works of fine art. From the weight and rhythm of thumbnails to the anatomical precision of figurative studies, you’ve learned how to observe, analyze, execute, and refine. We’ve customized ZBrush to fit your workflow, and under the guidance of Ian Robinson, explored how to present your work using Redshift rendering. In short, you’ve built the artistic discipline needed to take on just about any design challenge.
Now it’s time to shift gears.
This chapter marks your transition from classical realism into the world of concept design and visual storytelling - the kind of work that defines characters, creatures, and entire cinematic universes. And there’s no better guide for this journey than industry veteran Jared Krichevsky. For over 15 years, Jared has been a leading force in creature and character design, known for shaping some of the most iconic beings in modern film and television. From Godzilla x Kong: The New Empire (2024) Avatar: The Way of Water (2022), and Guardians of the Galaxy Vol. 3 (2023) to countless other titles, his work continues to inspire audiences and artists alike.
Required Plugins & Brushes
IMM Primitives Brush (included in ZBrush)
DamStandard, TrimDynamic, Inflate Brushes (standard ZBrush brushes)
ZBrush Plugins:
ZRemesher
UV Master
Decimation Master
Stroke > Interpolate Function (used for rhythmic sculpt detail)
Morph Target Brush (for test detailing flexibility)
What you’ll learn in this chapter:
How to translate an imaginative concept into a believable alien creature design
Jared’s full creature pipeline, from 2D ideation in Krita to final presentation in Marmoset
Best practices for blocking, sculpting, refining, and rendering a stylized head
How to iterate and experiment with different ideas throughout the sculpting process
The goal of this chapter is to walk through a real-world, production-style concept sculpting workflow from start to finish using ZBrush, while learning how professionals iterate and solve visual storytelling challenges using sculptural design.
This chapter shows how all the foundational sculpting knowledge you’ve built can be re-applied in creative, entertainment-based projects. You’ll discover how imagination blends with anatomy, how iteration leads to innovation, and how to deliver professional work for client or studio review. These are the same workflows used by top concept artists in the film and game industries.
By the end, you’ll understand how to concept, sculpt, refine, texture, and render a character using a mix of industry tools and artistic insight — and you’ll be ready to begin your own concept creature designs with confidence.
In this chapter, we’ll cover:
Design Ideation, Sketching in Krita, Gathering Feedback, Sculpting Preparation, Blocking Out, Design Exploration, Refinement, Test Rendering, Texturing, Final Presentation
Interstellar Clients
In the pages ahead, Jared will take you through his approach to designing an original alien head - from initial sketching and exploratory sculpting to refinement and final presentation inside ZBrush.
As you follow along, pay attention to how he balances imagination with anatomical grounding. This is a sculptor who can bend the rules because he understands them deeply.
What follows isn’t just a lesson - it’s a signal.
3:37a.m.
Figure 8.1 - We are here!
Greetings species X-4118-3742 of the outer galactic rim. We are hailing you from great distances to inform you that one of our ambassadors is set to arrive in 3 lunar cycles, earth time. To make way for his presence we need you to design his look and character, so the humans will be able to identify and relate to our species, while at the same time inspire awe of his unique alien appeal. We will continue communication in the coming lunar cycles.
To assist in your design, we provide the following parameters: our ambassador originates from an environment of high atmospheric density and fluctuating bioluminescent light. Visual communication is essential in our culture; subtle shifts in shape and color convey intent. Respiratory filtration structures must remain external, and symmetry is non-essential to our physiology. Appendages should remain expressive and agile. The ambassador will not only represent us, but must embody the mystery and grace of our cultural values.
Workflow Overview
For the designer you want to create a captivating creature that will have a connection to the audience. Using the tools at hand ZBrush, Keyshot, Marmoset 5, Photoshop, and Krita we will explore these tools and ideas. In the name of brevity I'll be going over the most important stages of the process. The pillars if you will. While each avenue could be explored in exhaustive depth, I’ll just focus on the big picture stuff. This is more of a glimpse into my world and how I approach things which I hope you will find helpful when attempting your own creatures.
Design Ideation
Start with Sketching
Before sitting down and getting serious inside of ZBrush, work out a few sketches to help us set the tone. This phase is very important because we can eliminate a lot of ideas very quickly. When the world is full of possibilities, you want to narrow down the scope a little bit. The sketches were done in Krita which is a free art tool, I really prefer their brushes and the feel of it. Krita’s brush engine gives more expressive, natural pencil behavior for loose creature ideation than many commercial apps. It’s free, fast, and intuitive for building quick silhouettes.
Collaborative Feedback
After getting a few opinions from friends and other artists we settle on the main idea going forward.
Figure 8.2 - Sketching is the fastest way to eliminate ideas and evaluate solutions.
Tip: In Krita, activating the Brush Stabilizer (under Tool Options > Smoothing > Stabilizer) helps you draw long confident strokes without shakiness — perfect for jawlines, collar contours, and hard surface paneling. Deactivate for organic form showing texture.
Note: Each alien here emphasizes a different visual "identity" by changing the silhouette and focal features - horned crests, elongated jaws, asymmetric plating. Before refining, ask: What’s the dominant shape motif? Triangle? Dome? Curve? Block?
Now that we’ve discussed the creative reasoning, let’s look at how to technically set up your sketching workflow in Krita.
Krita Recap
Open Krita and create a new canvas.
Use loose sketching brushes to explore head shapes.
Test several silhouette variations focusing on shape language.
Group design ideas on a single page.
Use brush stabilizer for clean outlines, disable for textured strokes.
Organic Sculpting
With a direction in mind, it’s time to move into ZBrush and begin laying the foundation.
Preparation
Before I begin any project, I lay down a cube on a ground plane, this reminds me that gravity exists in the digital world and that I need to plant my character firmly on the ground. Even though this is just a head bust I do this with most projects. I also import a model, I often use the Julie model inside the light box > Z tools > Julie.ztl placing her next to the cube. Having some kind of human-like model for scale is important because it helps keep human-like scale and interaction in mind. The cube adds gravitational grounding early, avoiding “floaty” designs. Julie.ztl is a pre-rigged human base mesh that visually anchors alien anatomy next to human proportions for intuitive scale.
Figure 8.3 with human scale for reference. You can see that my UI setup is very extensive, but essential for speeding up my workflow.
For example, let’s say you’re sculpting a creature with an elongated cranium or asymmetrical facial plating. If you don’t have any grounding reference, it’s easy to let the design float — to make something that looks “cool” but falls apart when you really scrutinize the anatomy or proportion. By grounding it, you’re constantly checking: Would this head tip over? Would these neck muscles realistically support this weight?
Also, visually, it just helps establish rhythm. You’re thinking in terms of base, midsection, and focal points — which makes your alien feel more designed and intentional, rather than random.
So yeah, even when you’re bending the rules, grounding keeps you honest.
With that foundation set, we’re ready to start sculpting - beginning with the blockout phase, where shape language and silhouette take center stage.
Continuing in ZBrush Recap
Load Julie.ztl via Lightbox > Tool > Julie.
Create a cube (Tool > Initialize > Cube3D or use IMM Primitives).
Place the cube at world origin as a ground plane.
Place Julie beside the cube for reference.
Block Out
Blocking out is where the sculpt takes its first physical form. Here's how to keep it loose but structured.
I then begin blocking out the basic forms in ZBrush using low poly dynamesh spheres and cylinders from the IMM primitives brush. Dynamesh is ideal for early sculpting because it allows unlimited merging and reshaping without worrying about topology. Low-res settings speed up form iteration and anatomical sketching.
When the basic forms are assembled I then dynamesh or subdivide at a higher poly count and begin sketching in the anatomy. The anatomy portion of any sculpt takes the longest, but is the most important, because you are laying down the structure of the entire sculpt, see fig 8.4. It's important to have as many references as possible, so I look at various anatomy models and so on while sculpting. Since it's an alien I also have to think about how we can use human anatomy as a foundation and push it just enough. I try my best to use restraint and not over design it as well with too many shapes outside of the simple silhouette.
Blocking Out in ZBrush Recap
Figure 8.4 - Block out Stages
Steps:
Select Dynamesh sphere or IMM Primitives.
Assemble base shapes: cranium, jaw, neck, horns, etc.
Merge using Dynamesh (Tool > Geometry > Dynamesh).
Keep resolution low to focus on silhouette and primary forms.
Refine secondary forms with ClayBuildup or Move.
Figure 8.4 - Blocking in the basic anatomy forms of the arm alongside visual references using PurRef.
Once the base forms are in place, this is where things start to get fun. Now we move into exploration, testing different head variations and letting design discovery take the lead.
Exploration
Now that the base is established, it’s time to explore variations.
Even though I have an idea of what I want for the head I keep it separate from the body, that way I can sculpt multiple versions and not worry about what I'm doing with the body. Exploring these multiple options by taking the basic head, duplicating it, and sculpting on top allows me to come up with different variations, see fig 8.5. Doing this keeps the process exciting and at a stage of consistent discovery. Even though we have the sketch that we started from, it doesn’t mean we have to stick to it, design is all about exploration.
Tip: Isolate and Iterate: Keeping the head as a separate subtool lets you experiment without the fear of breaking the rest of your model. Duplicate and iterate freely - you might stumble onto something better than the original plan.
Note: Dynamesh Resolution: When working with low-res dynamesh during the blockout, keep it intentionally rough and low relative to a single ZBrush unit. Once you’ve nailed down the structure, increase resolution for refining secondary and tertiary forms.
Figure 8.5 - Sculpting different options allows for discovery and finding character in the creature.
Steps:
Duplicate the head SubTool (Tool > SubTool > Duplicate).
Turn off symmetry temporarily and start variation passes.
Modify horns, jawline, or proportions on each version.
Display multiple head options side by side.
Once you’ve explored a few strong options and one starts to rise above the rest, it’s time to shift gears again - into refinement. This is where you stop experimenting and start sculpting with clarity, intention, and control.
Refinement
Once the exploration yields a favorite design, refinement begins, adding detail and polish while keeping the forms readable.
With each of the five heads I tried to go through various character archetypes and see what kind of personalities it would create for our alien ambassador. I then took the body, Zremeshed it, reprojected the details using Subtool > Project > Project History. Then applied a subtle turn in the neck.
ZRemesher provides clean edge flow needed for posing and texturing. Project History allows you to reapply original details non-destructively, preserving sculpt quality while improving mesh behavior. I did this without moving the head so that way I can keep sculpting on the face options symmetrically.
Figure 8.6 - Turning the head for test renders. Clean/Low poly geometry is essential for movement.
At this stage, refinement is no longer just about correcting anatomy or cleaning up shapes, it’s about clarity, confidence, and presentation. After reprojecting the details onto the newly ZRemeshed mesh, I continue refining the surface with a focus on plane transitions, form consistency, and readability in silhouette.
The face remains the focal point, so I kept it symmetrical to maintain flexibility and ease of sculpting. I fine-tuned the secondary forms: cheekbones, orbital shapes, brow flow, and the junction of the skull and neck. While the base forms were grounded in human anatomy, I began to deliberately push specific areas
This is where polish becomes critical.
I refine the rhythm and flow of muscles and underlying forms.
I use DamStandard, TrimDynamic, and Inflate brushes to carve in tension or build out volume where needed.
Wrinkles, pores, and secondary skin folds are gently suggested, but not overstated, since over-detailing too early can kill the design’s flexibility.
I regularly switch between orthographic and perspective views to check how the sculpt reads in different angles and focal lengths.
Because I’m still working with multiple head versions, I often do comparison passes: putting two versions side by side to evaluate which reads more clearly, feels more believable, or fits better within the tone of the concept. Sometimes I’ll even duplicate the body and do a rough merge with each head version to evaluate the full read of the design before committing.
Tip: The morph brush is great for testing surface noise within the refinement phase. Set a morph target and test areas without losing any base sculpt.
Note: Symmetry First, Asymmetry Later: Work symmetrically as long as possible during refinement. Asymmetry adds realism, but introducing it too early can complicate your workflow and slow iteration.
Once I’m satisfied with the refinement and the anatomy feels solid, the next step is to evaluate the sculpt visually in a new context - outside of the ZBrush sculpting viewport. This is where test renders come in.
Test renders help answer the question: “Does this design hold up under lighting?” It’s one thing to have a great sculpt in ZBrush, but it’s another to see how that form reacts to light, shadows, and camera angle. It’s also the first step in visualizing the model as a finished piece, whether for a concept pitch, production review, or portfolio showcase.
In the next section, I’ll walk through how I prepare quick test renders to evaluate form, mood, and presence - and how this phase helps guide the final tweaks to the design before locking it in.
TEST RENDERS
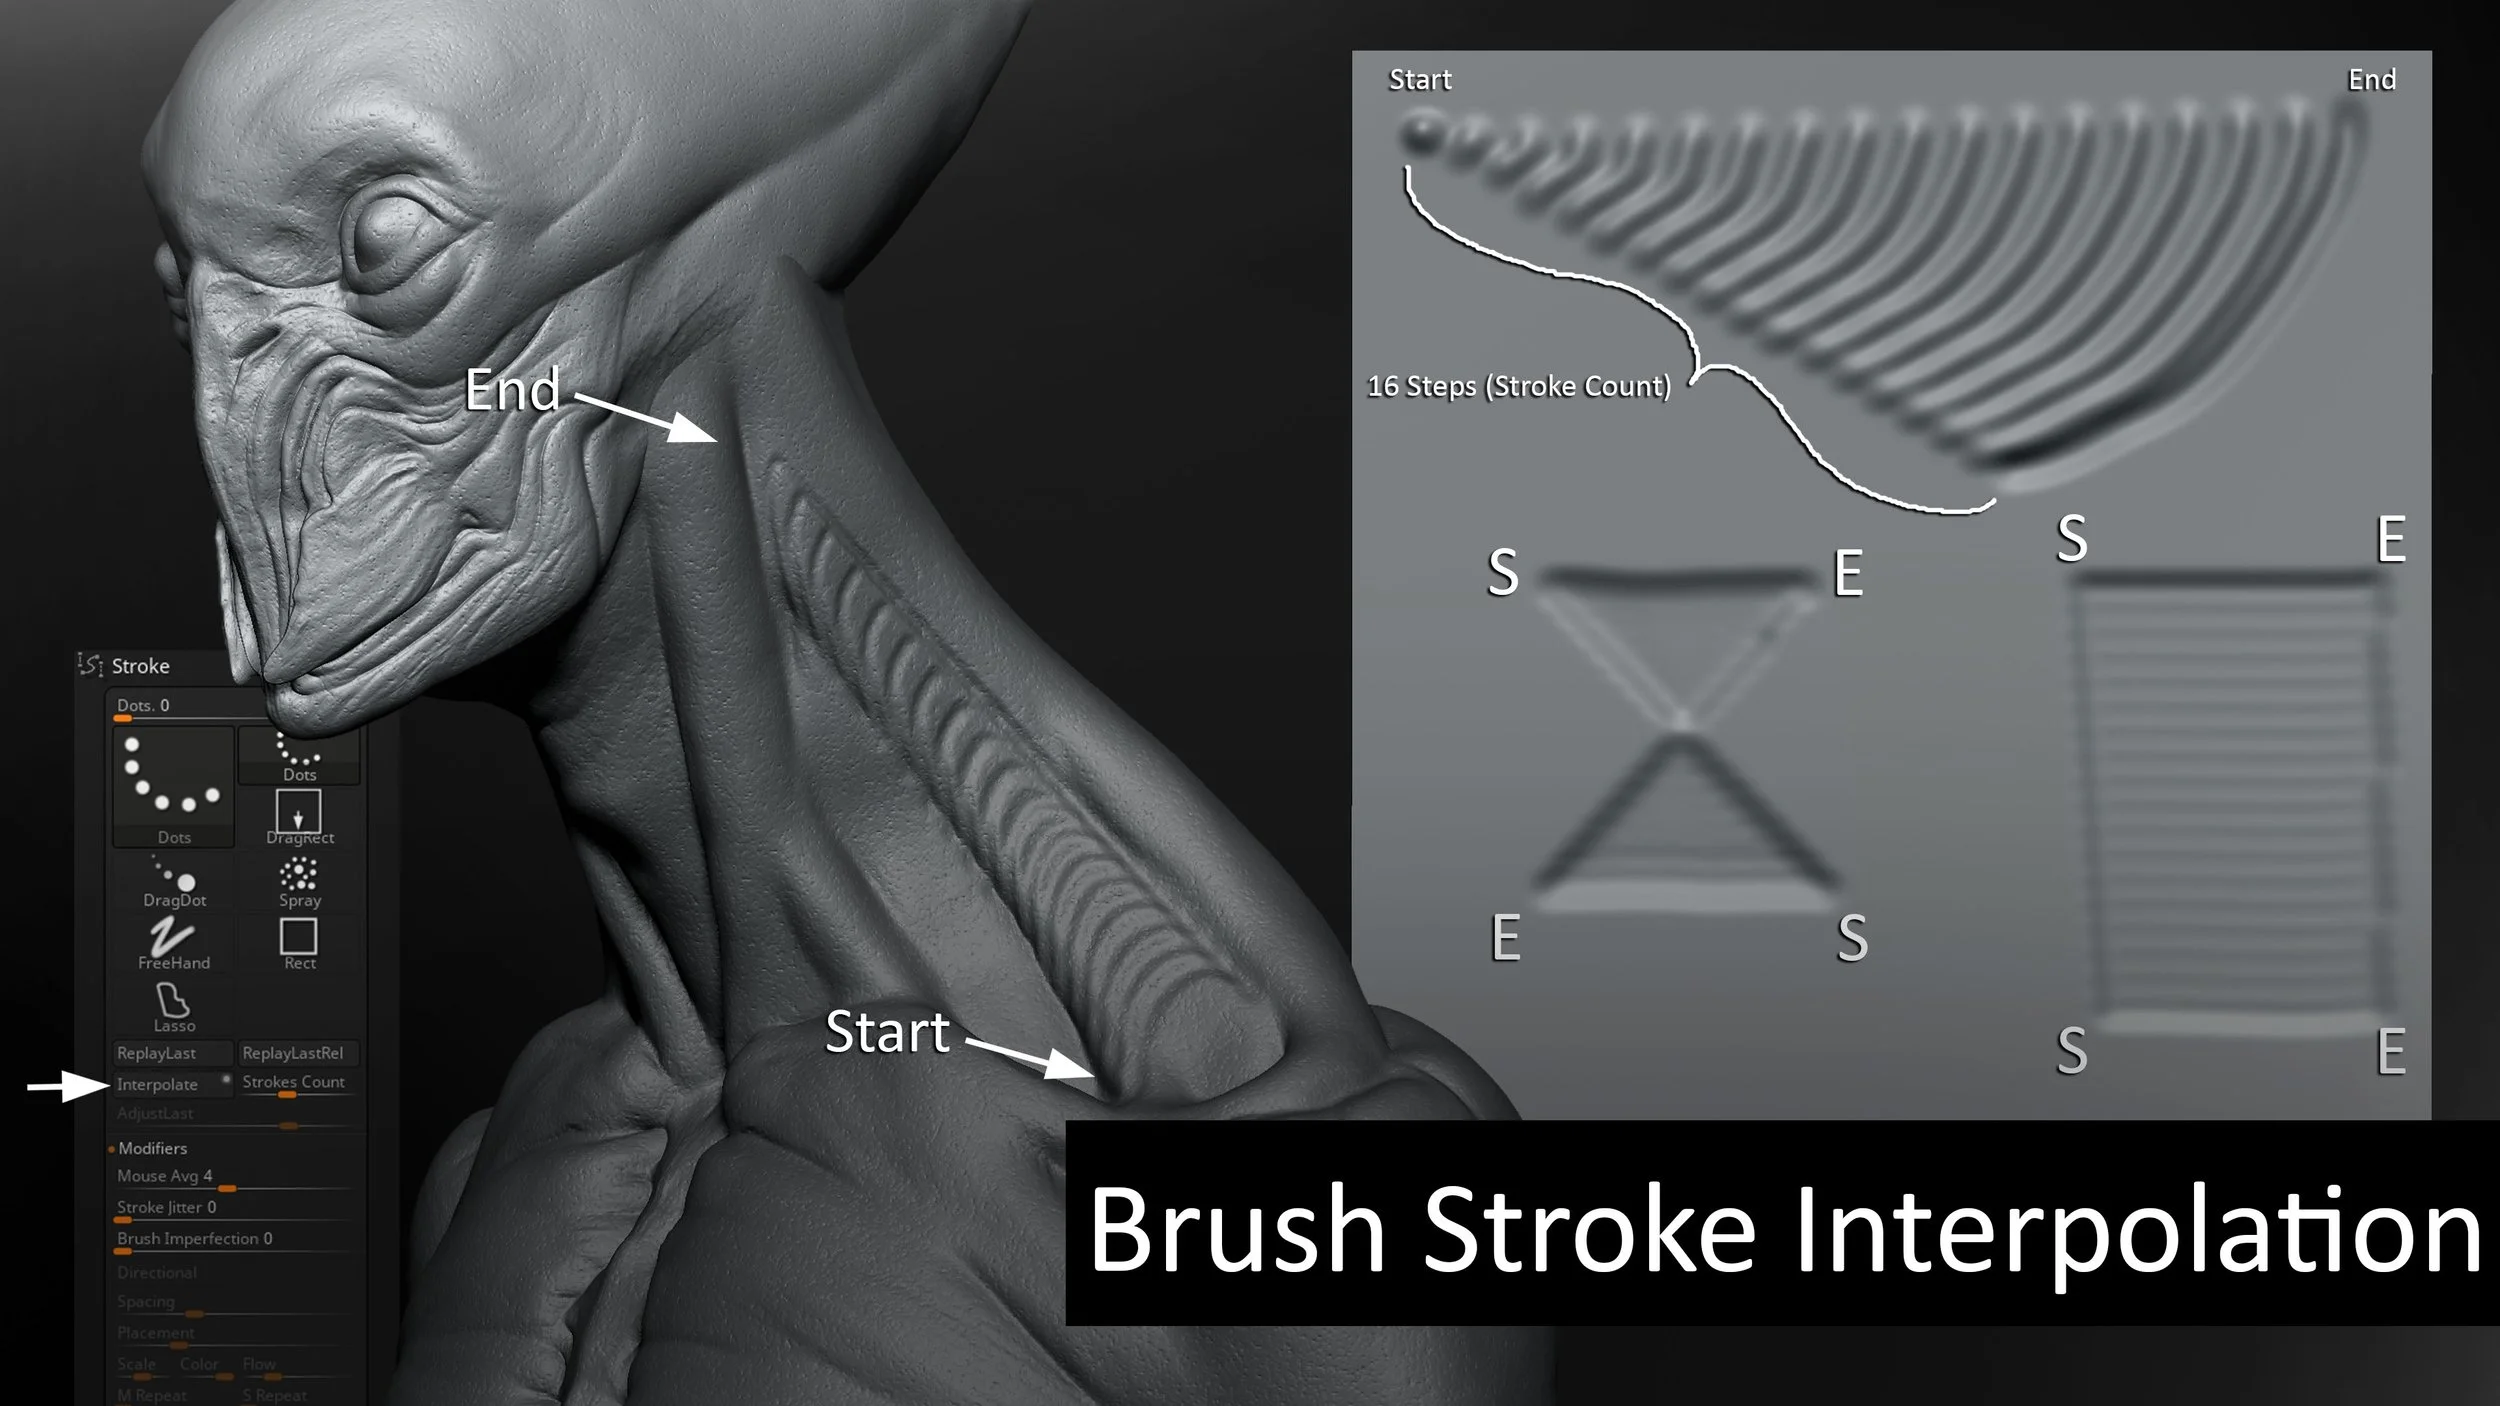
Figure 8.8 - I used the interpolate button under the Stroke menu to sculpt the repeating shapes in the neck and head.
This period of detailing goes on for quite a bit, so I tend to poly paint as well as sculpt at the same time. Playing with colors gives me an idea of what it could look like and how the color helps with the character. Whenever possible, it always gets great results to work in Substance Painter.
Note: Substance Painter is managed by Adobe. Please visit Adobe.com for pricing options.
So, I ZRemeshed the body, re-applied UVs to it using Plug-In > UV Master, and then created the texture maps based off from my polypaint.
UV Unwrapping in ZBrush
Now the sculpt is locked in, and we’re getting ready to texture it, which means it’s time to generate clean UVs. We’re not aiming for game-res topology here; we just need something clean and functional so we can bake maps and move confidently into Substance Painter. Here’s how I approach unwrapping inside ZBrush using UV Master:
1.) Use ZRemesher for clean topology.
Keep Symmetry turned on for symmetrical characters
Separate topology into polygroups for better UV islands
2.) Go to Plug-ins > UV Master.
Enable Polygroups and Symmetry.
3.) Click “Unwrap” and then “Flatten” to preview UVs.
Islands can be rearranged to fill a 1:1
Note: UDIMs are currently not yet supported inside of ZBrush
Figure 8.9 - UV Master Panel with settings and preview
With the UVs laid out and ready, it’s time to prep the mesh for texturing. Substance Painter handles millions of polys well, but to keep things running fast - especially if you’re stacking layers and working with SSS - I decimate the mesh while preserving those UVs. This next step ensures we’re working efficiently without losing sculpt detail or breaking the unwrap. Let’s walk through that prep process.