
Chapter 12 Extended
Extension intro here.>>>
Photogrammetry on iPad
Tech Specifications:
Technology: Built on Apple’s Photogrammetry API.
Output Limitations: At present, output is capped at 25k–50k triangles per mesh.
Workflow:
Designed for a simple 360° scanning process.
Automatically generates both a mesh and a texture.
Hardware Requirements:
iPad Pro 2021 or newer.
Requires LiDAR for optimal results.
Current Status:
Usable in beta, but still under development.
Intended to offer a quick, portable way to scan real-world objects directly into ZBrush on iPad.
Process
On your ZBrush App, go to the home screen and select Capture
Photogrammetry Broad Overview
Whether you begin with a photogrammetry scan rich in surface texture or a LiDAR scan that prioritizes accurate form, ZBrush serves as the bridge between digital capture and physical creation. Once a scan is cleaned, optimized, and made watertight in ZBrush, it becomes the foundation for a wide range of output methods - from fine art bronze casting to practical props, jewelry, and decorative objects.
For jewelry designers, the ZBrush workflow often leans toward direct casting in precious metals or creating masters for silicone molds. In this arena, scale and detail tolerance are critical, and the end use often favors direct investment casting. This is where ZBrush’s precision tools - such as measuring plugins, subdivision modeling, and crisp alpha detailing - shine. The process typically ends with a 3D print in wax or a castable resin that is burned out directly, with the molten metal filling the void left behind. The goal in jewelry is almost always minimal post-cast cleanup, which means the ZBrush model must be as perfect as possible before leaving the computer.
By contrast, larger sculptural work, props, or fine art preservation projects often use a matrix mold - an outer mother mold that supports a flexible silicone cavity around the sculptural form. This system allows for repeated castings in materials as varied as rigid polyurethane resin, lightweight foam fills, microcrystalline wax for lost-wax bronze casting, or plaster of Paris for quick prototyping. The advantage here is versatility: a single well-made matrix mold can produce outputs in multiple materials over time, without committing to a single casting path.
When it comes to lost wax casting (also known as the burn-out method), the process begins by creating a precise positive in wax — either hand-sculpted, 3D printed in castable wax resin, or indirectly produced by making a silicone mold of a 3D print and pouring in microcrystalline wax. The wax model is then coated in layers of ceramic shell or investment material. Once the shell has hardened, the piece is placed in a kiln, where heat melts the wax and burns away any residue, leaving a clean cavity for molten metal. The metal is poured, allowed to cool, and the shell is broken away, revealing the cast metal form.
With 3D printing, this burn-out stage doesn’t have to be limited to wax. Modern foundries can also burn out certain filaments or resins, though results vary. For example:
Castable Wax Resins (Formlabs, BlueCast, etc.) - Designed specifically for clean burnout with minimal ash residue; most common for jewelry and small-scale sculpture.
PLA Filament - Can be burned out, though it often leaves residue that needs to be accounted for in the investment and burnout schedule.
PVA or PVB Filaments - These can be dissolved in solvents prior to or during burnout, but they require specific foundry expertise and controlled conditions.
Hybrid Prints - Printing in a material like PLA and then creating a silicone mold to produce a microcrystalline wax positive - combining digital speed with the clean burnout of traditional wax.
No matter which approach you choose, working with a foundry should never be an afterthought. Planning your ZBrush output with the foundry’s process in mind will save time, money, and frustration. Plus, coming to the table prepared will make you overall more desireable to work with.Before delivering a file, ask:
Preferred File Format – OBJ, STL, or a specific CAD format?
Wall Thickness – Minimum and maximum tolerances for the casting material.
Tolerances for Shrinkage – Metals shrink during cooling; understand their compensation requirements.
Support Placement – If they’re printing in-house, find out how they prefer to orient and support models.
Surface Finish Expectations – Whether they want a high-res, smooth file or will do their own cleanup.
Gating and Sprues – Does the foundry want you to add them digitally, or will they handle them physically?
Burnout Schedule Compatibility – If using non-wax materials like PLA, ensure they have the proper burnout cycle for your material.
A short consultation with the foundry before you finalize your ZBrush file can prevent costly mistakes and help you deliver exactly what they need — whether the goal is a single heirloom piece of jewelry or a series of large-scale bronze castings.
With these considerations in mind, you can decide whether to move directly into a burnout workflow or to create a versatile matrix mold that supports multiple casting methods. In the next section, we’ll walk through the process of building a matrix mold around your 3D print — a method that not only works for wax positives in lost wax casting, but also adapts easily to resin pours, foam fills, plaster casts, and other materials. This flexibility makes it an invaluable approach for artists who want the option to produce work in different media without reprinting or re-sculpting their original model.
Prepping for the Physical
Steps to 3D Print a Matrix Mold with Mole Scanner
1. Scan the Object with the Mole 3D Scanner
Set up the Mole scanner and connect it to your mobile device using the 3DMakerPro Connect accessory.
Launch the mobile scanning app and choose the appropriate scanning mode.
Position your object within the scanning range, and move the scanner slowly around it to capture all angles. Use scanning spray if needed.
Monitor the real-time preview to confirm full coverage.
Save the scan in a compatible format such as OBJ or STL.
Tip: Move slowly and steadily for accurate capture; scanning spray helps with reflective or challenging surfaces.
2. Prepare the Scanned Data
Transfer the scan from your mobile device to a computer. The software supports Mac, Windows, iOS, and Android.
Import the scan into 3D modeling software suited to your printer.
Clean up artifacts and imperfections; make sure the mesh is watertight and repair any gaps.
Orient the model considering parting lines and optimal mold release directions.
Tip: Use mesh repair tools (like Netfabb or Meshmixer) to streamline cleanup. Pay attention to thin walls or overhangs that could impact print quality.
3. Print the Matrix Mold
Load the cleaned scan into your slicer software.
Adjust settings like layer height, infill density, and supports based on the mold’s detail and durability needs.
Export the G-code and ensure your printer is calibrated before starting.
Begin the print and monitor progress. Once complete, let it cool before removing any support structures.
Tip: Print a small test section to verify orientation and support needs. Use slower print speeds for fine detail.
4. Use the Printed Mold for Replication
Choose a casting material—resin, polyfoam, or similar—and prepare it according to specifications.
Carefully pour or inject material into the mold, filling all cavities fully.
Allow the material to cure or solidify as per product instructions.
Gently demold the replicated item, then clean and finish as needed.
Tip: Apply a mold release agent to protect the mold and ensure smooth demolding. Tap the mold gently to eliminate air bubbles before curing.
Resources
Here is a list of all the various scanning methods:
Photogrammetry, LiDAR (Light Detection and Ranging), Structured Light Scanning, Laser Triangulation, Time-of-Flight, (ToF) Scanners, Contact Scanning (Coordinate Measuring Machines - CMMs), Crystallography, Magnetic Resonance, Imaging (MRI) for 3D Models, Computed Tomography (CT) Scanning, Handheld 3D Scanners, Ultrasonic 3D Scanning, Infrared 3D Scanning, Optical Coherence Tomography (OCT), White Light Scanning, 3D Scanning with Drones, Holographic Interferometry, Millimeter-Wave Scanning, Biometric Scanning, Atomic Force Microscopy (AFM), Sonar Scanning, Tactile Scanning (Haptic), Portable Depth Cameras, Electro-Optical Scanning, Moiré Fringe Pattern Scanning, X-ray Microtomography, 4D Scanning, Terahertz Imaging, Shape-from-Shading, Fluorescence-Based Scanning, Refraction Scanning, Interferometric Scanning, Digital Holography, 3D Scanning via Bioluminescence, Multi-View Stereo (MVS), Echo-Based Scanning, Heat Mapping for 3D Reconstruction, Particle Imaging Velocimetry (PIV), Coded Aperture Scanning, Plenoptic (Light Field) Scanning, Volumetric Scanning, Hybrid 3D Scanning, Polarimetric Scanning, Nano-Computed Tomography (Nano-CT), Dynamic Surface Tracking, Hyperspectral 3D Imaging, Subsurface Scanning (GPR) Stereolithographic Reverse Engineering, Thermal Gradient Scanning, Biomechanical Surface Mapping, Neural Network-Based 3D Reconstruction, Bubble-Based Scanning, Evaporation Profile Scanning, Projection Mapping for 3D Reconstruction, Augmented 3D Scanning via Quantum Dots, Fluidic Volume Scanning, Multi-Axis Laser Scanning, Acoustic Holography, Reflectometry-Based Scanning, Gaussian Splatting.
Output: Prep the Mother Mold
Overview of Section
We will...
By the end you will be able to...
Set Digital Cast into mold kit file
Create...
Place Digi-cast into the mother mold area
Create Silicon Cavity design
Isolate the...
Go to Tools | SubTools | Duplicate to duplicate sculptural Digi cast in place.
Go to Tools | Deformers | Inflate. Set the slider to 2-4 or when the increase in size has created a 5-7cm added thickness around the sculptural object. Convert the object to Dynamesh and polish where needed for any overhang.
Activate the Tools | Surface | Noisemaker and add a light grid for added key placement.
Turn...
Make adjustments as needed
Tip: Use the slicing software to manage the measurements of the scene.
Output | Part 1 | 3D Printing the Pattern
Overview of Section
We will...
By the end you will be able to...
Materials Needed
Scene Set up in Bambu Slicer
1. ) : ...
Output | Part 2 | Pouring the Silicon Matrix
Overview of Section
We will...
By the end you will be able to...
Materials Needed
2 Part Silicon spray, Mixing Bucket, Spill tray, Gorilla Tape (high Tack), apron, Safety Glasses, Xacto Knife.
Pouring the Silicon
1. ) Use release spray on all internal areas to coat
2. ) Build your 3D printed mother mold system
3. ) Tape the seams for leakage
4. ) Measure and Mix the Silicon
5. ) our Slowly the Silicon into the spout of the mother mold. Close venting with Gorilla tape as the silicon begins to leak out from the vent shafts.
6. ) Let Silicon Set for 18-24 hours depending on the density
7. ) Open AA and BB Parts of your mold.
8. ) Trim any silicon flash and zig zag cut along where the mother mold splits.
9. ) Remove positive 3D Printed sculpture casting
10. ) Clean any silicon residue from all parts. Add baby powder to the outside of the silicon where it rests against the mother mold.
11. ) Reassemble the mother mold now with
Microcrystaline Pour
1. ) : Reapply release spray into
Step 2: Heat wax just about melting point
Step 2: Use pour spout to pour the melted wax into the Silicon Cavity
Microcrystalline Sculptors Wax
Post-processing the 3D print
Once your 3D model has been printed, the next step is preparing it for mold-making and casting. This involves a few essential post-processing steps to ensure your print is ready for the molding process:
1.) Begin with post-print cleanup by inspecting for any gaps or rough areas.
2.) Use a suitable filler, such as Natural Plastic Wood-X with Drydex, for filling any gaps as needed.
3.) Once the gaps are filled and dried, sand the surface thoroughly to achieve a smooth and polished finish with a 100 – 400 roughness. Try to ensure that you do not overdo it with sanding or wood filler, as too much of either could compromise the existing texture.
4.) If you printed your model with a hollow interior to save on material costs (as I often do) it’s important to address the opening before moving forward.
5.) Seal the hollow section by capping off the opening, as this will prevent any wasted silicone from going into the 3D model.
These preparatory steps ensure a professional-quality mold and final cast, setting the stage for a successful reproduction of your sculpture.

Figure 12.00 –
Creating a Silicone Mold
The next step in preparing your 3D print for casting is creating a silicone mold. Follow these steps to create a silicone mold:
1.) Begin by designing a mold box to hold the silicone during the pouring process.
2.) Ideally use a 3D-printed modular mold box for this purpose, as it can be customized to fit the dimensions of your print and reused for future projects. Ensure the mold box is sturdy and watertight to contain the silicone effectively.
3.) Before you pour, use release spray to coat the inside of the mold box and the artwork. Figure 12.9 shows a modified model based on a mold casting kit from Maker World: https://makerworld.com/en/models/685653?from=search#profileId-614248
4.) Start with the first half of the mold by placing your 3D print securely in the mold box.
5.) Suspend it from the top to ensure it has a thick wall of silicon all the way around.
6.) Pour silicone around one side of the print, taking care to ensure that all surface details are captured.
7.) As the top surface hardens, add marbles to the top of to be removed before the second pour to create keys in the mold. Allow this first layer to be cured completely before proceeding.
8.) Once the first half has cured, use release spray to coat the top of the first layer and pour the silicone over the top, completing the second half of the mold. This two-part mold will allow you to replicate your model accurately while ensuring easy removal of the cast.
9.) After both sides have cured, cut a hole through the Silicon where the silicon has
Now you are ready to move onto the next stage.
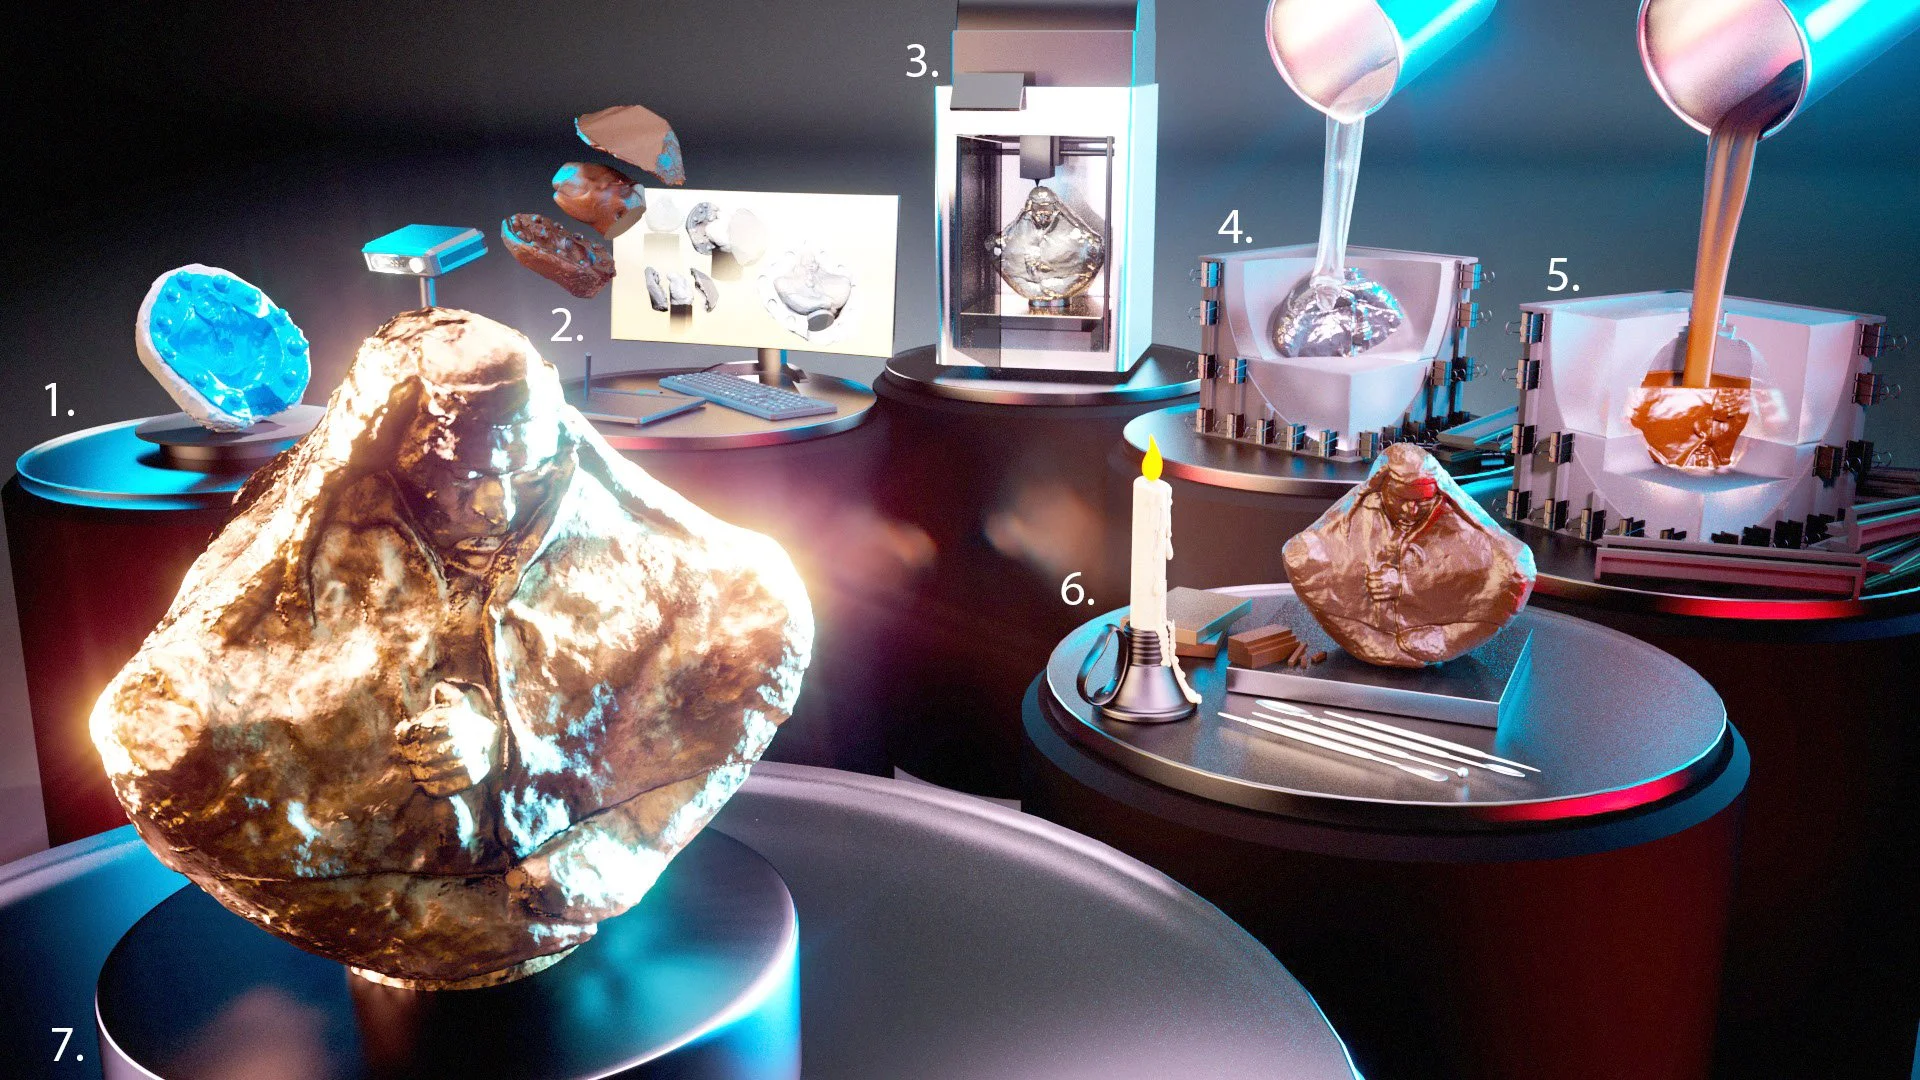
Figure 12.00 – Creating a two-part silicone mold from the 3D-printed sculpture.
With a well-designed mold, you’ll be ready to move on to the casting stage.
Casting in microcrystalline wax
Microcrystalline wax is a hot wax valued for its strength and ability to retain fine surface details, making it an ideal material for creating molds and preparing for the bronze casting process.
I’ve been using microcrystalline wax since I was a boy, inspired by watching my grandfather work with it. I was always amazed at how the wax could capture every intricate detail, which would later translate flawlessly into bronze.
One of the reasons I prefer microcrystalline wax is its versatility—when heated, it becomes malleable and easy to work with, hardening quickly to produce sharp, clean surface impressions. This quality is particularly beneficial during the post-processing stage, where maintaining surface accuracy is key.
Figure 12.7 shows …
Figure 12.7 - Wall thickness cross-sectional diagram
Here’s how to cast with microcrystalline wax:
1.) To create the wax casting, pour the melted microcrystalline wax into your prepared silicone mold. The goal here isn’t to fill the entire mold with wax but to build up a wall of thickness around the entire inside of the mold creating an inner shell thickness. The thickness will depend on what you feel would support its own weight.
2.) As you pour, rotate the mold and let the liquid wax solidify as it lines the inner walls. Repeat this until you have a wall thickness appropriate to the size of your work.
3.) Allow the wax to cool and solidify, forming a perfect replica of your original design.
4.) Once the wax casting is complete, carefully remove the mold and proceed with wax cleanup by removing any flash areas—thin material left along the seams of the mold. Refine rough sections carefully, taking care to preserve or replicate the original textures and details.
Following these steps will ensure that your wax model is ready for the next phase of the casting process with precision and integrity.
Implementing the Lost Wax process
Once the wax replica is complete, it’s time to transition into bronze casting. Some foundries may let artists be hands-on with their work going through the prepping process, while others might insist you wait outside. Also take note that depending on the complexity of your work, the turnaround time could take months before the bronze casting is shipped out. So, plan accordingly. While it’s highly recommended to let a professional foundry handle this process due to its complexity and risks, we’ll discuss a breakdown of the typical steps in this section.
The lost wax process is a centuries-old technique used to create bronze sculptures, and it remains the industry standard for its precision and durability. Once the wax replica is complete, the process transitions into bronze casting. The process begins by coating the wax model in layers of ceramic material, forming a hard shell that will serve as the mold. This step ensures that the intricate details of the original wax model are preserved. Next comes the burnout process, during which the wax is melted and drained from the ceramic mold, leaving behind a hollow cavity in the exact shape of the sculpture.
With the mold prepared, molten bronze is carefully poured into the cavity, filling every detail and capturing the original design. Once the bronze has cooled and solidified, the ceramic shell is broken away to reveal the sculpture. At this stage, surface refinement begins, with the bronze being cleaned, polished, and adjusted to eliminate any imperfections. To complete the process, a patina finish is applied to enhance the sculpture’s visual appeal and protect its surface, ensuring the piece retains its beauty and integrity over time.
Now that we’ve explored Method 1—scanning and preparing a 1:1 subject, you have a solid foundation for bringing real-world sculptures into ZBrush and transforming them for physical replication. In the next section, we’ll examine alternative methods for capturing and working with fine art in ZBrush replication and preservation.