Chapter 8 Extended
Add Intro transition from book here.>>>>
This page continues the presentation process in Substance Painter, Marmoset and Photoshop. This includes:
Texturing
ZBrush to Substance Steps
Final Rendering in Marmoset
Part 1: Export Maps from Substance Painter
Part 2: Import Your Model and Maps into Marmoset
Lighting
Final Presentation: Making Your Alien Shine
Texturing
With form locked in, it’s time to add life with texture, color, and subsurface scattering.
Preparing the Model
I once again Zremeshed the model and re UV’d etc… but this time I decimate the model using Plug-in > Decimation Master. The important thing here is to decimate with Keep UVs function turned ON. This will keep the UVs that we’ve created but we can still decimate the model and bring it down to a level that won’t be too taxing for Substance. I recommend decimating at 20% or lower, aiming for around 1–2 million polygons to keep performance smooth in Substance Painter. I also save out the full high-res model to bring in for baking the high res maps.
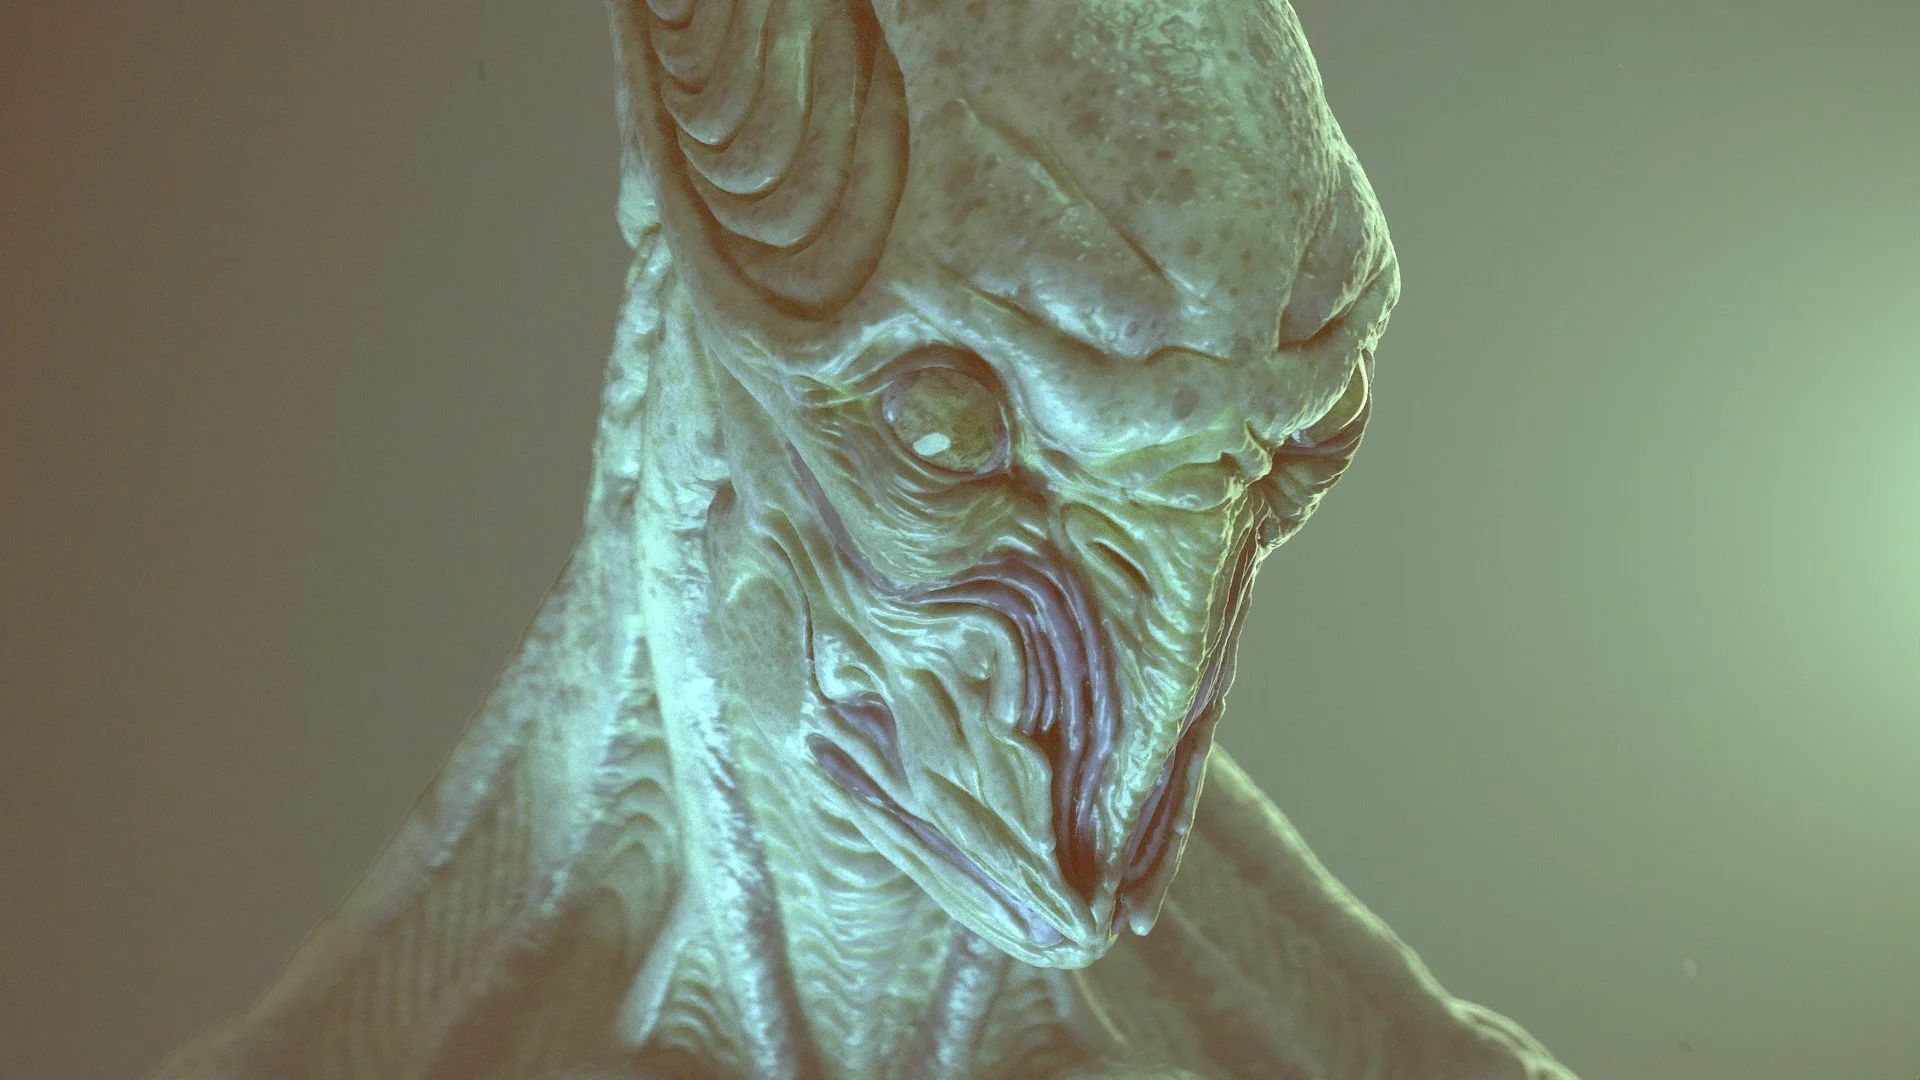
Figure 8.00 - My initial pass in Substance Painter. Exploration is key in finding the right color and material scheme.
See fig. 8.00 Some general base materials I like to apply are:
Materials: Skin Human Flat, ...
Smart Materials: Creature Skin Alien Blue, Creature Skin Green Smooth, Creature Tongue, Creature Teeth, Skin Feverish, Skin Human Simple, Skin Face.
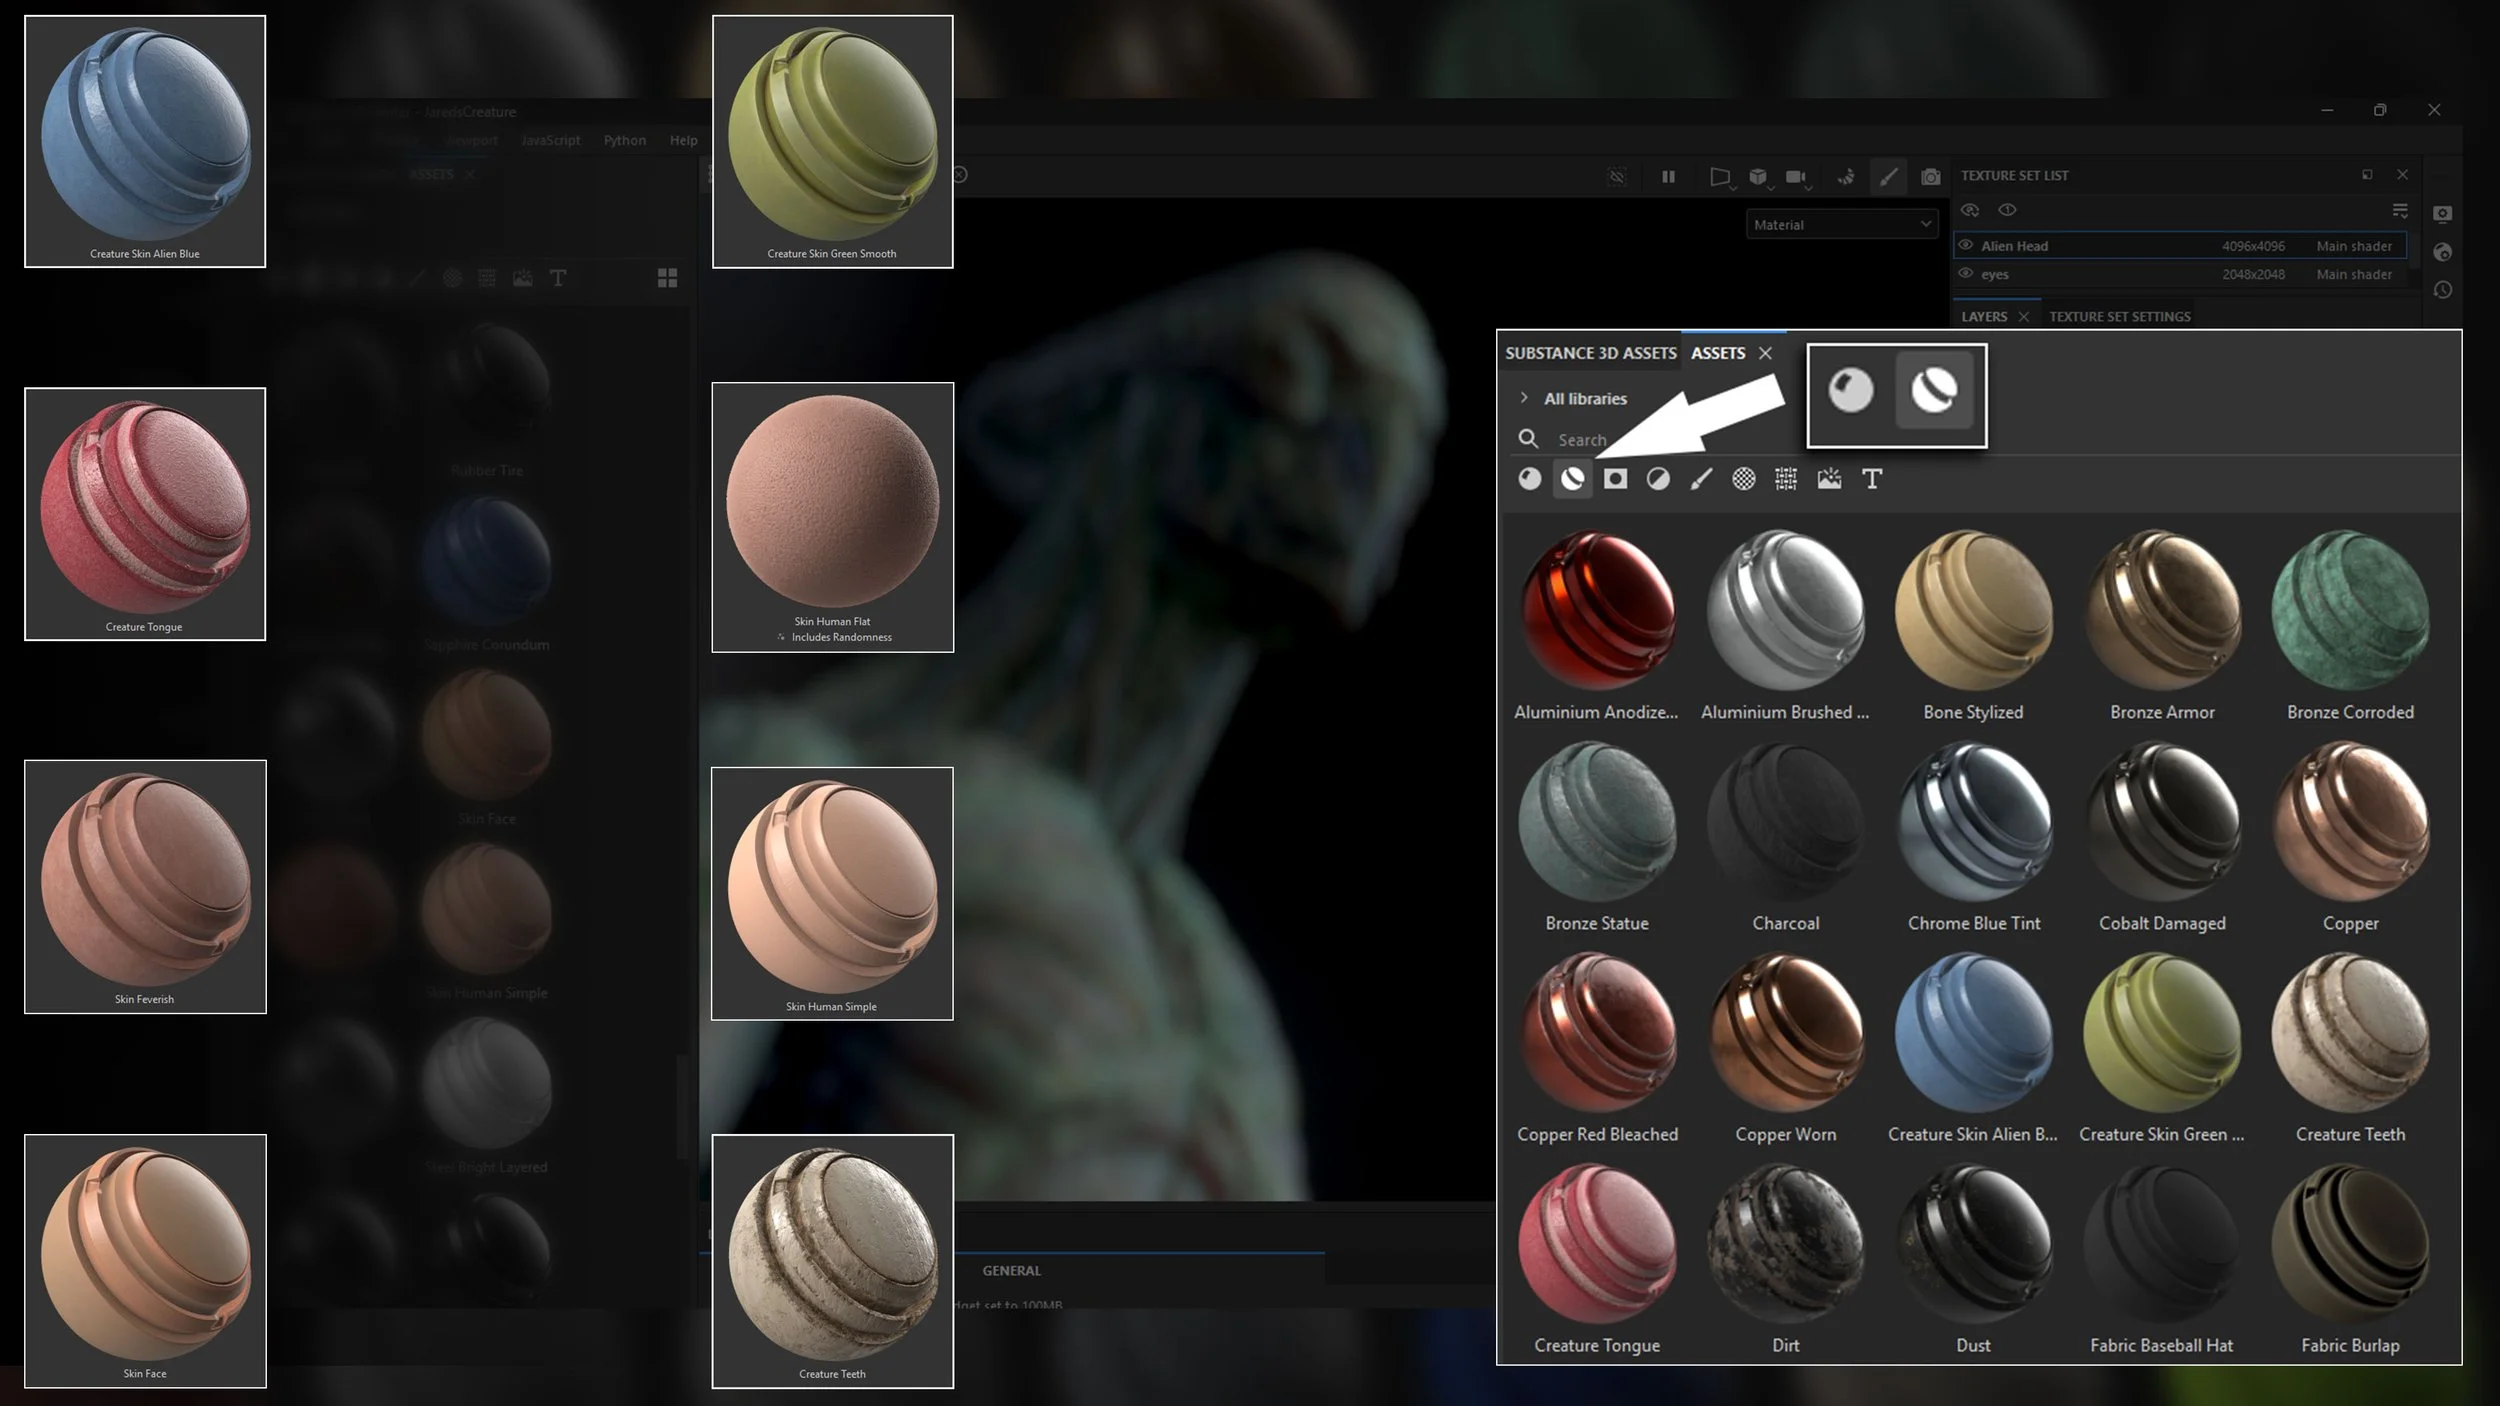
Figure xx.
Hand painted details and cleanup are mostly addressed in the treatment of the layer masks that are blending whichever materials and smart materials that I decide to use. My preference of brushes in substance remain fairly default aside from the changes I make in the brush pallet. I’ll often cycle through various alphas applied to the brush to help build up the layers of skin.
ZBrush to Substance Steps
1.) Import decimated mesh with UVs into Substance Painter.
Export as an FBX to pull for easier import into Substance Painter
2.) Bake High-Res Maps from sculpt (Texture Set Settings > Bake Mesh Maps).
This can be adjusted anytime during substance steps via the baking options.
3.) Apply base fill layers using tileable textures.
Start dragging and dropping your smart materials onto your subject. Notice how your layers begin to stack.
Use various masking to remove or add the material in isolated areas of your model.
4.) Hand-paint specific color regions.
Build up your hand painted layers especially for emulating skin translucency. Utilize the alphas available to you.
Cavities tend to hold darker colors. Push that in with masking generateors and paint dark to light.
Remember colors shift throughout the final presentation of skin. Using only one color will always look synthetic.
5.) Enable SSS preview in Iray mode.
……………….>>>
Figure 8.00 - Iray render preview window.
Tip: Export from ZBrush at Real-World Scale: Set your ZBrush scene scale to a realistic unit size before exporting - Substance Painter assumes real-world scale for things like smart materials and projections.
Note: Polygroups Can Guide UV Islands: If your sculpt is already organized by polygroups, you can use those as a base for defining UV seams in UV Master for more intuitive layouts.
Substance Painter Workflow
The thing I find about Substance Painter is that it requires a lot of experimentation to get the look you’re going for, so that means a lot of turning on and off layers and trying different layer styles or various generators. I use tileable textures to build out the base skin and look and then paint by hand in areas that need more attention. Working generally and broad to specific and small. The other thing I do is set up a scattering pass so I can get an idea of what it will look like with SSS materials later on.
Let’s walk through how we go from our ZBrush sculpt to production-ready maps using Substance Painter.
A screenshot of a computer
Description automatically generatedFigure XX. The initial result ended up very different from my polypaint. I’m always looking for happy accidents along the way.
1. Import the Model
Open Substance Painter.
File > New Project
Set Template: PBR – Metallic Roughness (with Alpha-blend if needed).
Import your decimated FBX mesh with UVs.
Make sure “Auto-Unwrap” is unchecked — we’ve already done that in ZBrush.
2. Bake Mesh Maps
Go to Texture Set Settings > Bake Mesh Maps.
Load your high-res sculpt as the high poly mesh.
Bake the following maps:
Normal
AO
Curvature
Thickness (used later for SSS preview)
Position & World Space Normals
Match settings to your UV resolution (2K or 4K depending on system power).
3. Lay Down Base Skin
Start with tileable skin materials or use Smart Materials as a foundation.
Apply using masked fill layers, not direct paint.
Adjust roughness, color, and normal intensity to start building depth.
Keep it broad - think overall tone and texture, not details yet.
4. Stack Additional Texture Passes
Use additional fill layers + generators to build:
Subdermal reddish tones (under cheeks, ears, neck)
Specular zones (forehead, nose bridge)
Color breakup using noise masks (for variation)
Don’t worry if it looks messy - keep toggling and experimenting.
5. Hand Paint Custom Regions
Add Paint layers for fine-tuned regions:
Eye sockets
Mouth folds
Bioluminescent accents (if relevant to your design)
Use custom alphas or grunge brushes to add subtle asymmetry and skin imperfections.
6. Set Up Subsurface Scattering (SSS)
Go to Viewer Settings > Shader Settings
Switch to PBR Metal/Rough + Subsurface Scattering
Use Thickness Map from your bake as your scattering base.
Tweak scattering radius and color until it matches the material you’re aiming for (skin, waxy flesh, etc.).
7. Preview in Iray
Open Iray Preview (Shift + I or click the Iray icon)
Adjust HDRI environment lighting or rotate the dome to see how light interacts with your material stack.
Fine-tune color balance, saturation, and subsurface depth based on how it looks here.
8. Export Textures
Once satisfied, go to File > Export Textures
Set Output Template: PBR Metal Rough (or Unreal/Unity if needed)
Export maps:
Base Color
Normal
Roughness
AO
Emissive (if used)
Subsurface / Thickness
Tip: Work in Masked Fill Layers for Flexibility: Instead of painting directly on color layers, use masked fill layers so you can easily adjust materials, roughness, and color without repainting. These offer full control over material properties like roughness, color, and metallic values - without needing to repaint or destructively commit changes. You can also use this to iterate through different materials isolated in the mask.
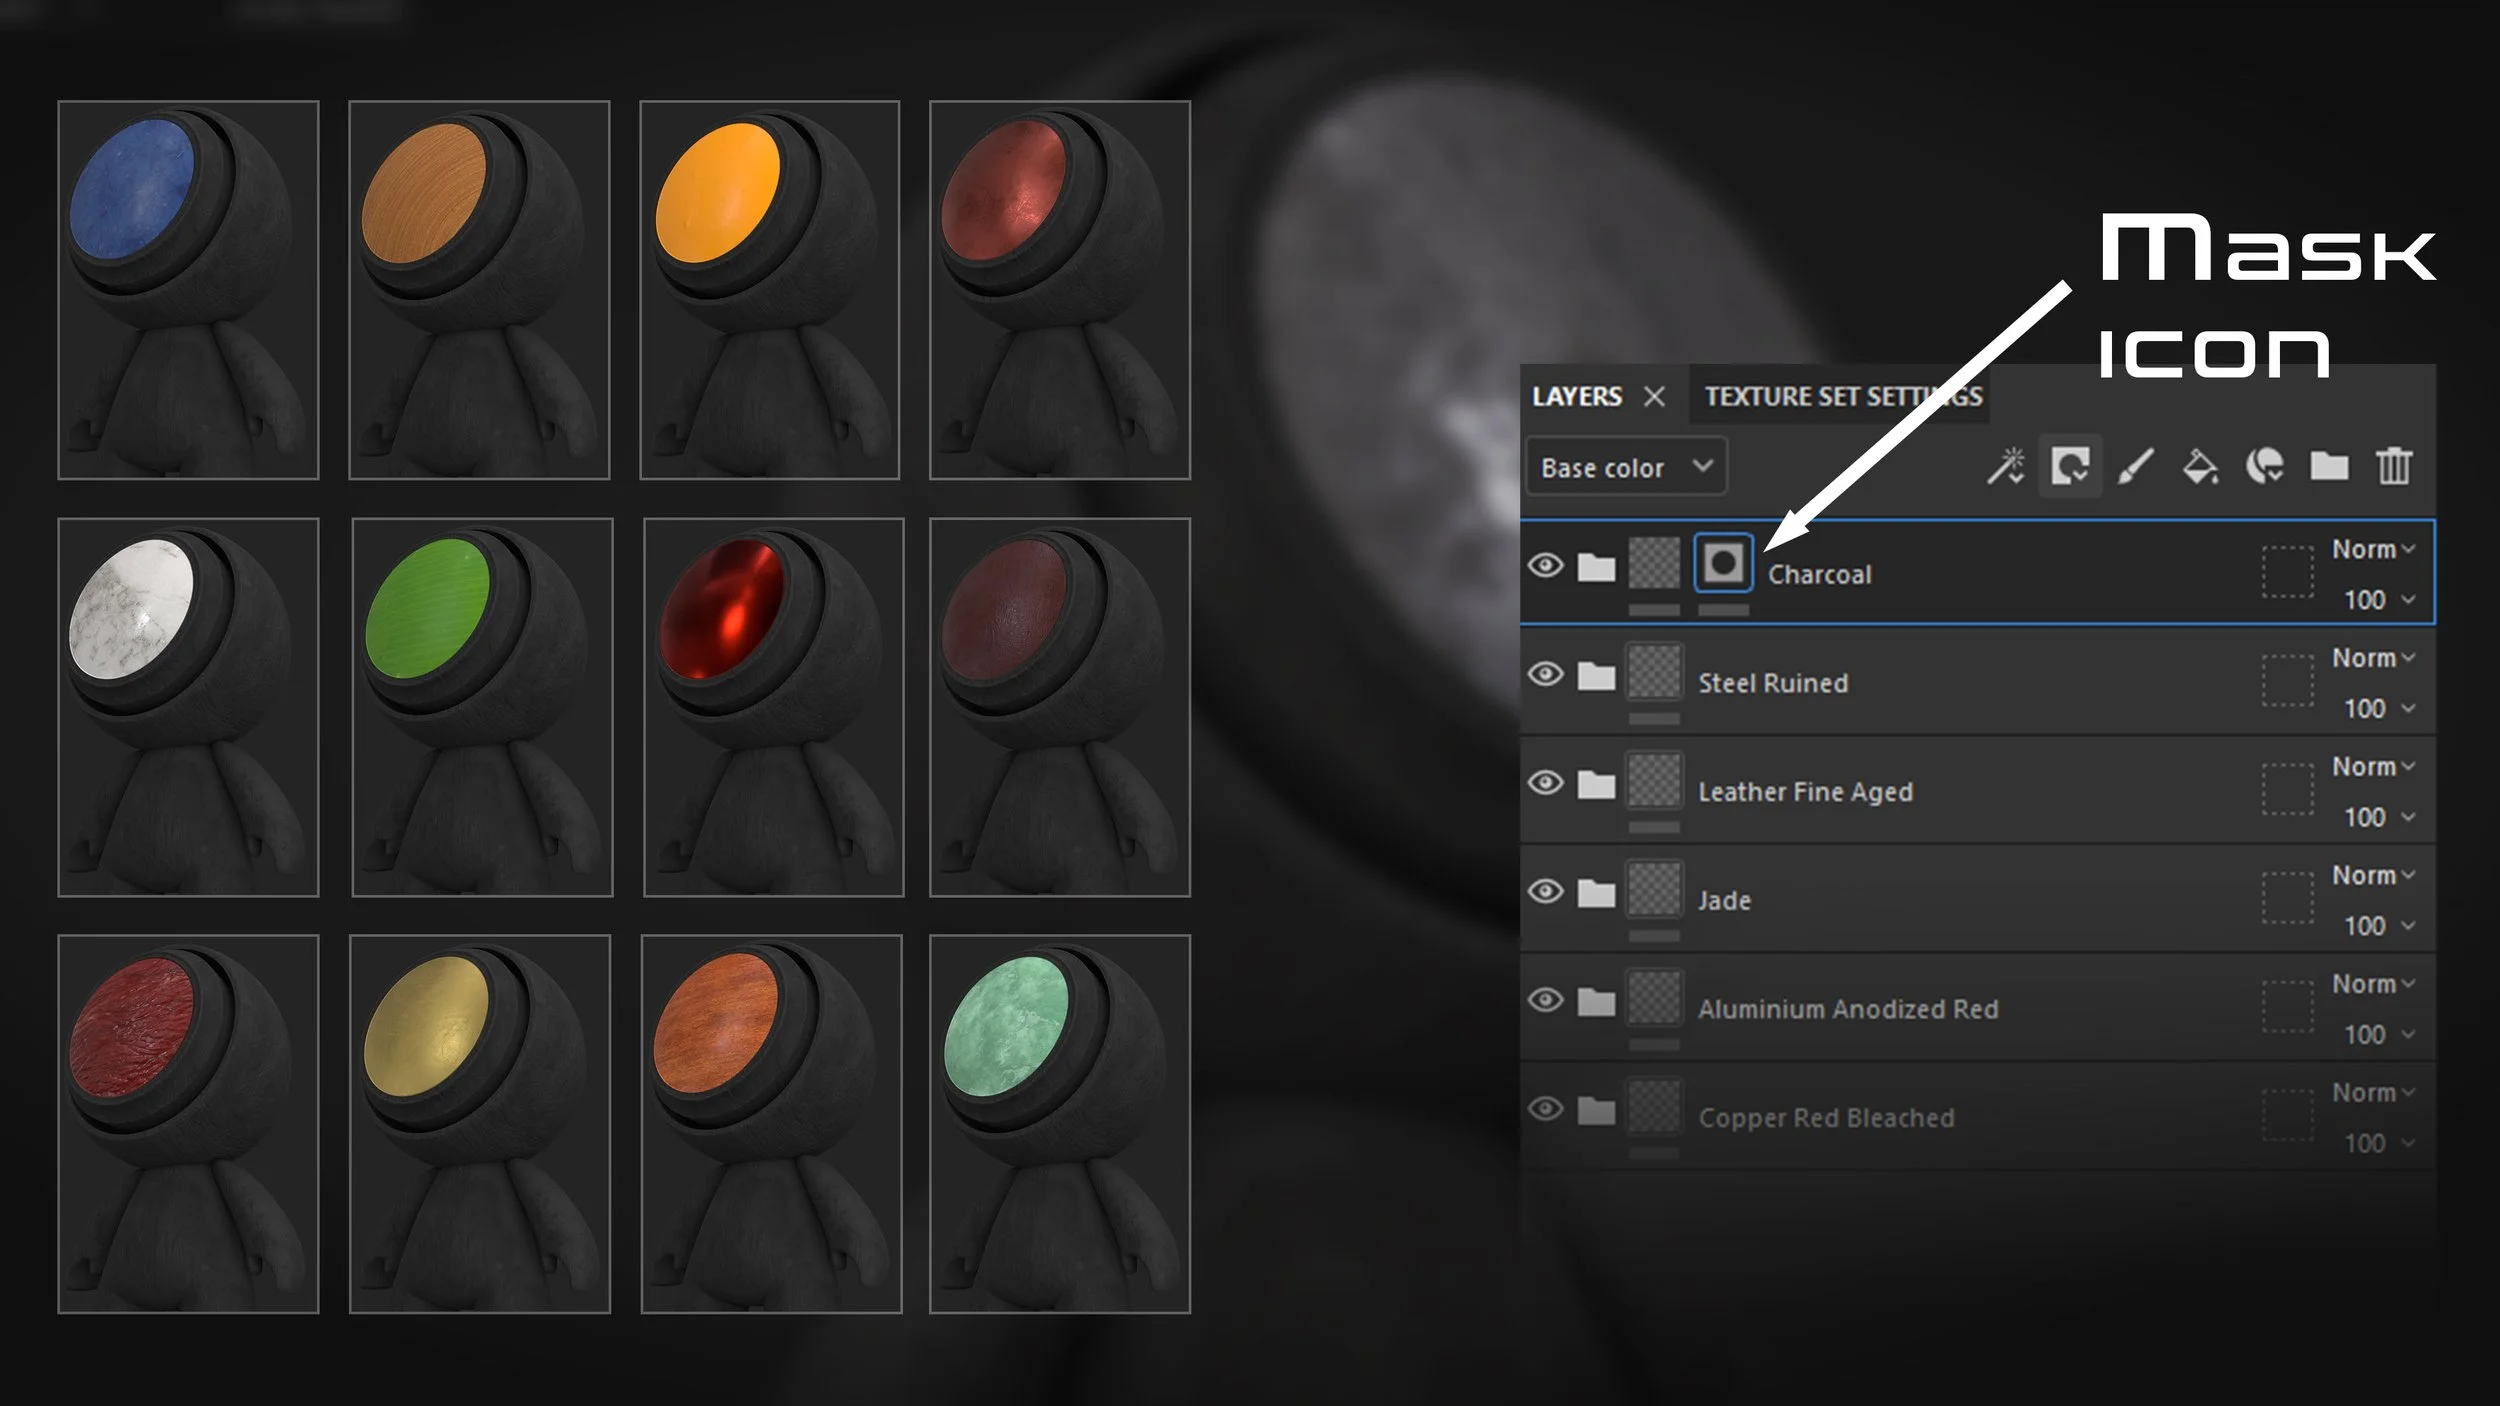
Figure 8.0 - Material Iteration with Masking
Tip: Use Smart Materials as a Starting Point: Even if you replace them later, smart materials are great for learning how layered shaders and procedural masks interact. Study how they’re built.
Note: Preview in Iray for Final Checks: Substance Painter’s Iray renderer gives a closer preview of how materials will respond to light and scattering effects, especially useful before committing to external renders.
Once our textures are in a solid place and the character starts to feel alive, we shift gears into final presentation.
This next stage takes us into Marmoset Toolbag 5, where we’ll dial in lighting, fine-tune material response, and render the creature in its most cinematic light. This is where all the design, sculpting, and texturing decisions come together — and where we showcase the story and personality behind the alien. Let’s walk through that setup.
Final Rendering in Marmoset
To finish the presentation, the sculpt is brought into Marmoset Toolbag 5 for cinematic rendering.
Exporting Maps
Once I was satisfied enough with the textures, I exported out the baked maps and brought everything into Marmoset. The model was very small coming out of ZBrush, so I scaled it up and began to tweak all of the material parameters to match what I had done in substance paper.
To ensure the materials matched my Substance Painter setup, I imported all relevant texture maps—Base Color, Normal, Roughness, Ambient Occlusion, and Subsurface Scattering (or Thickness, if I generated one). In Marmoset Toolbag 5, I assigned these maps to the appropriate channels and began fine-tuning the shader values. Small differences in how render engines interpret roughness or SSS can have a big impact on the final result, so I adjusted parameters like specular intensity, subsurface depth, and normal map strength until the render closely resembled my Substance viewport. It’s important to approach this stage with a critical eye, treating the Marmoset scene like a fresh lighting environment where form, color, and material need to harmonize under new conditions. Why Match Render Outputs? This ensures visual consistency across platforms. It’s also useful when clients or studios use one renderer for approval and another for production.
Export Maps | Description
Part 1: Export Maps from Substance Painter
These maps represent the visual surface of your model — color, shine, bumpiness, etc.
In Substance Painter:
1.) Go to File > Export Textures.
2.) Set Output Template:
Choose PBR Metal Rough (works great for Marmoset).
If rendering for game engines, you can choose Unreal or Unity templates instead.
Export Settings:
3.) Resolution: 2048x2048 or 4096x4096 (depending on detail and system power)
File Format: PNG or TIF
Output Directory: Set a new folder called “Alien_Maps” or something organized.
4.) Maps to Export:
Make sure these boxes are checked:
Base Color
Normal
Roughness
Ambient Occlusion (AO)
Emissive (if used)
Subsurface/Thickness (optional but recommended for skin)
Optional: If you used opacity or metalness, include those maps too.
Part 2: Import Your Model and Maps into Marmoset
1.) Launch Marmoset Toolbag 5
2.) Import Your Model:
Go to File > Import Model and select your decimated FBX or OBJ from ZBrush.
Your mesh may appear very small. Don’t worry — we’ll fix that in a second.
3.) Scale the Model Properly:
By default, ZBrush exports models at a very small world scale. To correct it:
Select your model in the Scene panel
In the Transform tab, set:
Scale: Between 50–100 usually works
Or manually increase using the scale gizmo until the model looks correct in frame
Optional: Create a ground plane or reference object to help visualize proper scale
Tip: You can export from ZBrush with real-world scale using ZPlugin > Scale Master to avoid this issue in the future.
Part 3: Apply Textures to the Model
1.) Create a New Material:
In the Material panel, click + New Material
Assign this material to your mesh
2.) Load Your Exported Maps:
To Assign Maps: Click on each map slot → choose “Load Texture” → select the correct file from your export folder.
3.) Adjust Parameters:
Tweak Normal Intensity to match sculpt fidelity
Fine-tune Roughness based on how glossy or matte you want surfaces
Enable Subsurface Scattering for realistic skin glow (under Material > Subsurface)
Adjust SSS Depth/Color to simulate alien translucency
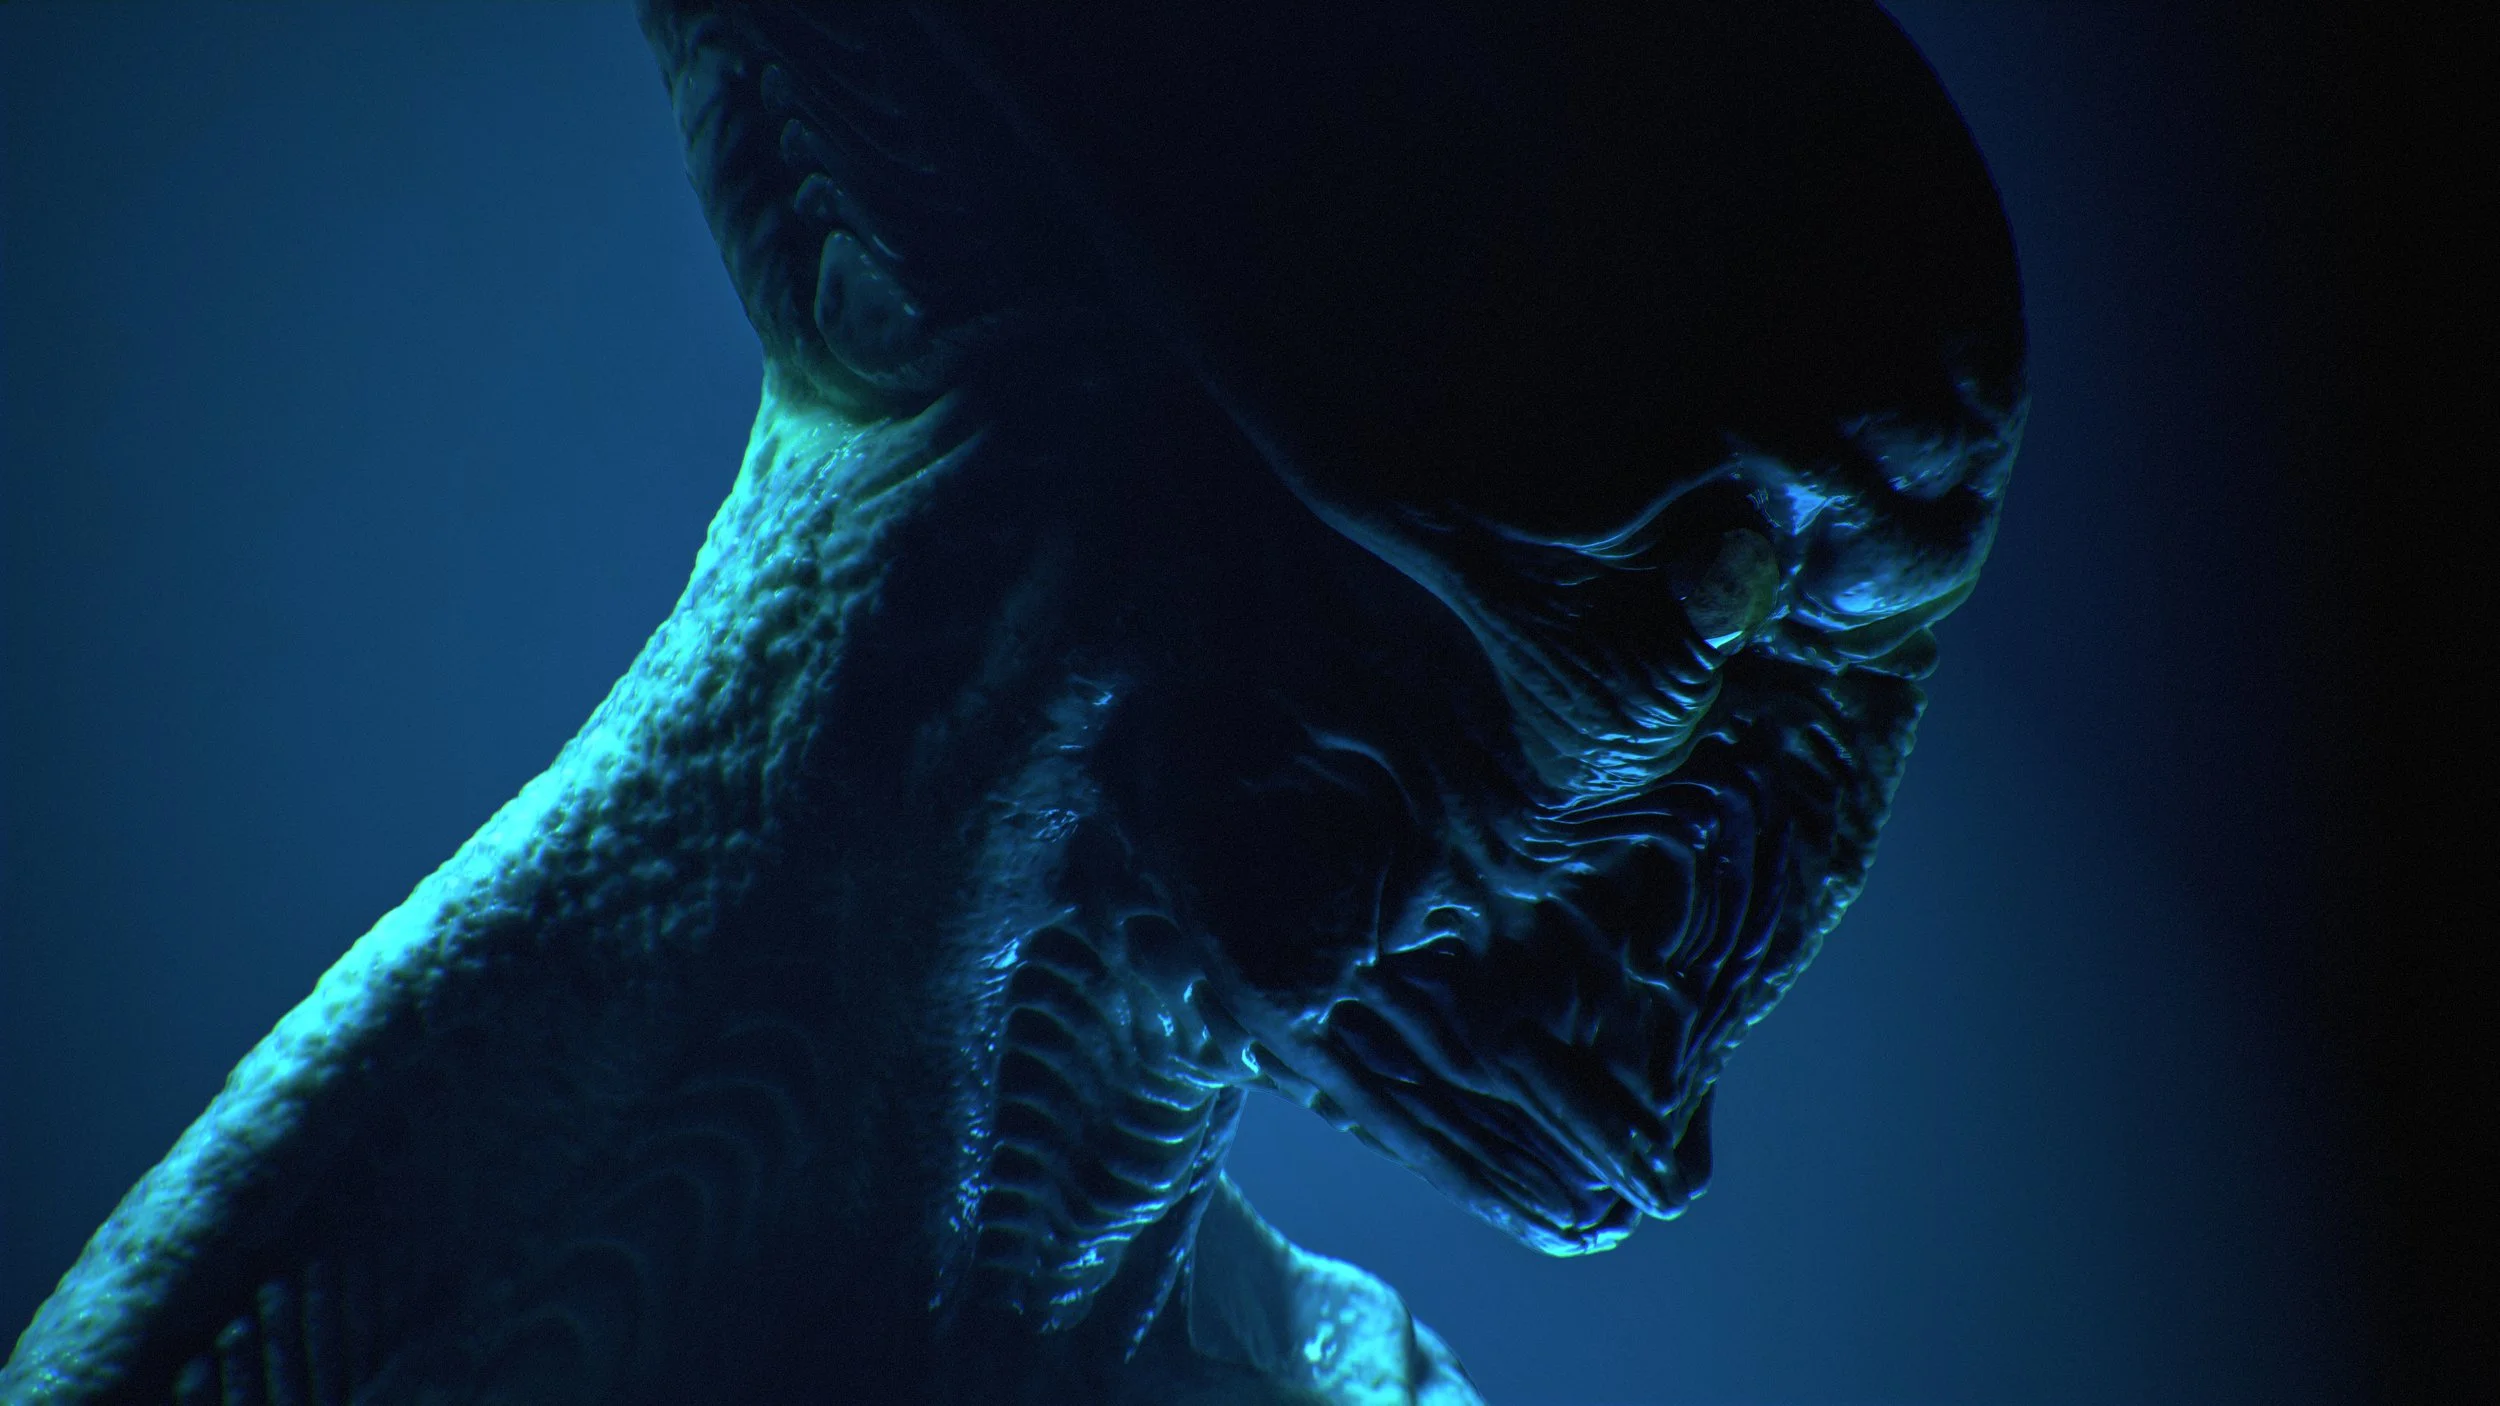
I also took time to dial in the lighting. Marmoset’s real-time HDR lighting tools are fast and intuitive, allowing for quick iterations with image-based lighting and additional rim or fill lights. I experimented with different mood setups - cool light from one side, warmer bounce from the other - to bring out the alien’s form and texture variation. Once the lighting and camera framing felt solid, I rendered several stills and turntables for presentation. This phase often brings a sense of closure, as the character takes on a new life under dramatic lighting - showcasing the hard work from earlier sculpting, texturing, and design stages.
Figure XX. Rendering in Marmoset Toolbag 5. Cinematic lighting adds the final touches.
Steps:
1.) Import textured model.
2.) Assign maps: Albedo, AO, Normal, SSS, Roughness.
3.) Setup 3-point lighting.
4.) Adjust FOV and camera framing.
5.) Turn on Ray-Traced rendering options.
6.) Export beauty renders and turntable.
Tip: Leverage the Shadow Catcher: For grounded subjects, use Marmoset’s shadow catcher plane to ground your model and add realism, especially for presentation shots that don’t require full environments.
Note: Match FOV from Substance: If you want your render to closely resemble your Substance view, make sure your Field of View (FOV) in Marmoset is set to match (typically around 35–50mm).
Lighting
After tweaking all of the various camera and lighting parameters I settle on a look that I like for the finished presentation. I kept a simple three-point lighting scenario, with volumetric fog, and all of the ray-traced rendering settings turned on. My computer rig is set up for this kind of heavy duty rendering so all in all it goes very fast.
Once your textures are dialed in and the model is imported into Marmoset Toolbag 5, lighting becomes the make-or-break factor in your presentation. Good lighting isn’t just about visibility — it’s about mood, form readability, and storytelling. That’s why most artists begin with a time-tested, flexible method: three-point lighting.
Why Three-Point Lighting?
This setup is an industry standard in film, photography, and CG because it’s designed to control both the shape and emotion of your subject. It sculpts the form, creates visual depth, and allows you to fine-tune shadows and highlights. It’s also modular — you can build from it, break it, or stylize it once you understand the basics.
The Three Lights
Marmoset Settings & Tips for Mood and Realism
1.) Use HDRI for Base Mood:
Start with a neutral HDRI (like “Studio” or “Photo Softbox”) to give ambient fill and global bounce. Then layer in your directional lights.
2.) Build One Light at a Time:
Solo each light when placing it. Add the Key Light first, lock the camera, then add the Fill, then Rim. Turn others off as you work to evaluate each one’s impact.
3.) Suggested Intensity Settings:
Adjust these based on the material of your alien. Wet skin? Increase rim intensity. Translucent ear? Light from behind to show SSS.
4. Light Radius & Falloff:
Tweak the radius of each light for softness - larger radius = softer light. Use linear falloff to mimic realistic light decay. This helps avoid “blown-out” highlights and preserves your sculpt’s subtleties.
Adding Atmosphere: Volumetric Fog
Volumetric fog simulates particles in the air that catch and scatter light — like dust, mist, or haze. It’s a subtle way to increase atmosphere and depth.
In Marmoset: Enable fog under the Scene Settings > Fog tab.
Keep the Density low (0.05–0.3).
Use fog color to match or contrast your background.
Use case: For alien or mysterious characters, volumetric fog enhances the sense of environment without needing a full scene or background.
Visual Fidelity: Ray-Traced Rendering
Ray tracing simulates real-world light behavior — how it bounces, reflects, and refracts. It’s what gives your renders cinematic realism.
In Marmoset Toolbag 5:
Enable it in the Render Settings panel (turn on “Ray Traced Shadows,” “Reflections,” “Global Illumination”).
It will increase render time but dramatically boosts quality, especially for subsurface scattering (SSS), reflections, and soft shadows.
Tip: Ray tracing lets you preview how light interacts with your alien’s translucent skin, reflective surfaces, or emissive elements in a physically realistic way.
Summary Tips:
Build your lighting one light at a time. Solo each one to evaluate its impact.
Use HDRIs for base ambient light, then sculpt with physical lights.
Save versions of your lighting setups to compare mood and silhouette readability.
5. Fog & Volumetrics (Optional):
A low-density volumetric fog (0.1–0.3) can add atmosphere. Use sparingly — it should complement, not obscure, your silhouette.
Bonus: Light Your Subject for Character
Don’t just light your model — light their personality. A noble alien might have gentle rim lighting and soft fill, while a mysterious, dangerous one benefits from harsh shadows and color contrast (like cool-blue rim vs. warm-orange key).
“Lighting is storytelling — every shadow and highlight is a narrative choice.”
Figure 8.0 - 3 Point lighting setup, a cool under light creates an eerie, otherworldly effect while the other lights describe form.
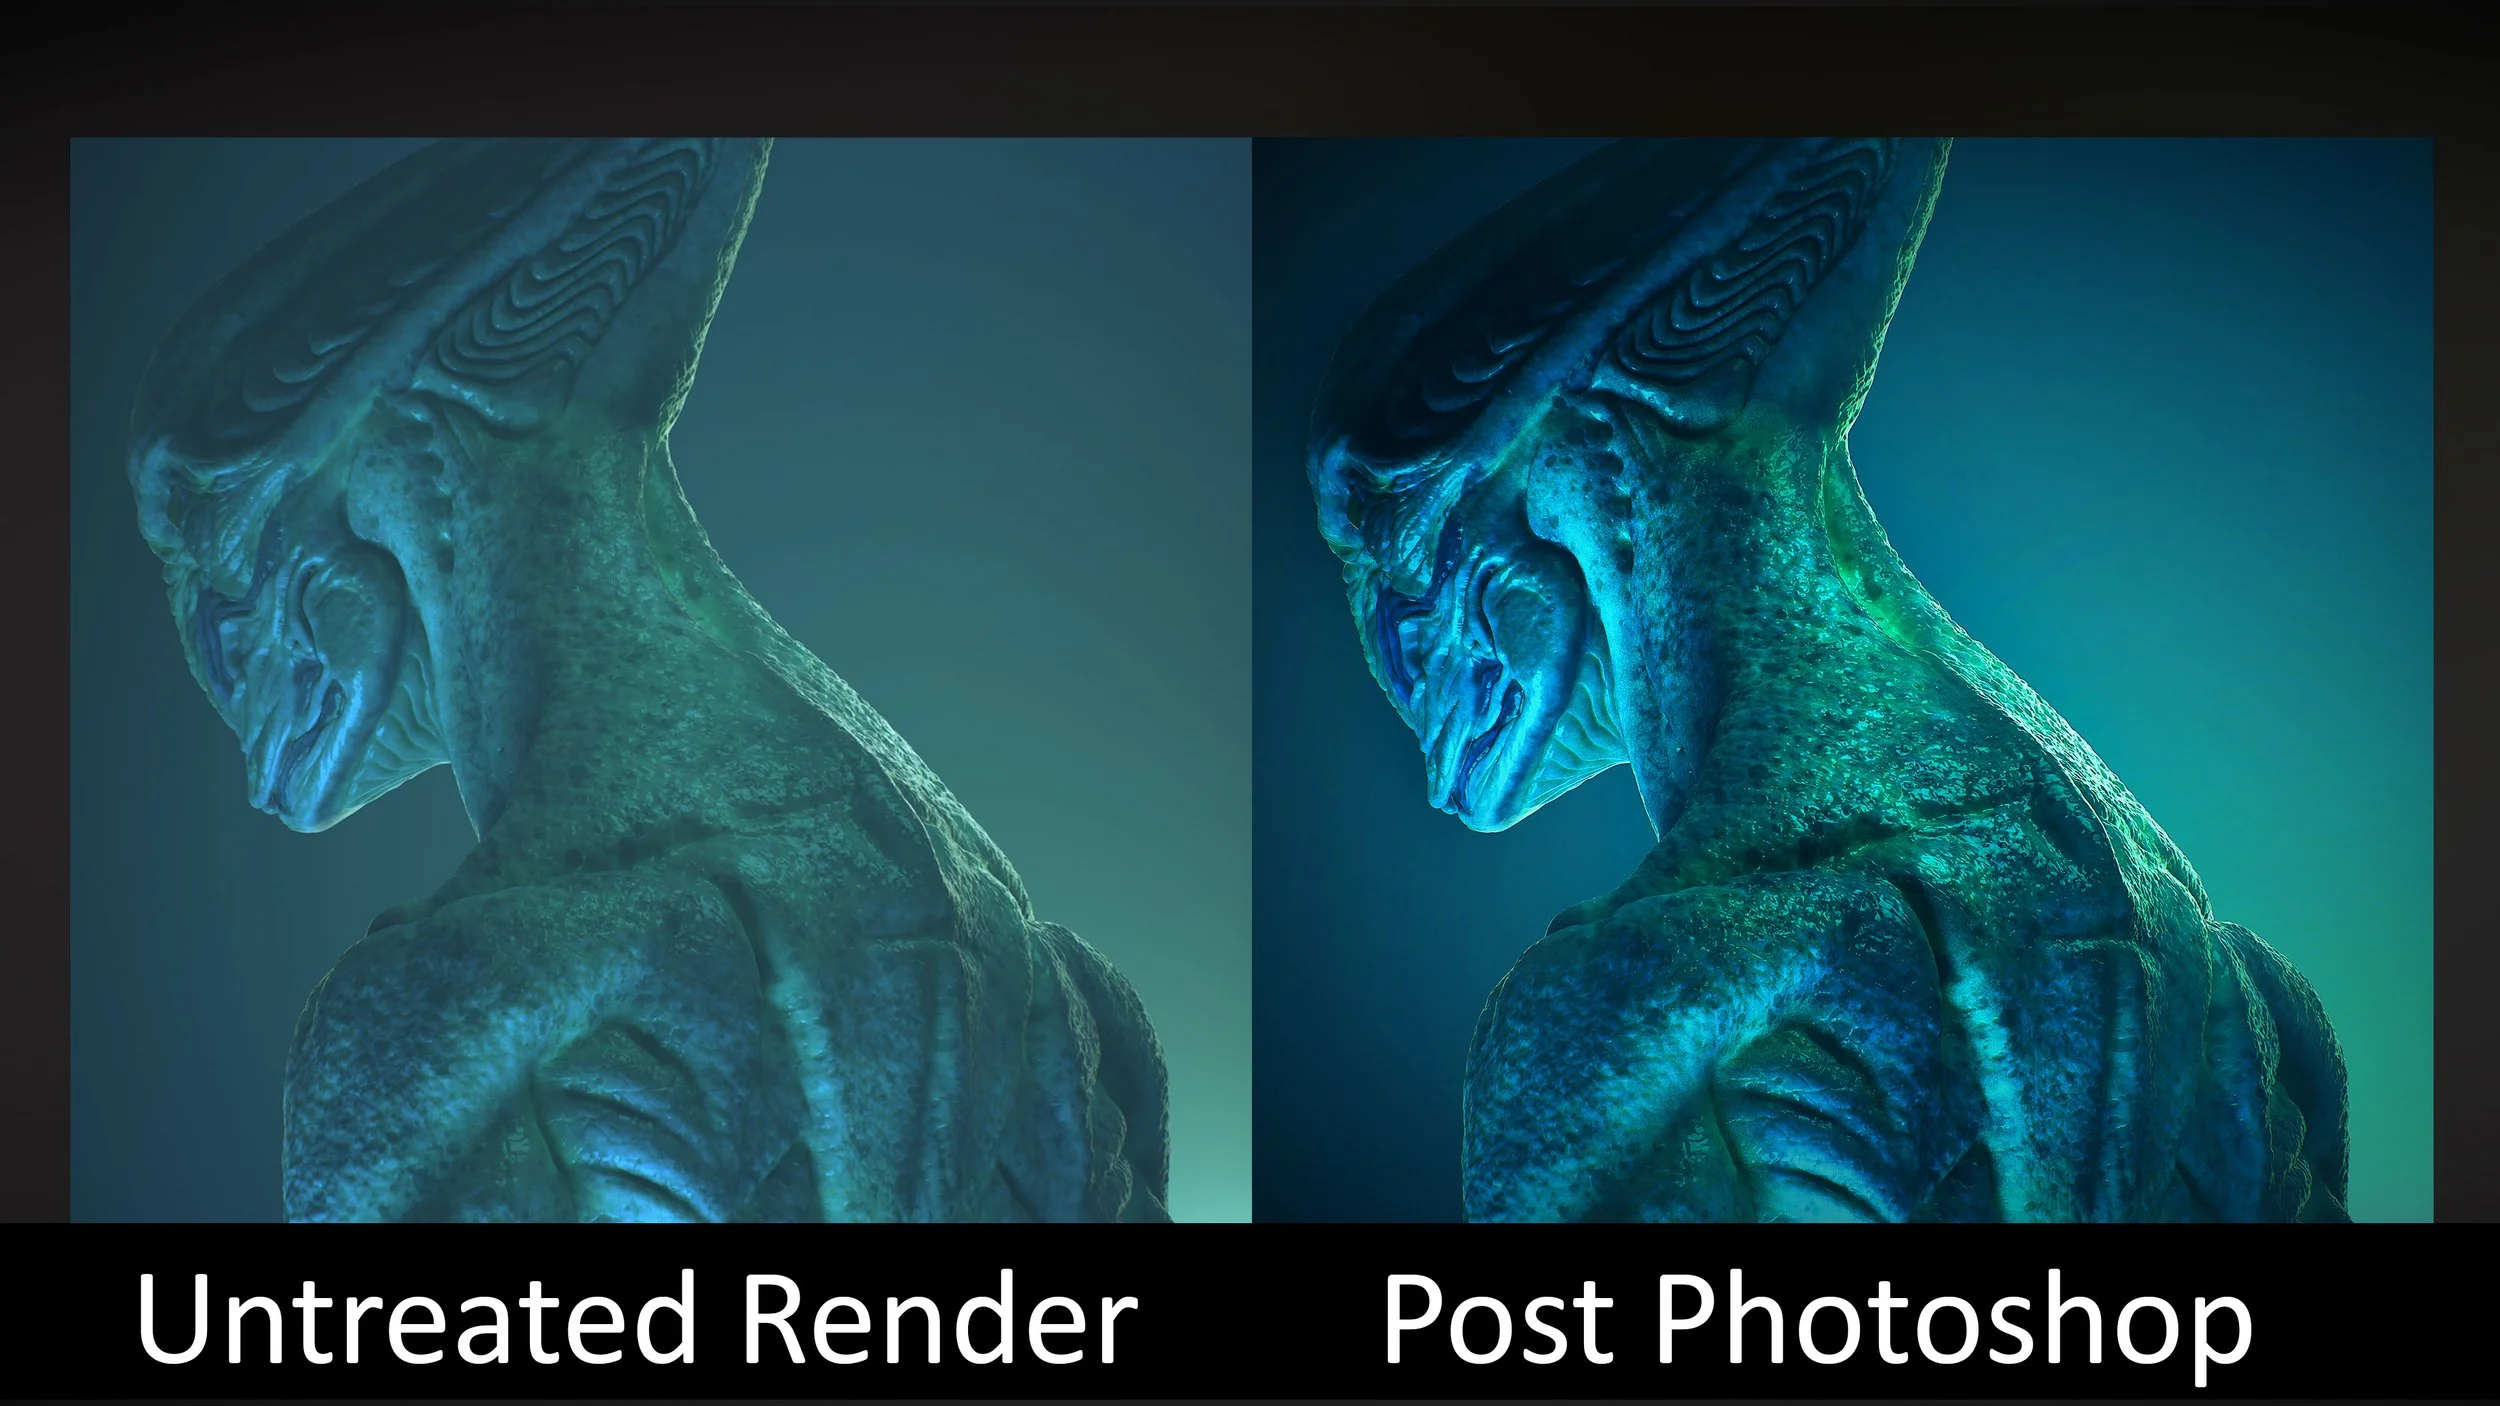
Post-Processing and Presentation Setup
Once I finalized the lighting and camera, I moved into post-processing inside Marmoset. While it’s tempting to rely solely on lighting, using subtle post adjustments can enhance your final output without the need for external compositing. I adjusted the exposure, added a slight vignette, and fine-tuned color grading with contrast and saturation curves to push the mood I wanted for the character. Marmoset also offers a bloom and sharpen pass—used in moderation, these help accentuate key highlights and crisp edges, especially around reflective or wet-looking surfaces.
Next, I prepared a series of presentation renders: a front-facing beauty shot, a dramatic profile, and a ¾ view to show off the silhouette. I also rendered a turntable and a clay pass to highlight the sculpted forms without textures. These types of renders are ideal for portfolios or client review. For each angle, I kept camera settings locked and only changed lighting subtly to maintain visual consistency. A clean, cinematic presentation helps not only to sell the character but also demonstrates a high level of professionalism and polish.
Tip: Build your light rigs one light at a time. Isolated lights during setup will help you gauge their individual contributions to the scene.
Note: Three-Point Isn’t a Rule—It’s a Starting Point: Don’t feel locked into traditional setups. You can adapt the three-point method to suit mood, environment, or storytelling intent.
Final Presentation: Making Your Alien Shine
Because it’s fun I try out a few different looks using various presets that come with the program. As well as a few different camera angles and lighting setups. I might even take the images into Photoshop for some minor color adjustments and so on, but the renders as is are fantastic and I don’t think I need to.
Figure 8.00 -
After sculpting, texturing, and lighting your alien ambassador, your final presentation is where everything comes together. This stage isn’t just about visual polish - it’s about communicating character, story, and professionalism. Whether you’re preparing portfolio shots, applying for a job, or presenting to a client or director, your presentation should tell a story at a glance.
Goals of the Final Presentation
Showcase your design clearly and cinematically
Highlight key anatomical or stylistic choices
Control the viewer’s eye through lighting and framing
Demonstrate rendering and post-processing skills
Refining in Photoshop: Post-Processing Tips
Optional, but highly effective - post-processing helps unify tone, balance brightness, and fix small distractions without re-rendering.
Here’s a starter guide for Photoshop (or Lightroom):
Basic Post Stack:
1.) Curves Adjustment Layer
Purpose: Adjust global contrast.
Tip: Slight S-curve to deepen shadows and lift highlights.
2.) Color Balance or Selective Color
Purpose: Adjust mood.
Tip: Shift midtones toward blue/cyan for alien vibe; warm highlights for soft flesh.
3. ) Vignette (Gradient Fill or Radial Filter)
Purpose: Focus viewer’s eye.
Tip: Use dark gray, low opacity (~10–20%) around edges.
4.) High Pass Sharpening (Optional)
Duplicate render layer > Filter > Other > High Pass (~1.0 px) > set to Overlay.
Adds subtle edge pop to sculpted forms.
5.) Cleanup with Spot Healing or Clone Stamp
Use to fix: Polygonal edges, render glitches, or unwanted highlights.
Bonus: Lightroom as a Fast Alternative
Load renders into Lightroom.
Use Presets or LUTs to experiment with mood instantly.
Adjust Exposure, Contrast, Texture, Clarity sliders for stylized looks.
Export multiple mood versions easily.
Visual Comparison Block (Optional for Layout Team)
This panel will combine multiple renders of the same model into a single composite image, allowing readers to visually compare different presentation techniques. The following views should be included:
1.) Front View (Neutral Lighting)
A straight-on render of the model with neutral, even lighting.
The purpose is to show the sculpture’s form without dramatic shadows or color grading, making it easy to assess proportions and detail.
2.) Three-Quarter View (Dramatic Rim Lighting)
A ¾ angle render with strong rim lighting to emphasize silhouette and edge highlights.
This view should convey depth and drama, drawing attention to the model’s outline and key features.
3.) Profile View with Volumetric Fog
A side-profile render incorporating volumetric fog for atmosphere.
This effect should create a sense of depth and mood, while still keeping the primary features visible.
4.) Final Photoshop or Lightroom-Enhanced Version
A fully post-processed version of the model using Photoshop, Lightroom, or a similar tool.
Enhancements may include color correction, contrast adjustments, sharpening, and any additional compositing elements that improve presentation.
These four renders should be arranged into a single, cohesive panel for easy side-by-side comparison. The goal is to clearly demonstrate how different camera angles, lighting setups, atmospheric effects, and post-processing choices can dramatically change the presentation and impact of a final 3D render.
Figure 8.00 - Presentation design for angle variation of the alien