Week 1
Getting Functional Inside ZBrush
This week we will cover…
Navigating the UI and Basic Sculpting: Primitive vs Polymesh3D, Dynamesh, Subtools, Sculpting Brushes
Week 1 Archive
-
Date Time: 2026-01-30 23:56:16
Location: [Insert Location]
Instructor: [Insert Name]
Summary
The lecture series on 2026-01-30 presents a comprehensive, hands-on introduction to ZBrush’s interface philosophy, sculpting workflows, navigation, brush systems, topology strategies, and production practices. The instructor frames ZBrush’s UI/UX using real-world spatial design analogies (airport signage, VR zones) to explain how the interface pushes menus aside to keep artists focused on the canvas, highlighting primary, secondary, and curiosity zones and the relationship between UI and UX. Students learn to initialize ZBrush, arrange trays and dock palettes, distinguish 2.5D pixols (legacy, texture-focused) from true 3D sculpting, and reliably enter 3D mode (press T and confirm the head icon). The session covers primitives versus PolyMesh3D and starting with Dynamesh Sphere 64 for sculpting, including brush usage (SnakeHook, Clay Buildup, Damien Standard), Dynamesh remeshing via Ctrl-drag to redistribute topology, resolution management, and practical pitfalls like stretched geometry and staying out of 2.5D.
Core navigation includes pan (Alt + press), zoom (Alt tap off model then release), frame (F), UI toggle (Tab), camera angle locking (Shift while rotating), and symmetry toggling (X) with clear indicators. Workflow foundations compare Dynamesh and Sculptress Pro: use Dynamesh early for global redistribution and fast iteration, smooth artifacts with Shift, and retopologize later; use Sculptress Pro for localized adaptive triangulation and fine detail with smaller brush sizes, including dissolving unwanted geometry with Shift on large brushes. The instructor provides broader production context, championing mistake-friendly exploration, a core set of brushes, and stylus use for pressure sensitivity. Students practice masking (Ctrl), selection with Ctrl+Shift (including lasso and edge loop operations), visibility toggling, inverted selections with Alt, and double-sided viewing via “Double.”
Cutting/slicing tools are demonstrated: Knife Curve for clean volume removal (start/end off-model, respects symmetry, triangulates only along the cut), Trim Curve caveats (messier triangulation and symmetry issues), Clip Curve for compressing geometry without removing volume, and Slice Curve for polygroups. Bezier and angled clip operations use Alt taps; perspective should be disabled for accurate clip results; PolyFrame reveals clipped topology, with re-Dynamesh recommended to fix stretching. Students learn centering with the floor grid and Deformation > Unify, history scrubbing via the orange dot (broad undos with overwrite prompts), document/canvas controls (upper canvas vs lower camera controls), and border visibility via Document > Range.
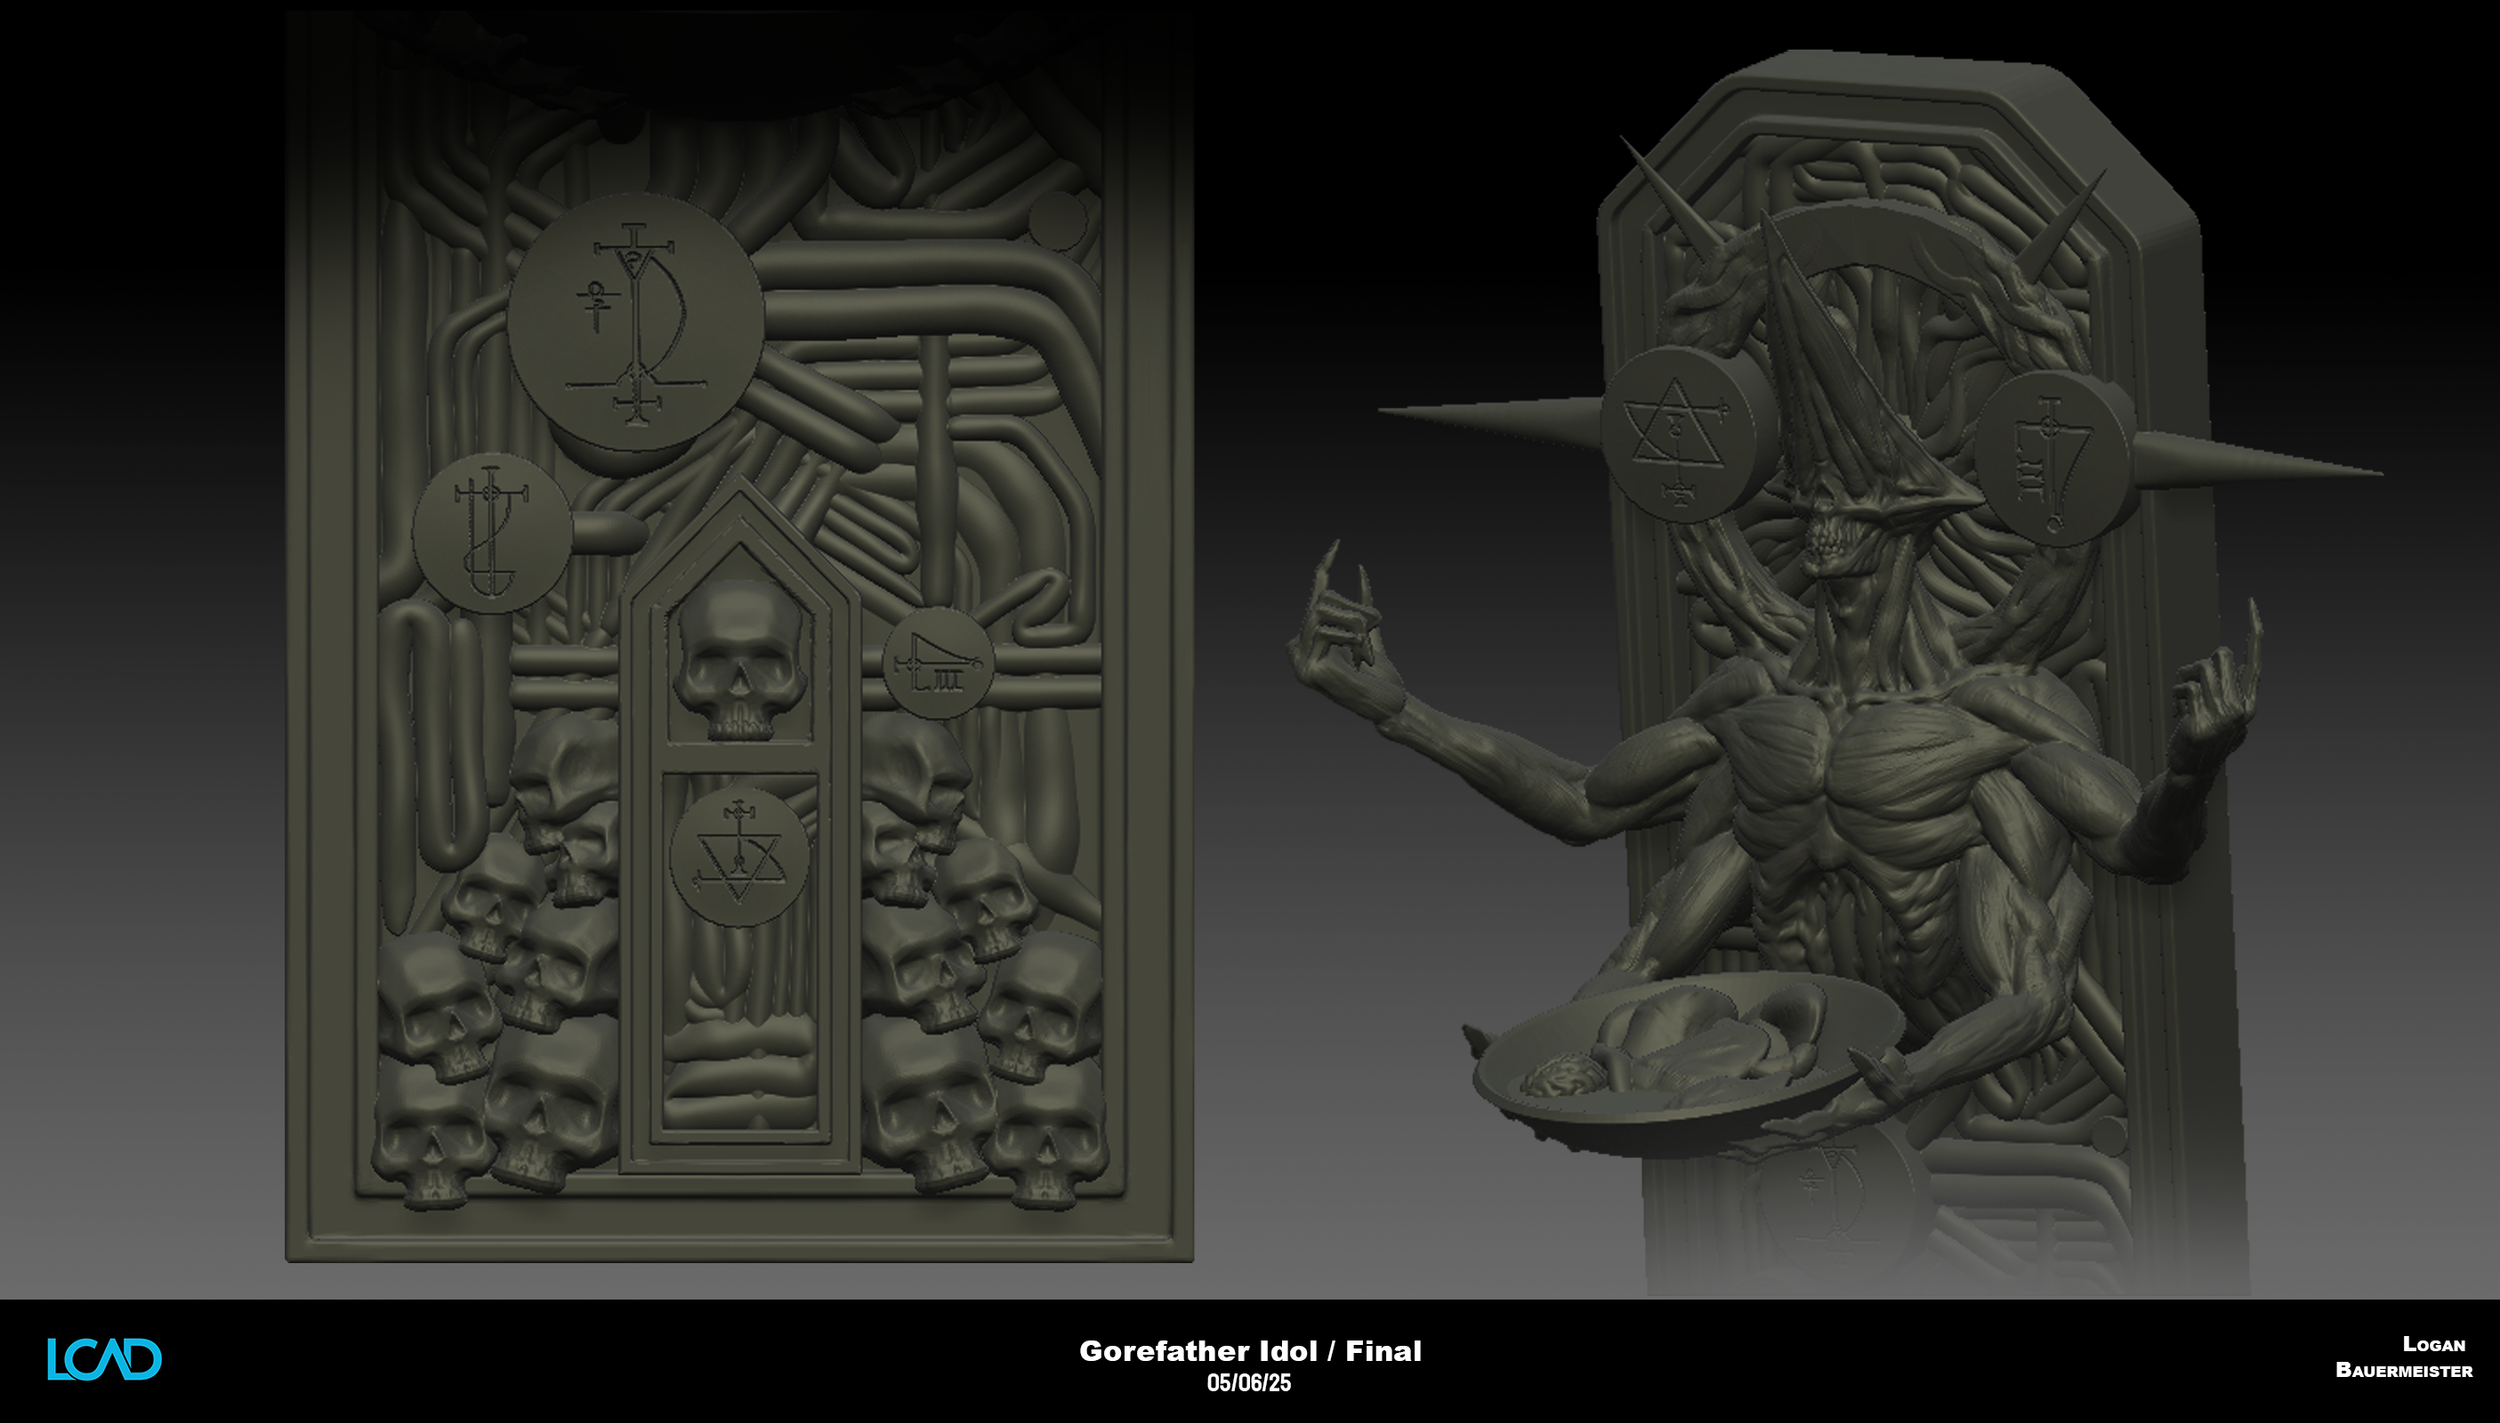
The course transitions into Project 1: building a skull-like form using the Chaos Brush and pinhead starter models from the instructor’s website (promo code LCAD for free assets), layering and variant generation (~15 layers to produce 50–100 designs rapidly), Dynamesh merges and subtractive steps for cavities, and a disciplined progression from primary to secondary to tertiary forms to avoid premature detailing. The instructor stresses watertight geometry for 3D printing, anatomical awareness, and modular subtools (e.g., separate teeth). System-specific constraints temporarily discourage Knife brushes in one classroom; students use Clip brushes and polygroups as a workaround.
Later sessions outline a production topology pipeline: transitioning from dense Dynamesh to clean, optimizable topology using ZRemesher and subdivisions, then projecting detail from the original mesh. ZRemesher guides can steer edge flow; duplicate and subdivide the ZRemeshed model, project details, and archive the original Dynamesh. The lecture expands into alphas for rapid surface detailing at low intensity, creative texture sourcing (e.g., turning photos into alphas), Insert Multi Mesh (IMM) brush setup and control (disable randomization via Brush > Modifiers > Multimesh), and Mesh from Brush. Polygroups and automasking (Mask by Polygroups at 100) facilitate isolated edits; gizmo (W) and Transpose Classic enable precise pivot control, duplication with Ctrl-drag, and rhythmic spacing in sequences. An automated ZBrush-to-Photoshop pipeline captures multi-view snapshots and passes alpha channels for ready-to-use slide layouts.
Professional context includes the instructor’s background in medical animation/illustration, long-term ZBrush engagement, education and mentoring, beta testing, and an in-progress ZBrush book on Amazon preorder. Classroom policy permits AI for textures/reference with citation, forbids client-facing AI outputs presented as original work, and recommends authoritative resources (Frank Netter) and industry sketches (Neville Page). Students are advised to set up Chrome Remote Desktop for reliable file access, anticipate version quirks, and prepare for next steps: a recap email, review of week one materials, a short quiz next class, and continued practice on navigation, brush systems, Dynamesh vs Sculptress Pro, cutting tools, polygroups, optimized topology workflows, and presentation preparation.
Knowledge Points
1. ZBrush Interface Philosophy and UI/UX
Menus are minimized to prioritize canvas-centric creation; panels can be hidden/collapsed once tool locations are understood.
Spatial analogies help organize attention: primary (canvas), secondary (active tool adjustments), curiosity cues guiding natural reactions.
UI relates to UX through studied 3D/VR design principles; legacy menus are retained for veteran workflows.
2. Initialization, Workspace, and 2.5D vs 3D
Trays and palettes: double arrows toggle trays; dock menus by dragging the circle-with-line icon; undock by dragging to canvas.
Initialize ZBrush via Preferences > Initialize ZBrush; Ctrl+N clears 2.5D canvas but not 3D objects.
Pixols carry depth but are not sculptable 3D; drag a primitive, press T to enter 3D, convert to PolyMesh3D to sculpt.
3. Primitives, PolyMesh3D, and Dynamesh Sphere 64
Primitives allow parameter previews but cannot be sculpted; Make PolyMesh3D unlocks sculpt tools.
Start with Lightbox > Project > Dynamesh Sphere 64; manage resolution in Tool > Geometry > Dynamesh; remesh with Ctrl-drag off-model; increase resolution gradually.
4. Navigation, Symmetry, and Verification
Pan (Alt + press), zoom (Alt tap off-model then release), frame (F), hide/show UI (Tab).
Lock rotation with Shift; symmetry toggle X shows mirrored dots or faint inner circle when zoomed.
5. Core Brushes and Size Control
Clay Buildup (B C B): build/subtract volume; Alt to carve.
SnakeHook (B S H): pull/extrude silhouettes; pairs well with Dynamesh and Sculptress Pro.
Damien Standard (B D S): crisp lines and fine detail.
Brush size via S or Spacebar; Dynamic toggle controls apparent size scaling with zoom.
6. Dynamesh vs Sculptress Pro
Dynamesh: global topology redistribution; ideal early for blockout; can wash out fine detail; smooth artifacts with Shift; enable in Tool > Geometry > Dynamesh.
Sculptress Pro: localized adaptive triangulation under the brush; small sizes add fine detail; can dissolve geometry with Shift; M shows insert items; turn off PolyFrame to better see detailing.
7. Masking, Selection, Polygroups, and Double-sided Viewing
Masking: Ctrl to mask; Ctrl+Alt subtract; invert by Ctrl tap off-model.
Selection: Ctrl+Shift to hide/show visibility; Alt inverts selection; lasso stroke supports repositioning; edge loop selection along “train tracks”; expand (X), shrink (S), select all (A).
Polygroups: assign with Ctrl+W; use Polyframe; tap Ctrl+W repeatedly for contrasting colors; Mask by Polygroups at 100 for targeted edits.
Double: enables inside/outside visibility for interior work.
8. Cutting, Clipping, and Slicing Tools
Knife Curve: start/end off-model, respects symmetry, removes volume cleanly; Alt taps add curve points or angles; triangulates only along the cut.
Trim Curve: less reliable symmetry, can produce messy triangulation.
Clip Curve: compresses geometry; avoid clipping toward center line with symmetry on; inspect topology with PolyFrame and re-Dynamesh if needed.
Slice Curve: creates polygroups by slicing without removing volume; useful for hard surface workflows.
Bezier/angle creation with Alt taps; turn off Perspective for accurate clip results; move active strokes with Ctrl+Shift + Spacebar.
9. Centering, History, Canvas/Document Controls
Floor grid reveals off-center models; Deformation > Unify re-centers and resets scale.
Orange history dot scrubs back; confirm overwrite prompts to revert broadly.
Upper controls (Scroll, Zoom, Actual, Half) affect canvas; lower controls (Move, Zoom, Rotate) affect camera; Document > Range clarifies canvas borders.
10. Performance, Architecture, and Tool Limits
ZBrush: subdivides up to ~64M polygons; typical working limits ~14M; Geometry HD exceeds a billion (not covered).
CPU/RAM-driven brush system; GPU mainly for rendering.
Blender often becomes choppy around ~10M polygons; Nomad referenced without specific limits.
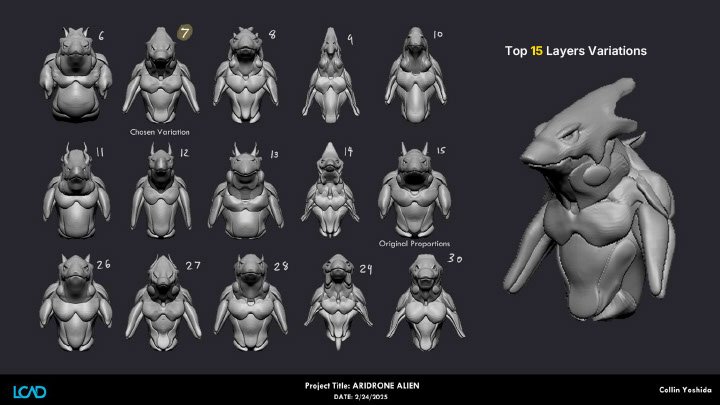
11. Project 1: Additive Process, Variants, and Deliverables
Use Chaos Brush and pinheads to add clay-like pieces; create ~15 layers; combine sliders to generate 50–100 variants quickly; follow primary→secondary→tertiary progression; avoid premature detail.
Dynamesh merges and subtractive operations open cavities; ensure watertight meshes for 3D printing; model teeth as separate subtools; focus on anatomical storytelling.
Access assets free with promo code LCAD; downloads available via site and email.
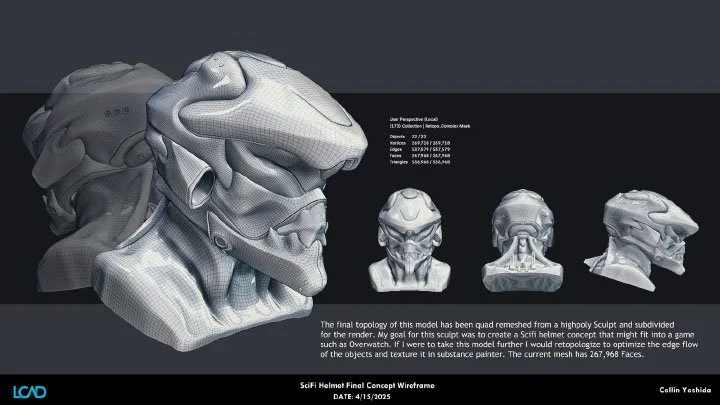
12. Topology Pipeline: ZRemesher, Subdivisions, and Projection
Transition from dense Dynamesh to clean topology with ZRemesher; use guides when needed.
Duplicate mesh: ZRemesh one copy; subdivide; project details from original Dynamesh; archive source; continue detailing on optimized mesh; maintain believable surface flow.
13. Alphas, IMM Brushes, and Controlled Placement
Import alphas; use low intensity; blend across surfaces; creative photo-to-alpha sourcing accelerates realism.
IMM setup: add via cart and coupon; double-click to load; press M to pick items; disable randomization by setting Brush > Modifiers > Multimesh to 0; Geometry > Modify Topology > Mesh from Brush replaces the mesh.
Gizmo (W) and Transpose Classic: set pivots with Alt; mask control for isolated manipulation; duplicate with Ctrl-drag; establish rhythmic spacing by releasing Ctrl mid-drag.
14. Presentation Pipeline and Classroom Policy
Automated multi-view snapshot pipeline sends images with alpha channels to Photoshop for slide layouts; iterate compositions in Photoshop.
AI permitted for textures/references with citation; prohibited for client-facing deliverables presented as original; use industry references (Netter, Neville Page).
15. Logistics, Troubleshooting, and Next Steps
Temporary Knife brush system issues in one classroom; use Clip brushes and polygroups as a workaround.
Version quirks may affect Lightbox/interface; quick keys: Q for Draw, W for Gizmo; clear masks with Ctrl-drag off-model.
Set up Chrome Remote Desktop for cross-location file access.
Post-class: expect a recap email, review week one materials, prepare for a short quiz next class, and continue practicing covered techniques.
-
Subject
ZBrush Interface Dynamesh Sculptris Pro Brush System Navigation Polygroups Masking & Clipping Project 1 Workflow Topology
Knowledge Point Summary
Interface Philosophy & Navigation: An overview of the ZBrush UI design (Primary/Secondary/Curiosity zones) aimed at maximizing creation space, coupled with specific navigation controls (Alt + Stylus/Click) and the "Airport Analogy" for understanding information hierarchy.
Geometry Systems (Dynamesh vs. Sculptris Pro): A comparison of two core geometry engines. Dynamesh (starting via Lightbox) recalculates the entire global topology to fix stretching, while Sculptris Pro utilizes dynamic tessellation to add/reduce geometry locally in real-time based on brush size.
Brush System, Shortcuts, & Customization: Essential keystrokes for tool access (e.g., B-C-B for Clay Buildup, B-S-H for Snake Hook), pressure sensitivity usage, and methods for installing custom brushes (Insert Mesh) and managing UI trays.
2.5D vs. 3D Modes: Explanation of the default "Pixol" state versus true 3D sculpting mode, including the necessity of converting standard Primitives to "Make PolyMesh 3D" to enable sculpting tools.
Selection, Masking, & Visibility: Advanced object management using modifier keys (Ctrl, Shift, Alt) to mask areas, toggle visibility with Polygroups, and isolate specific geometry for detailed work.
Hard Surface Tools (Clip/Trim/Knife): Techniques for flattening or cutting geometry using Clip and Trim brushes, with a note on avoiding the Knife Curve brush due to specific classroom hardware limitations.
Project 1 Workflow (Chaos Brush): A methodology for additive sculpting using a custom "Chaos Brush" and layers to generate 50-100 variants rapidly, moving from primary to tertiary details to create a watertight, printable model.
Topology Optimization & Presentation: The pipeline for transitioning from Dynamesh to clean topology using ZRemesher and projection, alongside strategies for presentation (automated Photoshop export with alpha channels) and file accessibility via remote desktop.
Knowledge Point Explanation
1. Interface Philosophy & Navigation
Key Points
Airport Analogy: Menus are like airport information screens (Output) placed peripherally; the Canvas is the traveler's path (Primary Zone).
Reset: Use Preferences > Initialize ZBrush to clear the workspace.
Navigation: Alt + Click & Drag = Pan; Alt + Click (release Alt) + Drag = Zoom.
Camera Locking: Hold Shift while rotating to snap/lock the view to an orthographic angle.
Explanation
The interface is designed to minimize menu surfing and maximize canvas presence. The instructor compares the UI to a chaotic airport where non-essential info (secondary zones) is pushed to the periphery, leaving the center clear for work.
Navigation: While buttons exist for Move/Zoom/Rotate, shortcuts are essential. Pan is Alt+Drag; Zoom requires holding Alt, clicking, releasing Alt, then dragging.
Centering: If a model gets lost, pressing F frames it. If it moves off the world center, Deformation > Unify recenters it.
2. Geometry Systems (Dynamesh vs. Sculptris Pro)
Key Points
Dynamesh: Recalculates global topology. Good for blocking out. Fixes stretching by holding Ctrl + Dragging on the background.
Sculptris Pro: Adds local geometry (triangles) dynamically. Good for organic extrusions and details. Activated via the "S" symbol or specific brushes like Snake Cactus.
Resolution: Dynamesh resolution should be increased incrementally (e.g., start at 64, move to 200). Avoid jumping to 4096.
Explanation
Dynamesh Workflow: Start with a "Dynamesh 64" project. As you push/pull geometry, polygons stretch. Dragging a mask on the background re-Dynameshes the object, redistributing the wireframe to support the new form.
Sculptris Pro: Unlike Dynamesh, this tool tessellates only where the brush touches. Large brushes create large triangles; small brushes create fine details. This allows for infinite extrusion (e.g., growing branches on branches) without global recalculation.
3. Brush System, Shortcuts, & Customization
Key Points
Selection Shortcuts: Hit B (Brush Menu) -> First Letter (e.g., C) -> Specific Letter (e.g., B) for Clay Buildup.
Essential Brushes: Snake Hook (B-S-H) for pulling forms; Clay Buildup (B-C-B) for adding volume/muscle.
Modifiers: Alt inverts the brush (carves in); Shift smooths.
Dynamic Size: Toggle "Dynamic" on the Draw Size slider to control if the brush scales with the model or the screen.
Explanation
ZBrush relies heavily on shortcuts for speed. The instructor emphasizes using a Wacom stylus (2048 pressure levels) over a mouse (constant 100% intensity). Custom brushes, such as Insert Mesh brushes, can be downloaded and loaded directly. For manipulation, the Gizmo and Transpose tools allow users to move, scale, and rotate objects, or duplicate them by holding Ctrl while dragging.
4. 2.5D vs. 3D Modes
Key Points
Pixol: A pixel with depth information.
Switching Modes: Press T to toggle between 2.5D painting and 3D Edit Mode.
Primitives: Standard primitives are just previews; click "Make PolyMesh 3D" to sculpt on them.
Clear Canvas: Ctrl + N clears 2.5D stamps/clutter.
Explanation
ZBrush opens in 2.5D mode by default, where drawing creates "Pixols" (texture+depth) but not 3D geometry. Beginners often create multiple "stamps" of a model. To sculpt, one must draw a tool, press T to enter Edit Mode, and ensure the object is a PolyMesh3D. If the canvas becomes cluttered with non-editable copies, Ctrl + N wipes it clean.
5. Selection, Masking, & Visibility
Key Points
Masking (Ctrl): Protects areas from sculpting. Ctrl + Click off-model inverts mask; Ctrl + Drag clears it.
Visibility (Ctrl + Shift): Green box isolates geometry; Alt (turns Red) hides geometry.
Polygroups: Ctrl + W groups visible polygons. Useful for isolating parts (e.g., an ear).
Shortcuts: Ctrl+Shift+X (Expand), Ctrl+Shift+S (Shrink), Ctrl+Shift+A (Select All).
Explanation
Managing what part of the model is active is crucial.
Masking: Allows for selective editing. The "Lasso" stroke type is recommended for speed.
Polygroups & Visibility: Users can hide parts of a mesh to reach obscured areas (like inside a mouth). The "Double" display setting is recommended to see backfaces.
6. Hard Surface Tools (Clip/Trim/Knife)
Key Points
Clip Curve (Ctrl + Shift): Smashes vertices to a flat line. Does not delete geometry; requires Dynamesh to fix stretched polygons.
Knife Curve: Physically cuts and closes geometry (topology-aware).
Classroom Warning: Due to hardware restrictions, the Knife Curve may crash specific lab computers; use Clip/Trim brushes instead.
Technique: Use Alt once for a curve, double-tap Alt for a sharp angle.
Explanation
The instructor compares cutting vs. smashing. The Knife tool creates clean geometry at the cut but is currently unstable in the lab. The Clip/Trim tools flatten the existing mesh against a curve. While effective for silhouette work, they create messy triangulation on concave shapes (e.g., a Pac-Man mouth) and require re-Dynameshing to clean up.
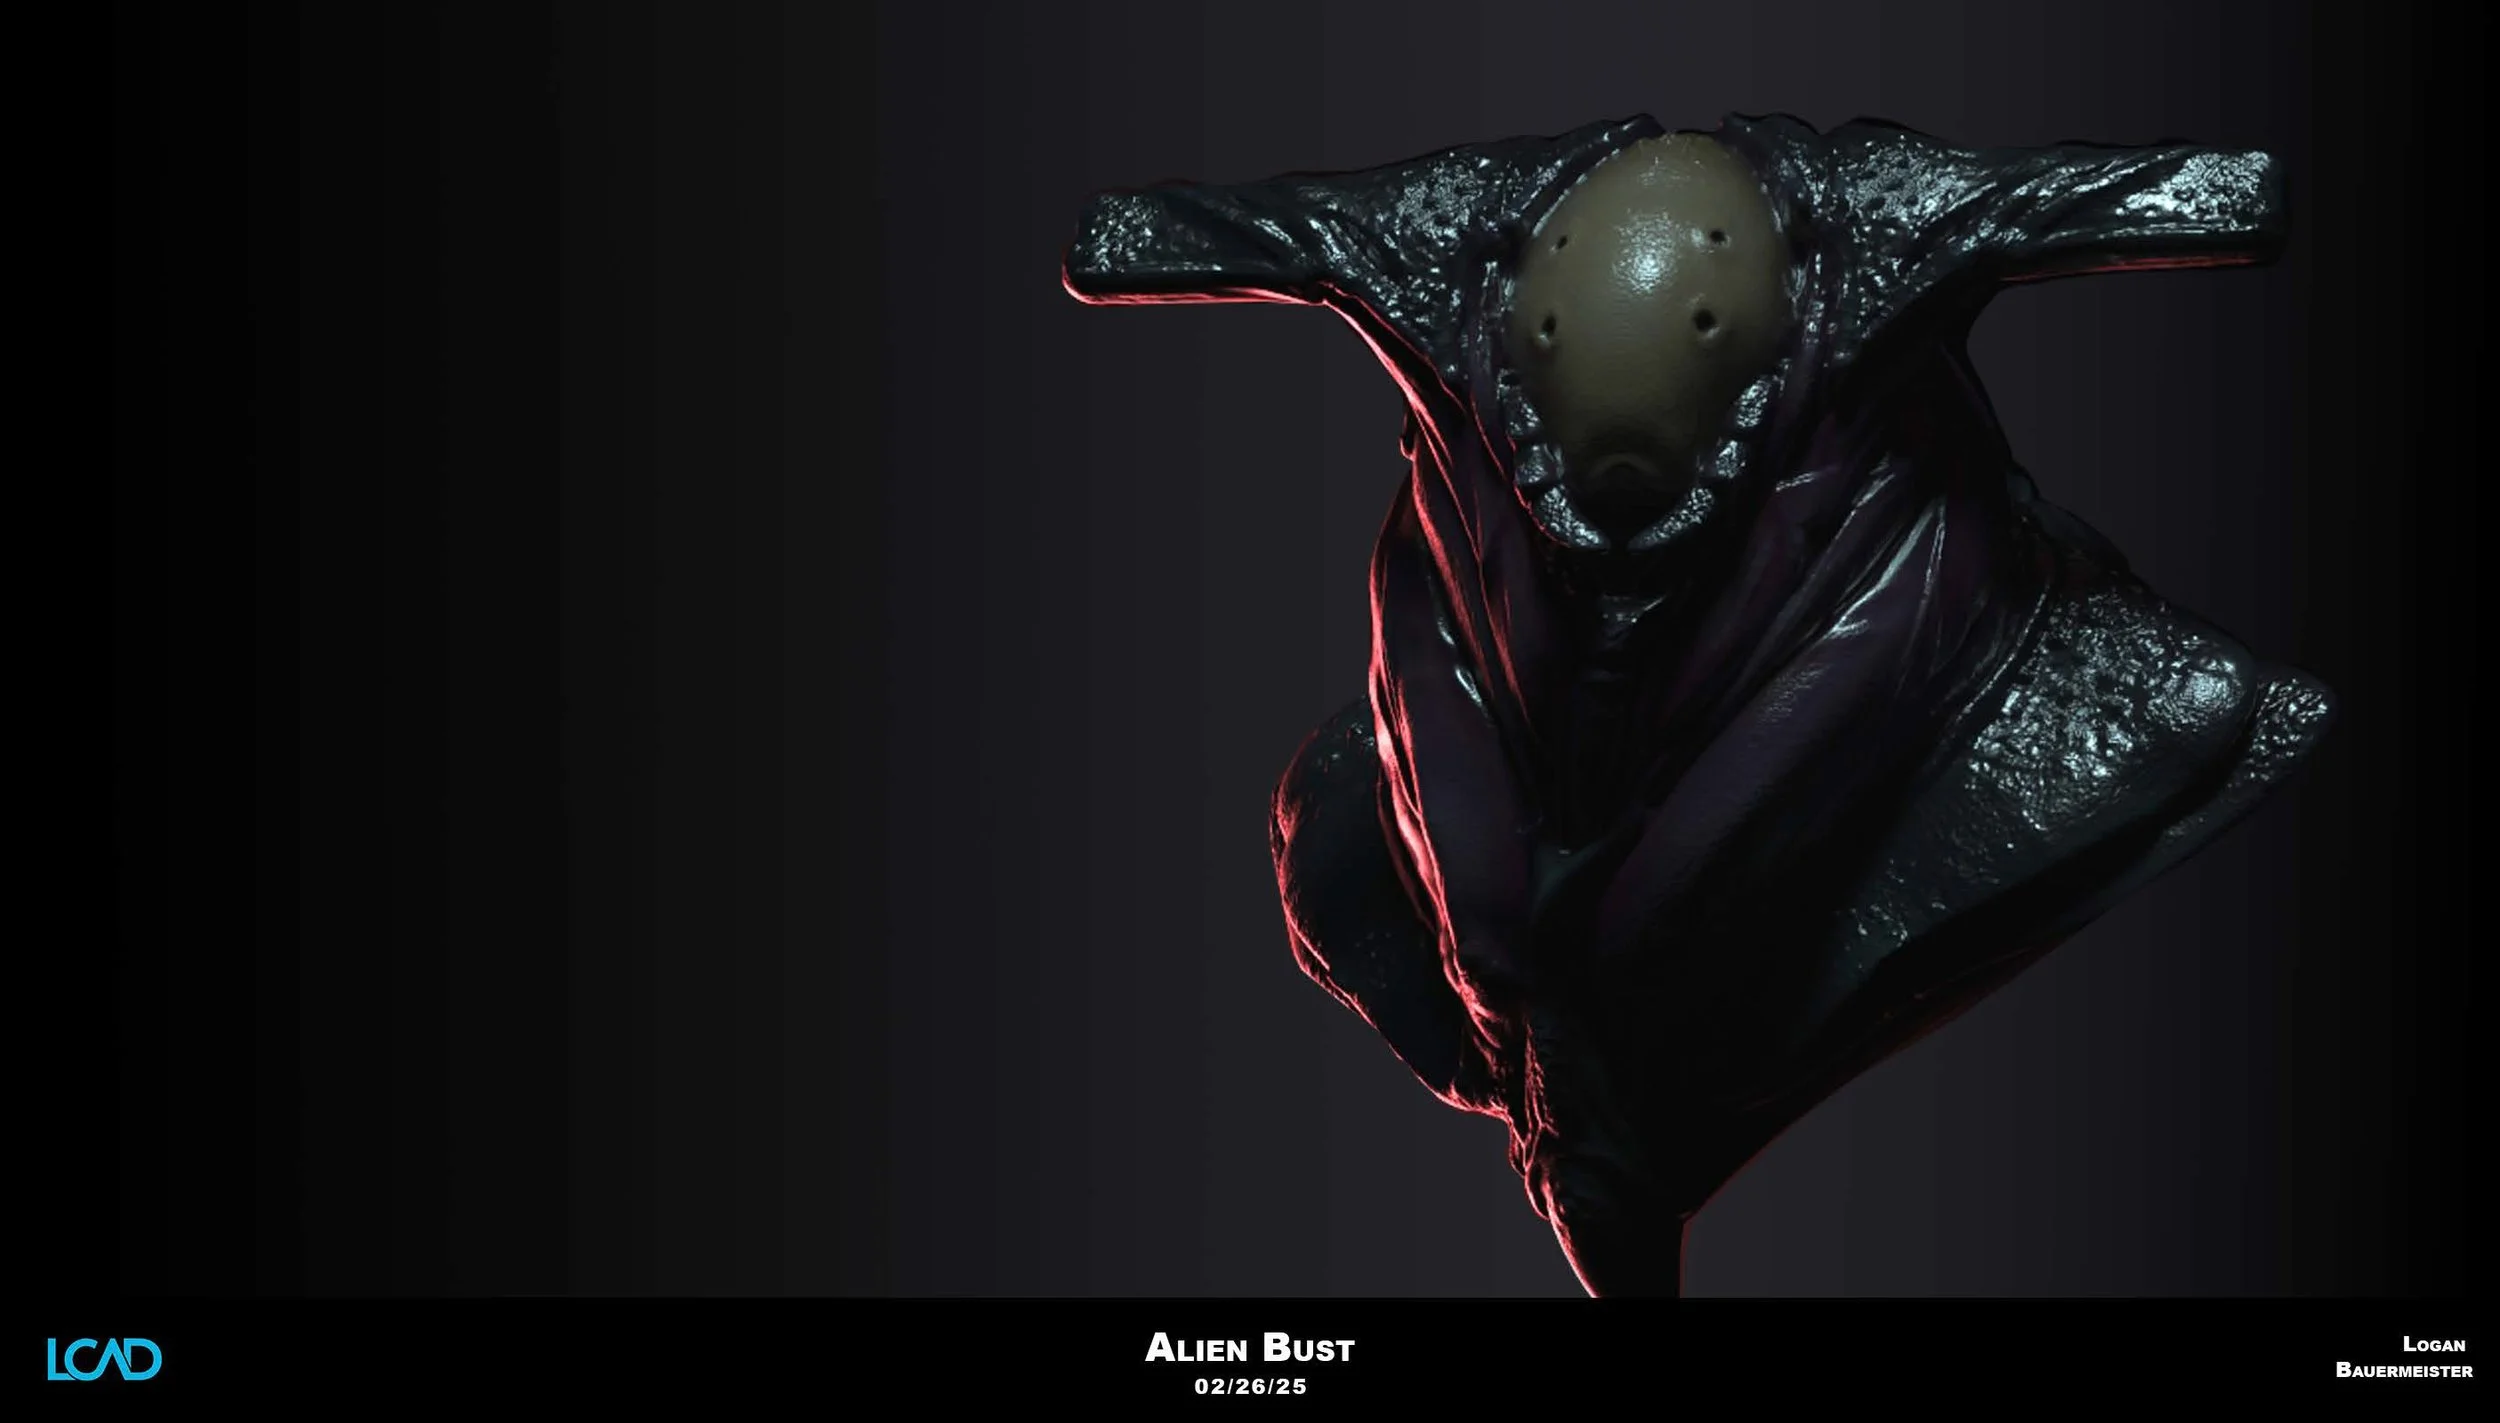
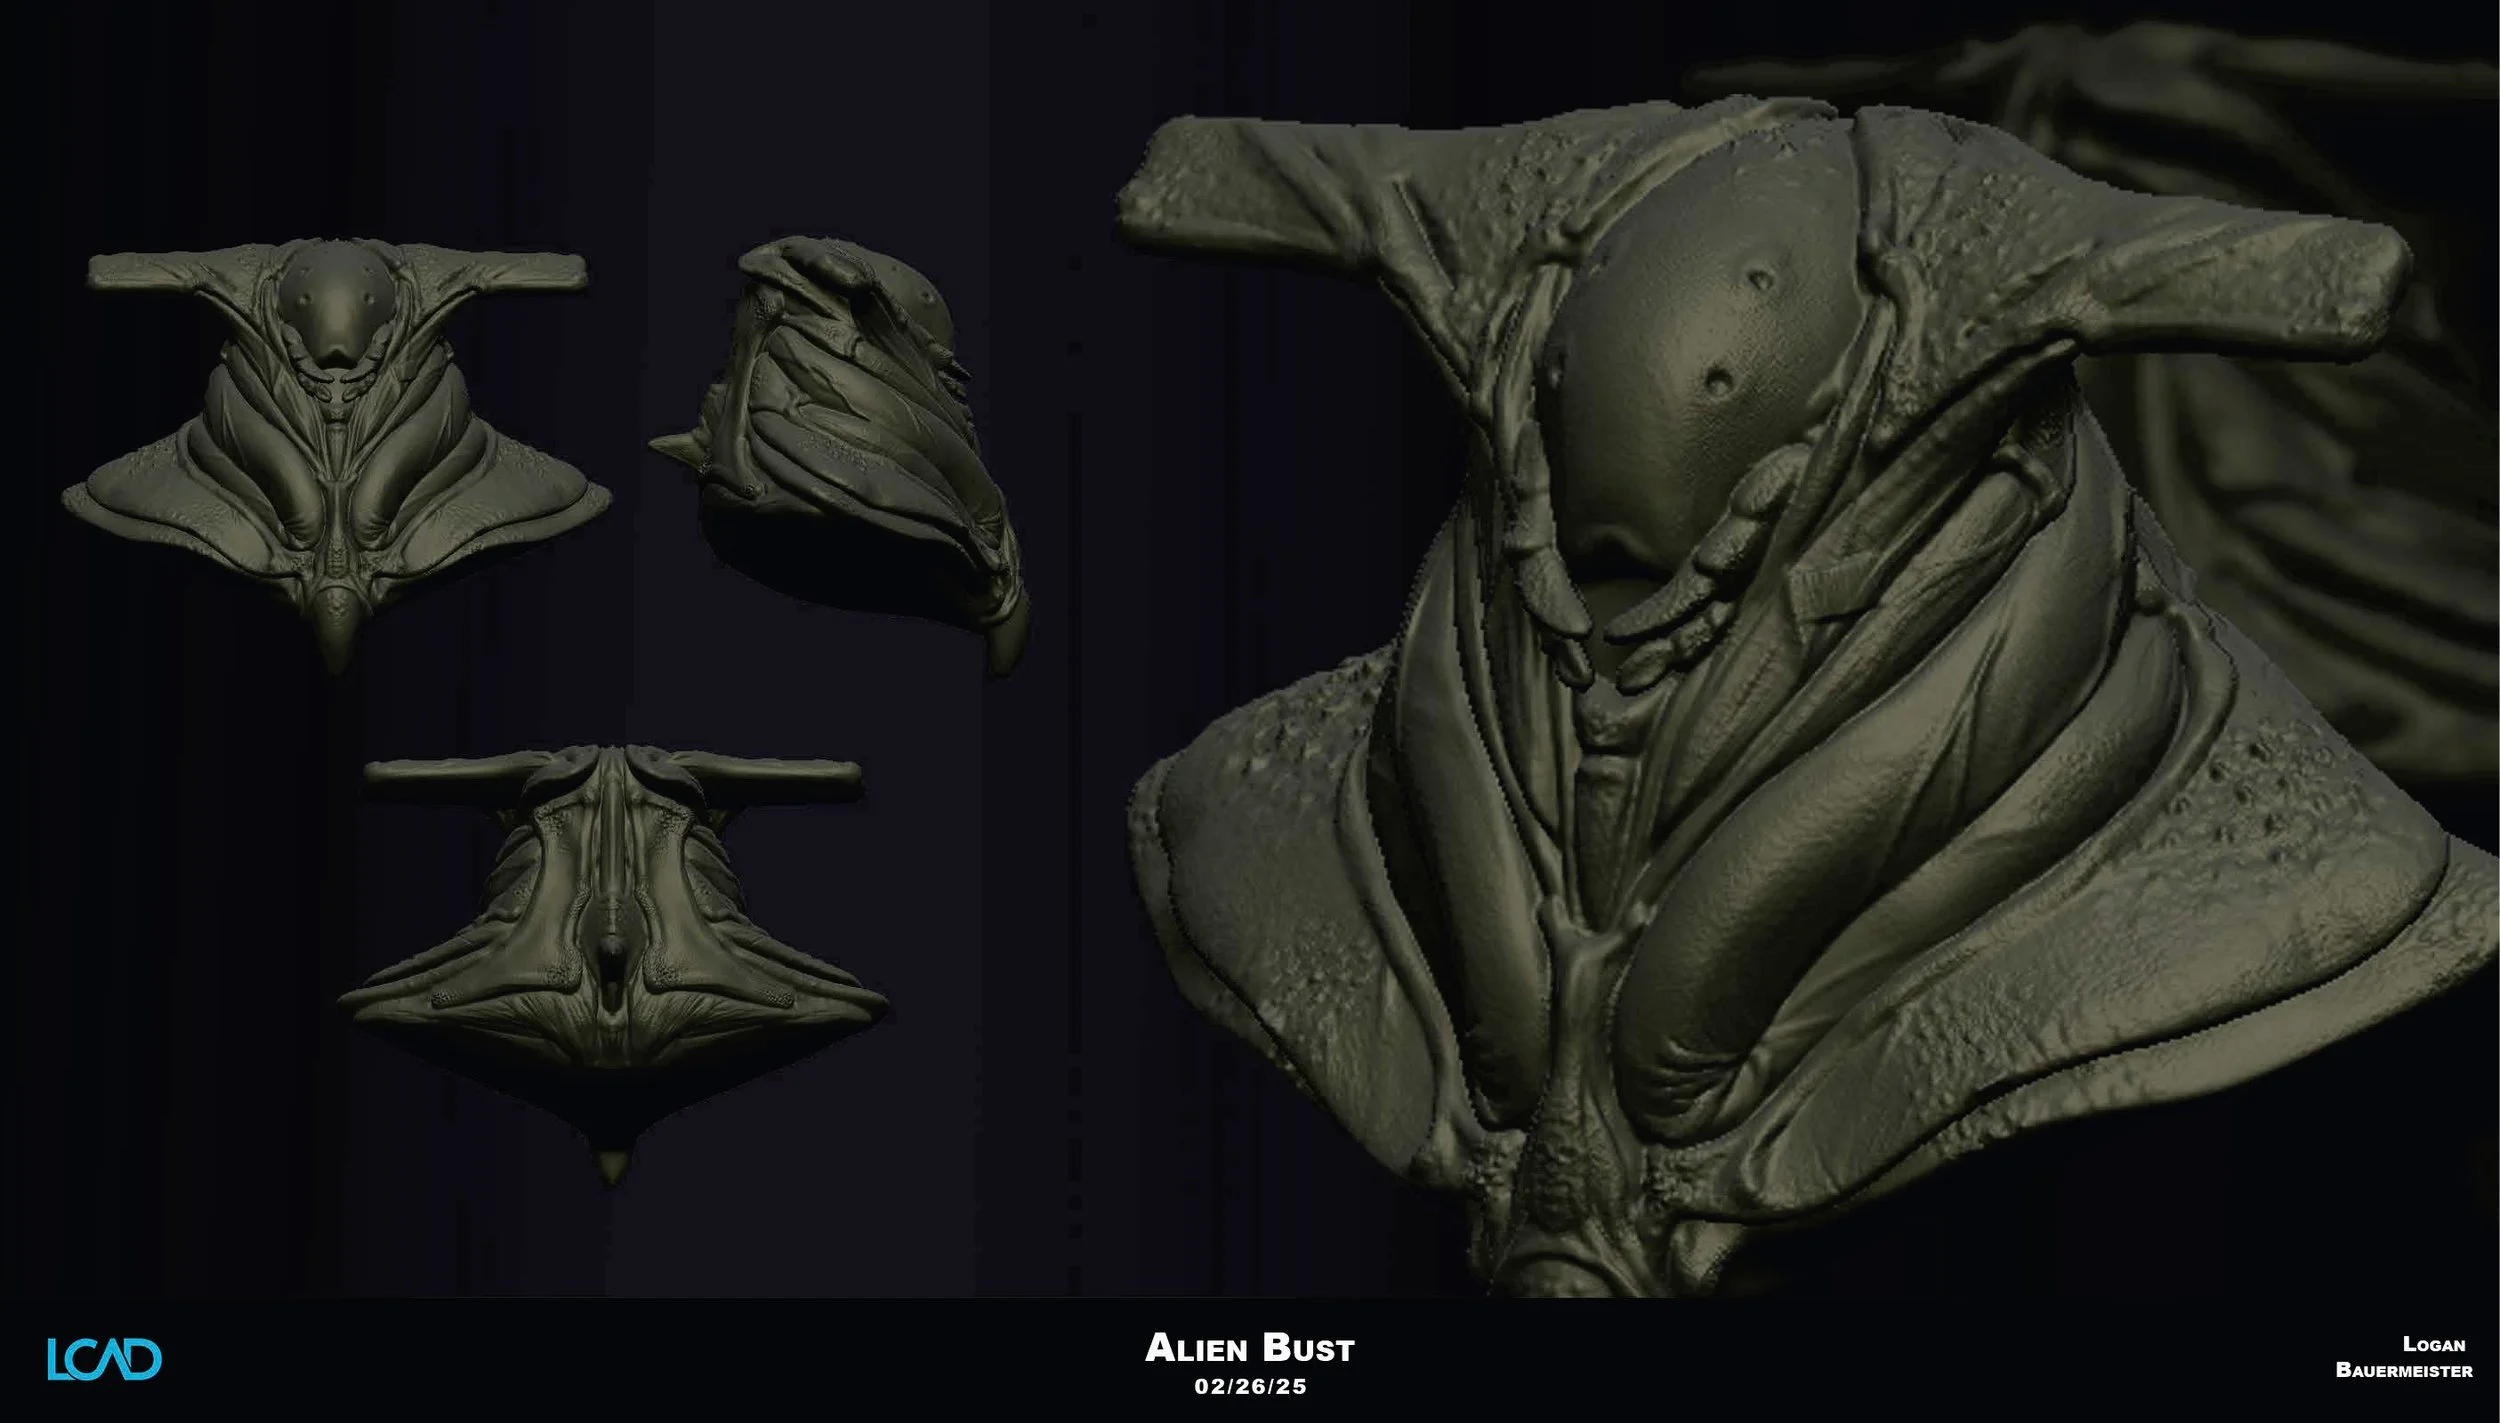
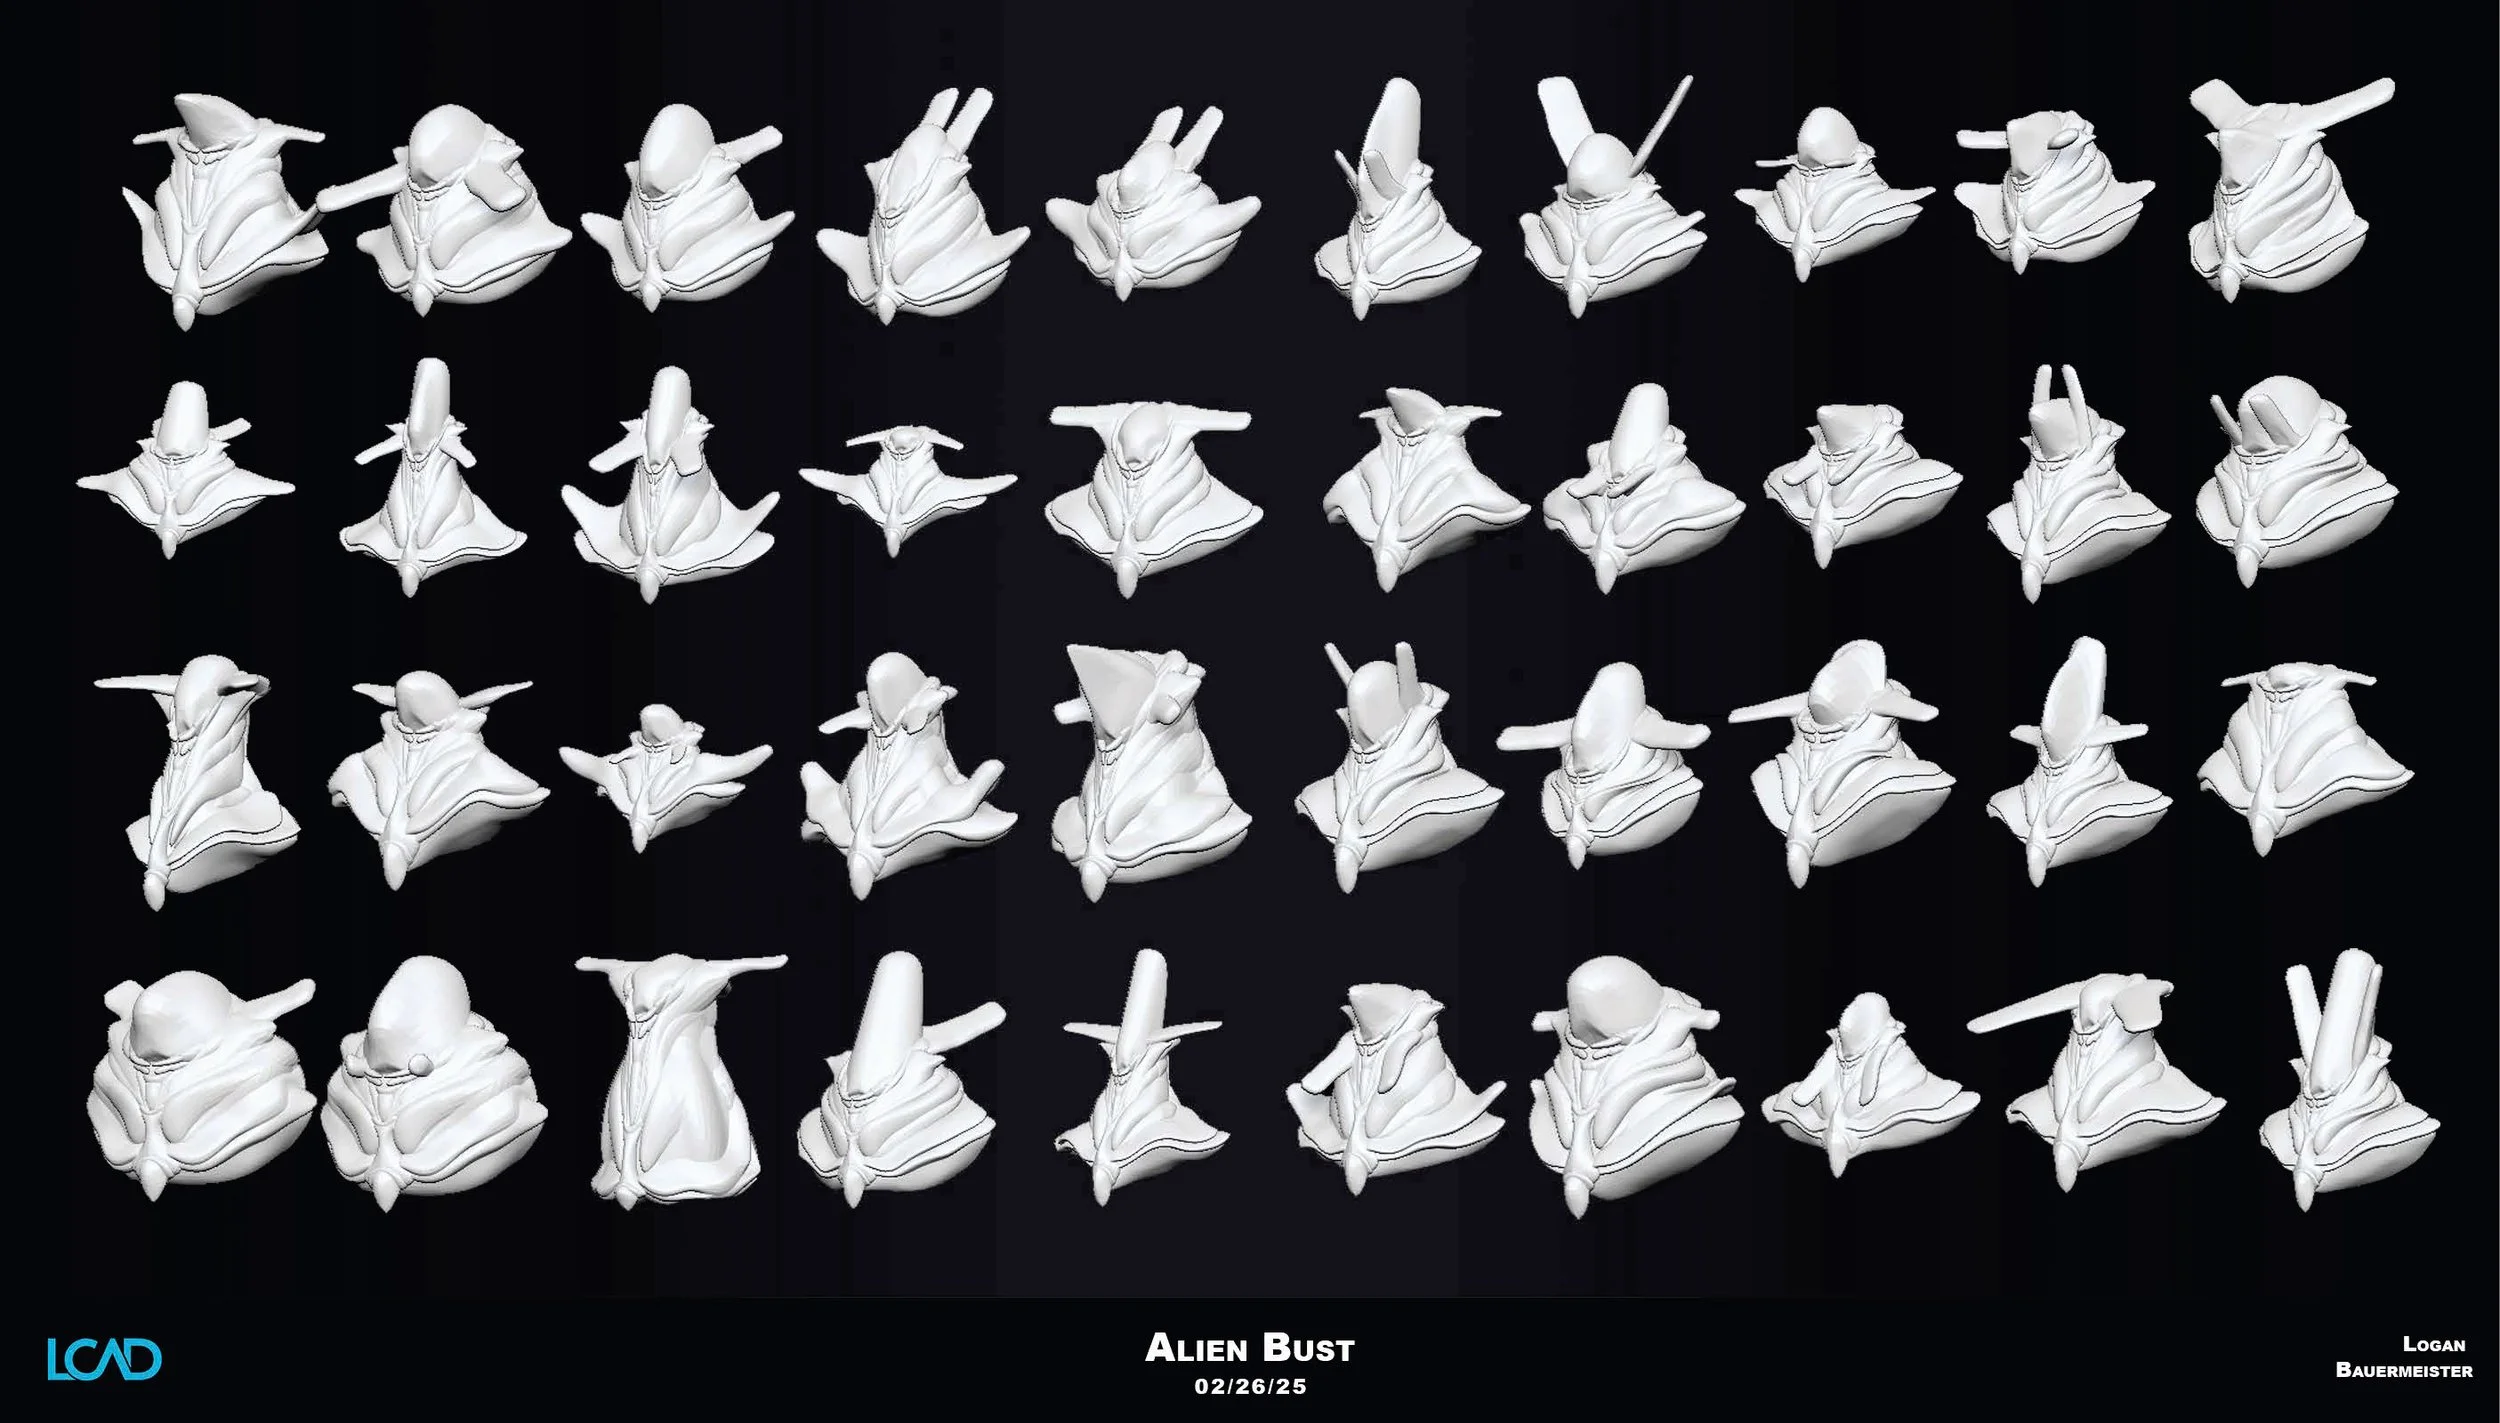
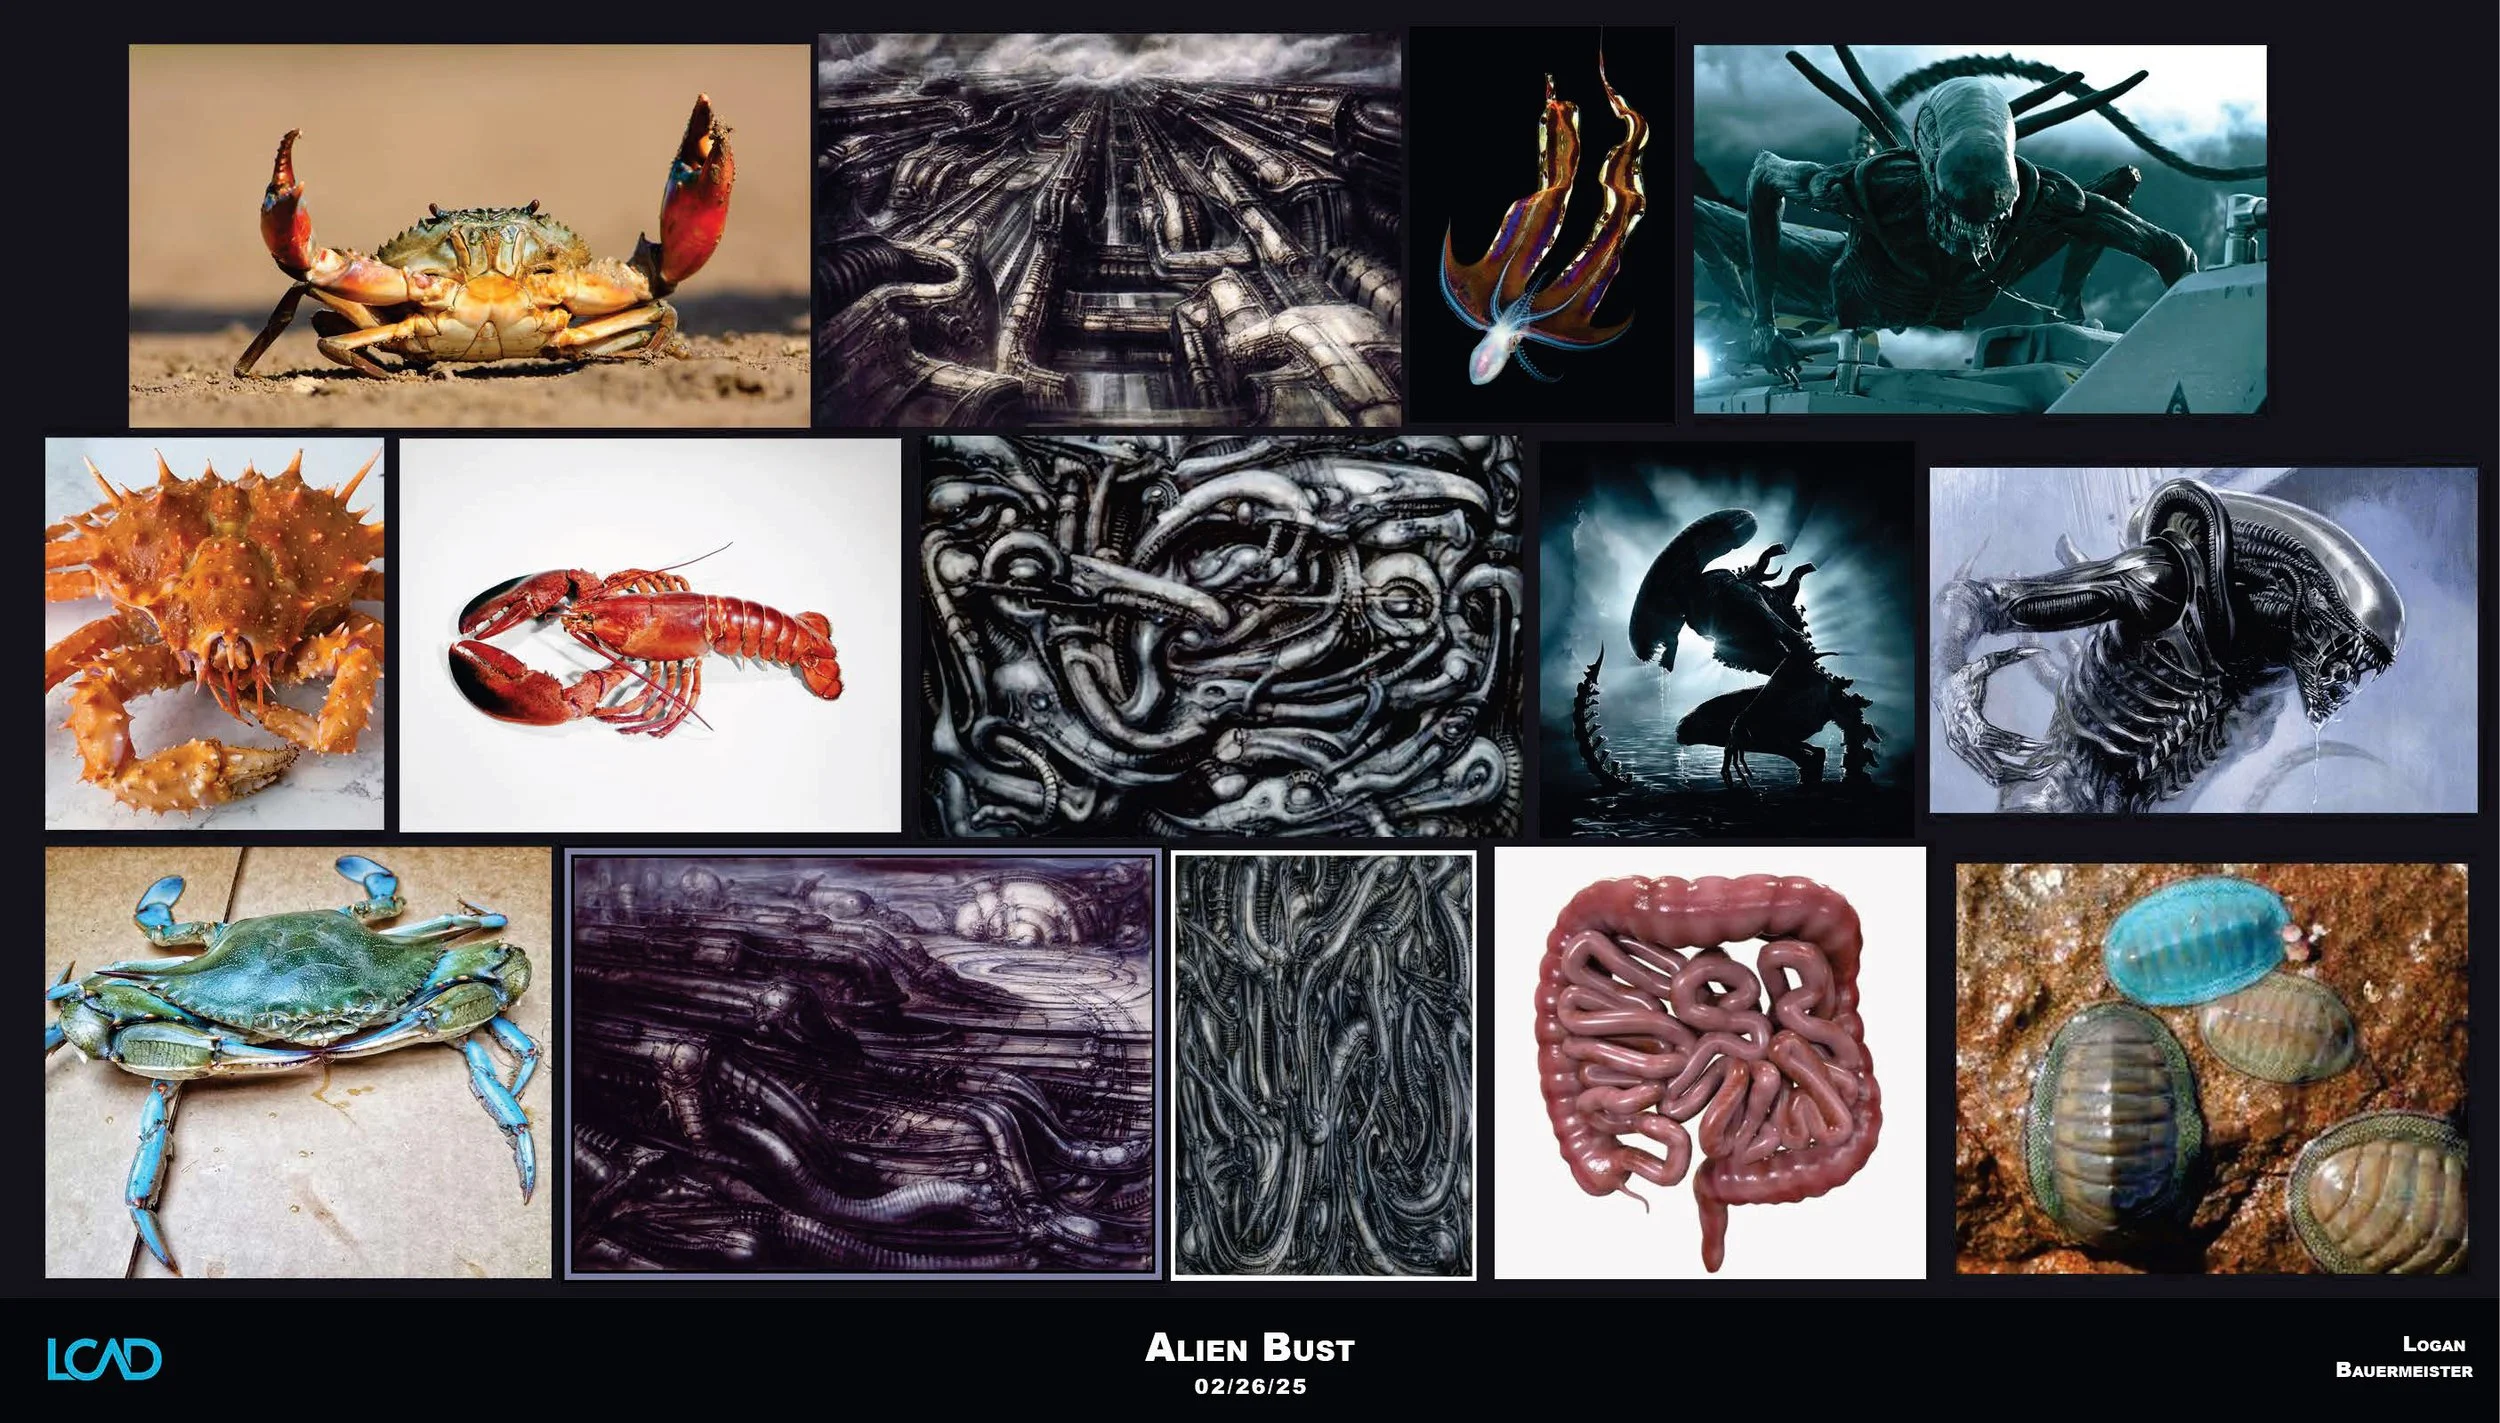
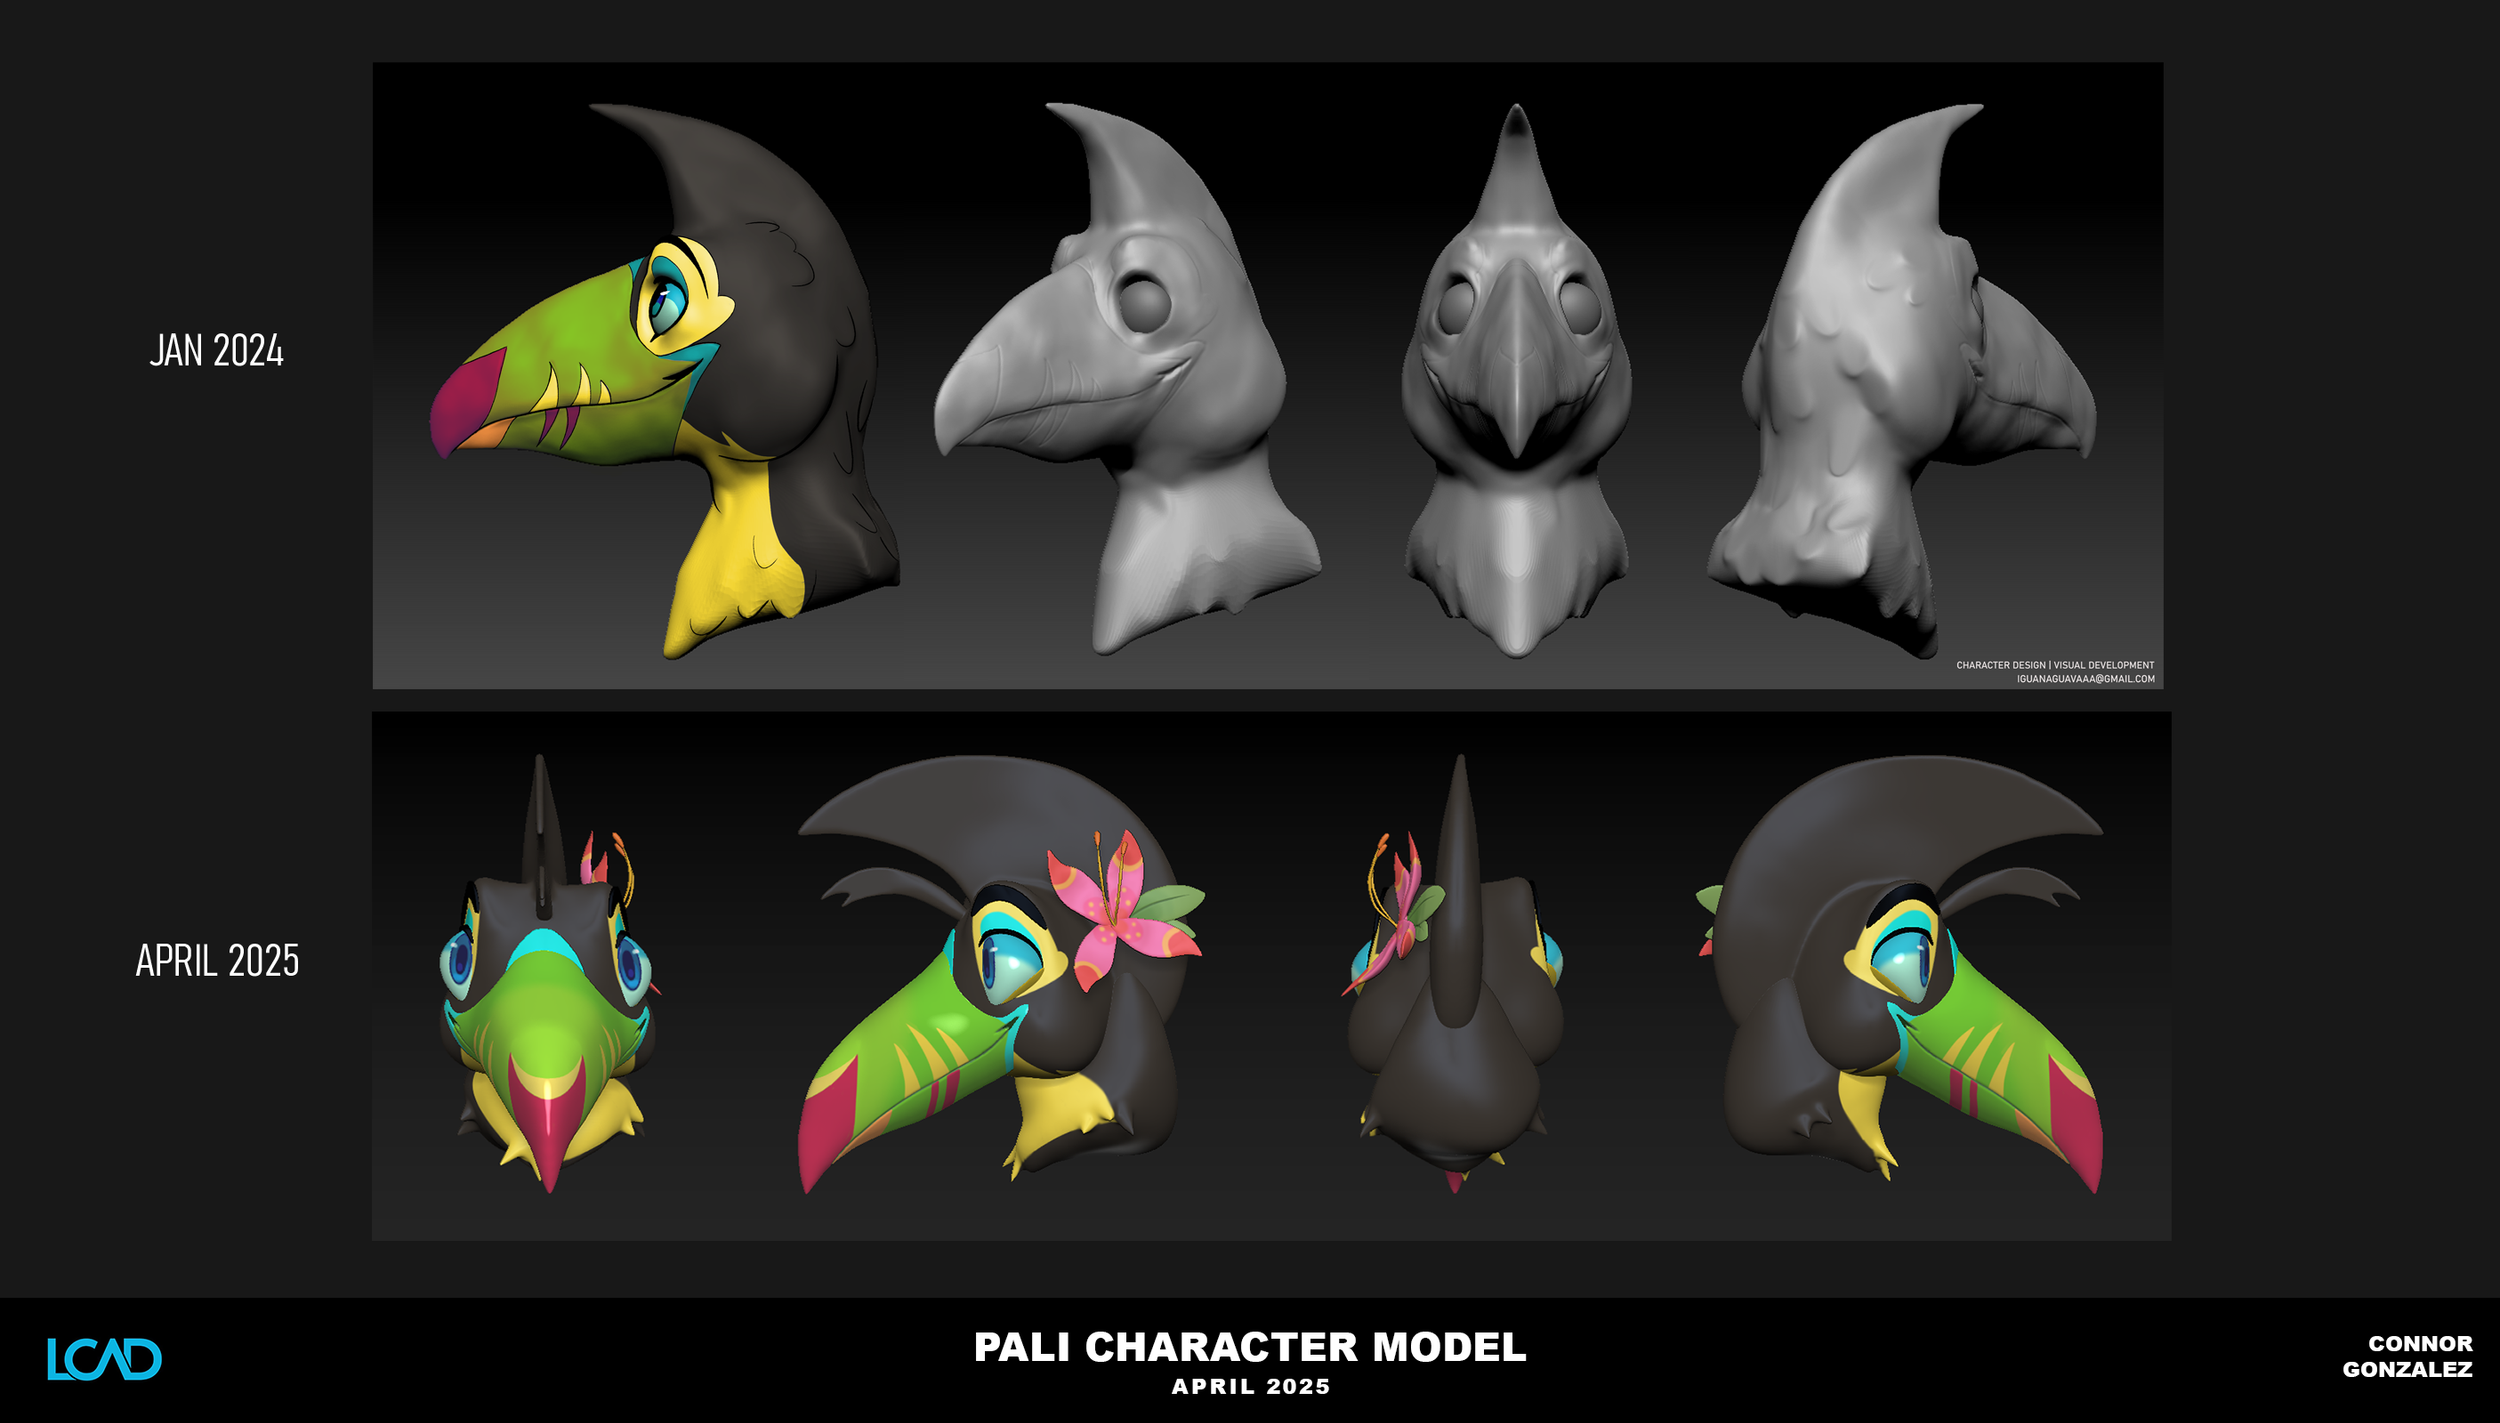
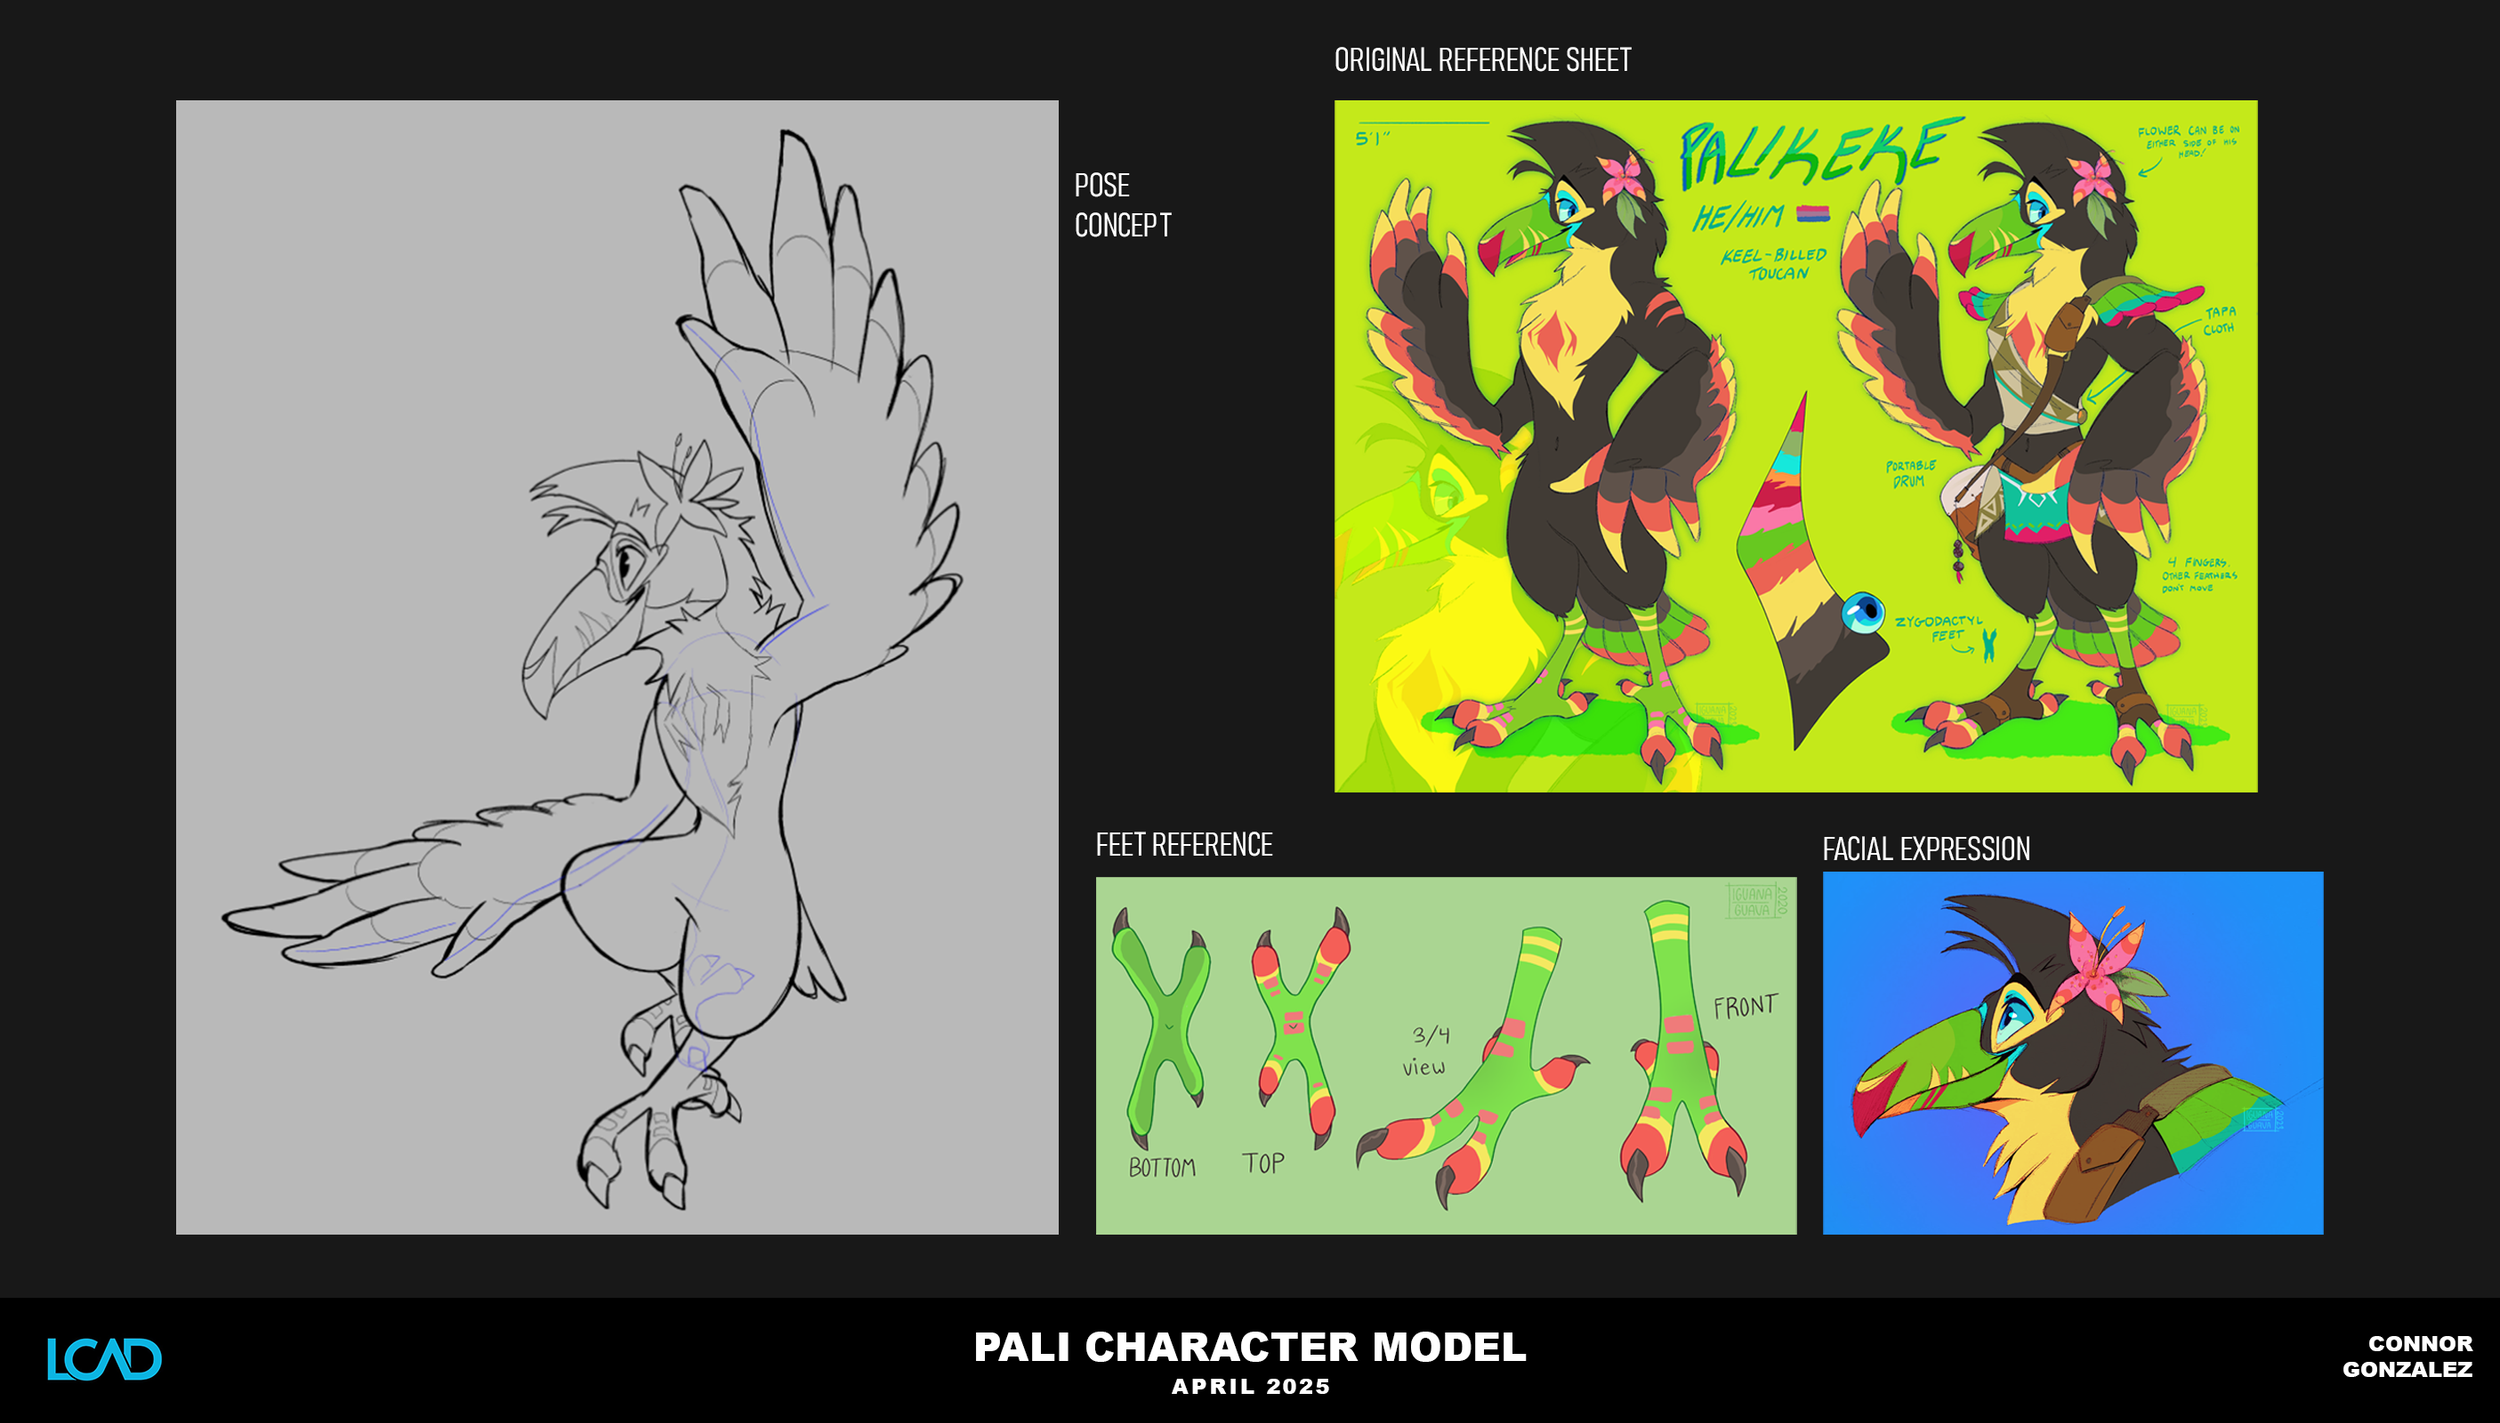
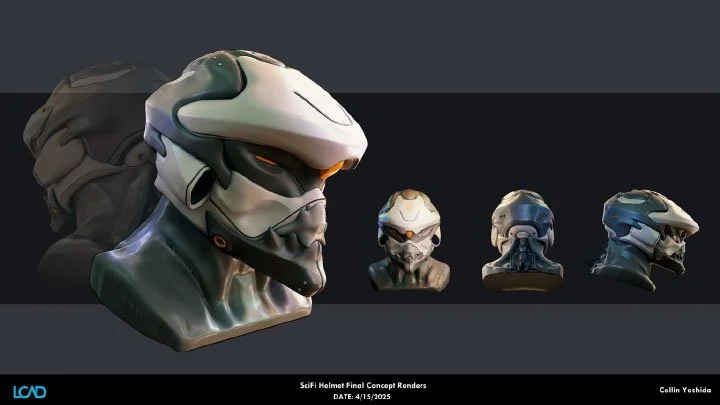
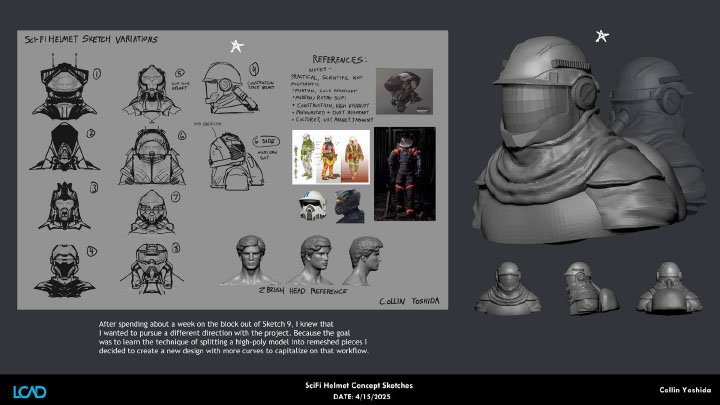
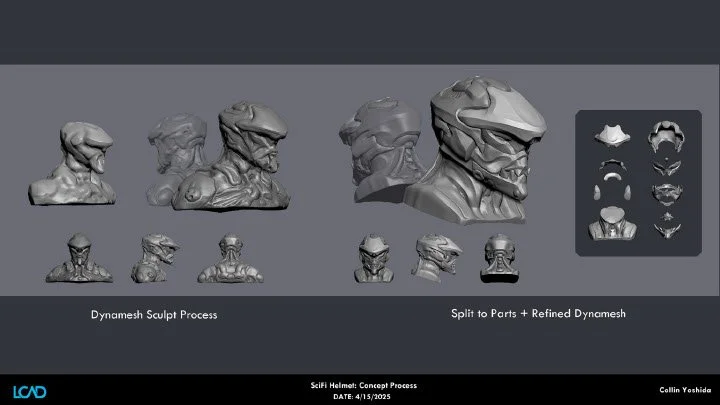
7. Project 1 Workflow (Chaos Brush)
Key Points
Concept: Additive sculpting using a "pinhead" armature and "Chaos Brush" (virtual clay).
Process: Use layers to create 50-100 design variants ("Rorschach approach") quickly.
Topology: The final mesh must be watertight (no holes/thin shells) for 3D printing.
Hierarchy: Focus on Primary shapes first, then Secondary, then Tertiary.
Explanation
Students are tasked with designing a skull/creature. The workflow encourages rapid iteration by using layers to store different "mutations." The Chaos Brush allows for aggressive volume building. Once a design is chosen, Dynamesh is used to fuse the various blobs and strokes into a single, printable solid.
8. Topology Optimization & Presentation
Key Points
Workflow: Dynamesh (Concept) -> Duplicate -> ZRemesher (Clean Topology) -> Project Detail -> Subdivision.
ZRemesher: Creates organized loops but loses high-frequency detail.
Alphas: Use low-intensity alphas (e.g., skin pores, riverbed dirt) to add realism quickly without manual sculpting.
Presentation: Automated tools in ZBrush can send views directly to Photoshop with alpha channels for easy compositing.
Explanation
To prepare a model for production or final presentation, the messy Dynamesh topology must be cleaned using ZRemesher. Details from the original sculpt are projected onto this new, clean mesh. For surface textures, the instructor advises using alphas derived from real-world photos (like dried dirt for muscle fibers) to save hours of manual work. Finally, remote desktop tools are suggested to ensure file access between home and school.
Homework
Setup: Watch the provided ZBrush menus video and ensure remote file access is working.
Downloads: Download the "Chaos Brush" and related alphas from the instructor's website (use code LCAD).
Practice:
Switch between Dynamesh and Sculptris Pro to feel the difference.
Drill the Snake Hook (BSH) and Clay Buildup (BCB) brushes.
Practice Masking, Polygroups (Ctrl+W), and Visibility shortcuts (Ctrl+Shift).
Experiment with Clip/Trim brushes (avoid Knife if crashing occurs).
Project 1: Begin the "Breast/Bust Project" using the pinhead armature. Create variants using Layers and the Chaos Brush.
Cleanup: Ensure the current model has teeth as separate subtools.
[AI Suggestions]
Core Concept Mastery: The lesson revolves heavily on Geometry Management (Dynamesh vs. Sculptris Pro vs. ZRemesher) and Selection/Visibility workflows.
Recommended Drills:
- **Destruction Drill**: Intentionally stretch a Dynamesh sphere until it breaks, then re-Dynamesh to fix it.
- **Infinite Branching**: Use Sculptris Pro with the Snake Cactus brush to grow complex structures, practicing dynamic zoom/size control.
- **Selection Ninja**: Load a demo head and practice isolating the ears, nose, and jaw using only Polygroup shortcuts and Lasso selection.
Extracurricular Resources:
- [ZBrush Docs - Dynamesh](http://docs.pixologic.com/user-guide/3d-modeling/modeling-basics/dynamesh/)
- [Pixologic ZClassroom - Sculptris Pro](https://pixologic.com/zclassroom/workshop/sculptris-pro)
- [Frank Netter - Atlas of Human Anatomy](https://www.netteranatomy.com/) (for anatomical reference)
Primitive vs Polymesh3D
Understanding the difference between Primitives and Polymesh3D objects is foundational to working efficiently in ZBrush. Most beginner frustrations come from trying to sculpt on a primitive before converting it properly.
What Is a Primitive?
Primitives are ZBrush’s built-in parametric starter shapes. Common examples include:
Sphere3D, Cube3D, Cylinder3D, Cone3D, Torus3D
Primitives are parametric, meaning you can adjust their properties before converting them into real geometry. You can adjust:
Resolution / segment density, Proportions and size, Shape parameters
Primitives are ideal for:
Blocking out simple forms, Establishing proportions, Rapid experimentation
Limitations of primitives:
You cannot sculpt freely on them,
Most sculpting brushes are disabled
You cannot subdivide or remesh
They are not true editable geometry yet
What Is a Polymesh3D?
A Polymesh3D is a fully editable polygon mesh. Once an object is converted to Polymesh3D, it becomes true geometry that ZBrush can sculpt, subdivide, and process normally. Polymesh3D allows you to: Sculpt with all brushes, Subdivide for higher detail, Use Dynamesh, ZRemesher, Booleans, Apply Deformations and modifiers, Export to other software
Once converted, parametric controls from the original primitive are no longer available.
How to Convert a Primitive into a Polymesh3D
Select a primitive (for example, Sphere3D).
Adjust its parameters as needed.
Go to Tool → Make Polymesh3D.
The object is now fully sculptable.
Key Differences
Typical Workflow
Start with a primitive.
Adjust size and resolution.
Convert to Polymesh3D.
Begin sculpting and refining.
Polymesh3D
Fully sculptable
No parametric sliders
Supports subdivision and remeshing
Used for refinement and production
Primitive
Not fully sculptable
Parametric controls available
No subdivision levels
Used for initial block-in
Important Tip
Always convert your primitive to Polymesh3D before attempting serious sculpting. If brushes are not behaving correctly, this is usually the cause.
Dynamesh
Dynamesh vs Sculptris Pro in ZBrush
Both Dynamesh and Sculptris Pro allow you to freely sculpt without worrying about traditional topology, but they solve the problem in very different ways. Understanding when to use each will dramatically improve sculpting speed, surface quality, and file stability.
Dynamesh is truly analogous of sculpting with traditional real-world clay. As you add volume to clay by stretching out details or laying on strips of new clay the actual consistency of the material remains exactly the same. So no matter how much volume you add, you still have the same capacity for sculpting. DynaMesh accomplishes the same thing, maintaining the uniform resolution and polygon distribution of your mesh. This is very unlike traditional sculpting methods which result in stretched polys if you push the surface too far – something that hampers your ability to do anything more with the surface in those areas. DynaMesh will truly free your sense of creativity.
When the Sculptris Pro button is enabled all brushes that are compatible with Sculptris Pro mode will add triangle tesselation with each brush stroke. This mode will also deciamte where needed as the brush is applied to the surface.
What Is Dynamesh?
Dynamesh constantly rebuilds your mesh into evenly distributed polygons when you remesh.
Dynamesh allows you to:
Stretch, pull, and reshape forms without topology distortion
Fuse multiple meshes together
Cut holes and perform aggressive shape changes
Maintain uniform polygon density across the model
How Dynamesh works:
You sculpt freely.
When topology stretches or breaks, you trigger a remesh.
ZBrush redistributes polygons evenly across the entire surface.
Dynamesh is ideal for:
Blocking primary forms
Large structural changes
Boolean-style sculpting and kitbashing
Merging parts together
Concept sculpting and ideation
Limitations of Dynamesh:
Destroys fine detail on remesh
Resolution is global, not localized
Can become heavy if pushed too high
Not suitable for final surface detail
Sculptris Pro
Sculptris Pro dynamically adds and removes polygons locally while you sculpt.
Instead of rebuilding the entire mesh, it:
Adds resolution only where your brush touches
Reduces polygons in unused areas
Preserves detail automatically
Allows continuous sculpting without manual remeshing
Sculptris Pro is ideal for:
Organic sculpting
Refining secondary and tertiary forms
Adding localized detail
Surface exploration
Sketch-style sculpting workflows
Limitations of Sculptris Pro:
Can create uneven topology
Not ideal for hard-surface modeling
Harder to control polygon flow
May require cleanup before production
When to Use Each
Use Dynamesh when:
You are blocking out large shapes
You are merging forms together
You are cutting holes or reshaping silhouettes
You want consistent topology density
Use Sculptris Pro when:
You are refining organic forms
You need localized detail
You are exploring surface variations
You want uninterrupted sculpting flow
Key Differences
Dynamesh:
Global remeshing
Uniform polygon distribution
Excellent for major form changes
Requires manual remesh
Sacrifices fine detail
Sculptris Pro:
Local adaptive tessellation
Adds detail only where needed
Continuous sculpting workflow
Preserves surface detail
Produces uneven topology
Typical Workflow
Start with Dynamesh for block-in and major shape changes.
Establish clean primary forms.
Switch to Sculptris Pro for refinement and detail.
ZRemesh or subdivide for production topology when needed.
Important Tip
Dynamesh and Sculptris Pro are not competitors, they are complementary tools. Smart artists move between them based on sculpting stage and intent.
Subtools
Understanding SubTools in ZBrush
A SubTool is an individual mesh or object inside a single ZBrush Tool. SubTools allow you to break complex models into manageable, organized parts while keeping everything inside one scene.
Think of SubTools like layers or parts in a mechanical assembly, each piece remains independent but works together as a complete model.
What Is a SubTool?
A SubTool is:
A separate mesh inside one ZTool
Independently editable
Able to have its own subdivision levels, materials, visibility, and resolution
Non-destructive and modular
Examples of SubTools:
Character body
Clothing pieces
Armor plates
Eyes and teeth
Accessories and props
Environment elements
Each SubTool can be sculpted, hidden, isolated, duplicated, merged, or exported independently.
SubTool controls are found under:
Tool → SubTool
Professional ZBrush workflows rely heavily on smart SubTool organization.
The Benefits of Working with Subtools
SubTools allow you to:
Keep your project organized
Maintain performance and responsiveness
Isolate detail work without affecting other parts
Control subdivision levels per object
Enable clean Boolean workflows
Easily swap, iterate, and version parts
Common SubTool Operations
You can:
Add new SubTools
Duplicate SubTools
Split meshes into separate SubTools
Merge SubTools together
Hide and isolate SubTools
Rename and organize SubTools
Reorder SubTools in the stack
Visibility and Isolation
SubTools can be:
Shown or hidden individually
Soloed for focused sculpting
Temporarily masked or hidden
Isolated for performance optimization
This allows you to work cleanly without visual clutter or accidental edits.
SubTools and Performance
Large scenes can become slow if everything is combined into one mesh.
SubTools help by:
Keeping polygon counts separated
Allowing selective subdivision
Letting you hide heavy geometry
Improving viewport performance
Smart SubTool management directly impacts sculpting speed and stability.
Best Practices
Keep each logical object as its own SubTool
Name your SubTools clearly
Avoid merging everything too early
Use folders to organize complex scenes
Duplicate before destructive changes
Keep subdivision levels where possible
Typical Workflow
Start with a main base SubTool.
Add additional parts as separate SubTools.
Refine each part independently.
Merge or Boolean only when necessary.
Organize before exporting or rendering.
Important Tip
If your model feels slow, cluttered, or difficult to manage, your SubTool organization probably needs improvement.
Sculpting Brushes
List of brushes from ZBrush 2026.1
Sculpting Brushes in ZBrush
ZBrush sculpting brushes are specialized tools designed to push, pull, build, carve, smooth, and refine digital clay. Understanding what each brush family is best suited for allows artists to sculpt faster, cleaner, and more intentionally.
Brush choice directly affects surface quality, anatomy accuracy, and production efficiency.
There are many different brushes you can sculpt with in ZBrush. Each brush has a unique property that allows it to do something the other brushes cannot. Also, brushes in ZBrush can be modified using several important controls such as Gravity, Wrap Mode or Density. You can create your own versions of any brush by adjusting the settings, saving the brush so that you can use it later.
These are the main categories of brushes:
Curve brushes which make use of the Stroke Curve mode
Planar, Trim and Polish brushes – ideal for hard surface sculpting
Groom brushes – designed specially for use with FiberMesh
Pen brushes – used for QuickSketch
InsertMesh brushes – quick access to any mesh you can imagine
Curve Bridge brush – create polygon bridges to weld edges
ZSketch brushes – special brushes only used for ZSketch
Alpha 3D brushes – full 3D alpha brushes with under-cuts
Core Brush Families
ZBrush brushes can be grouped into functional families based on what they do to the surface. These families are separated into what their “Base Type” algorithm is designed for. This is the core of what drives their behavior. defines how a brush interacts with geometry, topology, depth, masking, projection, or visibility. Understanding these behaviors helps artists select the correct tool for shaping, detailing, deformation, and technical workflows. These base types are:
Anchor
Anchors geometry around a pivot point and rotates or transforms surrounding topology relative to that anchor. Commonly used for mechanical pivots, hinges, and articulated deformation.
Polish
Smooths and relaxes surfaces while preserving overall volume and surface continuity. Used to clean noise and unify planar transitions without excessive shrinkage.
Sphere
Generates spherical inflation behavior that pushes geometry outward uniformly from the stroke center. Useful for building rounded forms and organic bulges.
Single Layer
Adds thickness in a single direction without affecting the opposite surface. Commonly used for clothing thickness, shell generation, and controlled surface offsets.
Clay
Builds material using layered additive strokes that mimic traditional clay buildup. Designed for constructing primary and secondary forms.
Trim
Flattens and cuts surfaces to create planar transitions and sharp edges. Ideal for defining hard surface planes and cleaning organic form structure.
Displace
Offsets geometry based on alpha intensity and stroke depth, pushing or pulling surface detail. Used for height-based surface sculpting and texture application.
Nudge
Moves vertices laterally across the surface without significantly changing depth. Useful for sliding topology, adjusting flow, and subtle surface corrections.
SnakeHook
Pulls and stretches geometry outward dynamically, allowing extrusion-like sculpting. Commonly used for appendages, tendrils, horns, and organic extensions.
Inflate
Expands or contracts surface volume evenly along normals. Useful for thickening thin areas and reinforcing volume.
Move
Repositions large volumes of geometry for proportion and silhouette control. Primary tool for blocking and gesture adjustments.
Magnify
Scales geometry locally outward or inward from the stroke center. Functions like a localized zoom or lens distortion effect on mesh volume.
Contrast Delta
Sharpens surface contrast by increasing height differences between neighboring surface regions. Enhances existing detail without introducing new forms.
Contrast Target
Pushes surface detail toward a defined target contrast level. Used to normalize or amplify surface definition across an area.
Insert Mesh Dot
Inserts predefined mesh objects at stroke locations as independent geometry. Used for kitbashing, repetitive components, and rapid asset placement.
Elastic
Applies spring-like deformation that stretches and relaxes geometry dynamically. Useful for organic pull behavior with soft resistance.
History
Reverts geometry toward a previously stored mesh state. Enables partial undo and controlled restoration workflows.
Project
Projects visible surface detail from one mesh onto another. Used for transferring sculpted detail, scan data, or retopology alignment.
Mask
Applies masking values instead of geometric deformation. Used to protect areas from edits and isolate sculpting regions.
Morph
Stores and restores morph targets for localized recovery and comparison. Allows controlled blending between sculpt states.
Pinch
Pulls geometry together toward the stroke center, tightening edges and sharpening creases.
Quick Polygroup
Creates polygroups interactively based on brush strokes. Used for rapid segmentation and organizational workflows.
Geometry
Applies topology-level operations such as edge manipulation and structural edits directly through brush interaction.
Retopo
Supports retopology workflows by snapping, aligning, or generating topology over target surfaces.
HideShow
Controls mesh visibility by hiding or revealing geometry through brush strokes.
Blur
Softens surface detail and transitions by averaging neighboring surface information.
Blur Alternate
Applies an alternate blur algorithm that preserves broader form while reducing high-frequency noise.
Project Submissions
All submissions for this class must be made in the form of a slide in order to receive credit. You may access the Template File here. Only slide made with the template will be acceptable.
Acceptable slides must also be clean and organized
All appropriate information must be filled out
Any use of AI is welcome but must be sited
Presentation of Slides must be in sequencial order
All slide must be .PNGs. PDFs, PSDs, TIFFs, and Powerpoint will not be accepted.